
Build a Web-Aware TypeScript Agent With Mastra and Zenrows
A custom Zenrows Fetch tool gives a Mastra agent reliable access to dynamic and protected pages, returning Markdown to reason over or structured JSON when you need fields. Includes the typed tool, the agent, and a workflow for bulk URLs.



Mastra is straightforward to work with, but its built-in webFetchTool makes basic plain HTTP requests, does not run JavaScript, and returns raw HTML. This works for simple pages, but it breaks down on browser-rendered or protected sites, such as a product listing protected by Cloudflare. This is a problem because the agent will report a false or missing price when reasoning on a challenge page.
One way to resolve this is to wrap an AI web data infrastructure tool, such as Zenrows, as a custom tool for the agent. Zenrows Fetch with mode=auto handles protected access in a single API call, and returns clean Markdown for the agent. This tutorial will show you how to build a Mastra agent with a custom Zenrows Fetch tool. By the end, the agent will have reliable access to web targets, protected or not, without manually managing proxies or stealth patches.
Why TypeScript AI Agents Need a Smarter Web Fetch Tool
As mentioned earlier, Mastra's built-in webFetchTool has limitations that show up when the agent encounters a page that renders in a browser or is behind bot protection. The failures don't often surface as errors because Cloudflare returns a challenge page with a normal HTTP status code. Oftentimes, the agent interprets it as the result and returns it as valid content. For a market research agent, that means the model reasons over challenge-page HTML instead of real product data.
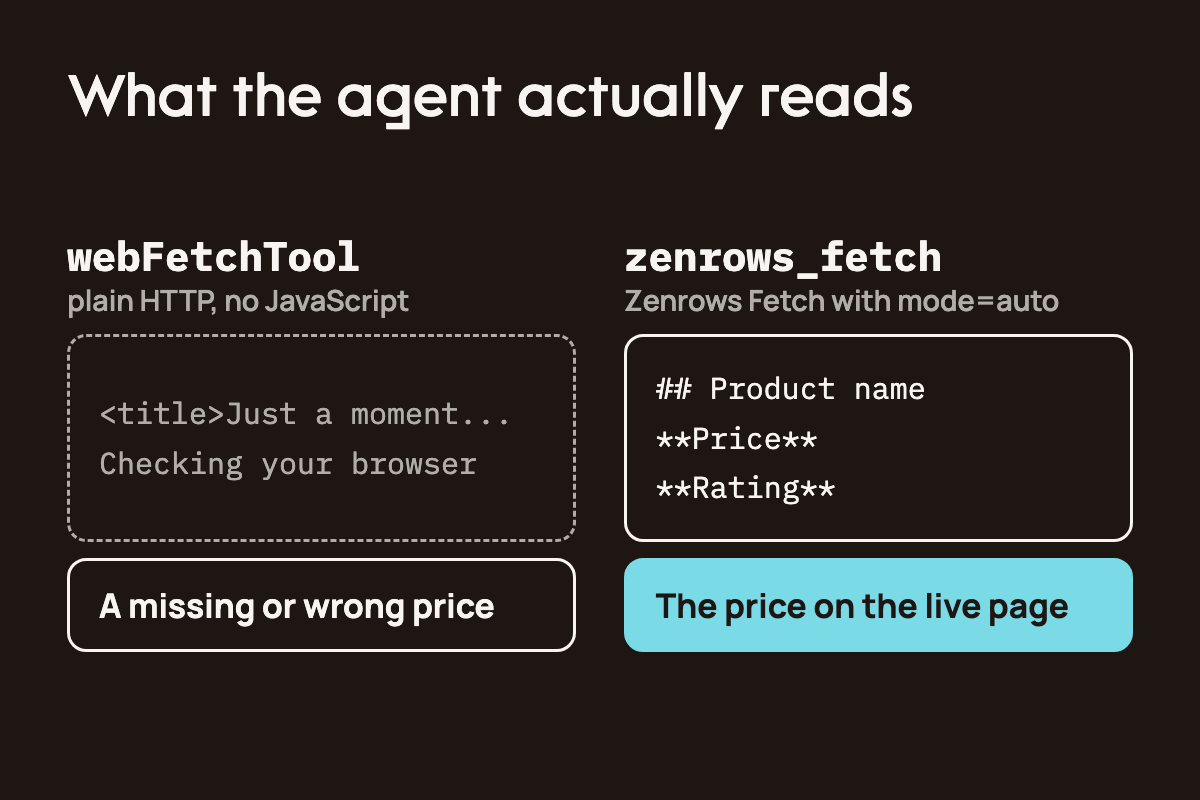
The problem lies in the transport layer, which manages how bytes reach the agent via HTTP requests, headers, and proxies, and whether JavaScript runs. Zenrows Fetch can help Mastra handle DataDome, Akamai, and Cloudflare-protected site access challenges with a single call using mode=auto. Wrapping this Fetch call in a createTool definition allows Mastra to control the tool's input and output schemas while fetching web data with mode=auto.
What You Will Build
This step-by-step guide will walk you through building a web-aware Mastra agent with a custom Zenrows fetch tool that can fetch live product data from an e-commerce site and can handle protected targets.
Prerequisites
Before you start building, make sure you have your API keys.
- Node.js 22.13 or later.
- An API key for one model provider. This tutorial uses OpenAI by default and shows the Anthropic alternative, so you only need the key for the provider you plan to use. You can get your OpenAI API key from your OpenAI developer dashboard and your Anthropic API key from your Anthropic developer dashboard.
- A Zenrows API key to retrieve the full contents of web pages. You can also get this from your Zenrows developer dashboard.
The first step is to set up a new Mastra project. Mastra's CLI scaffolds the project structure, config files, and a starter agent. Run the command below to install @mastra/core and its dependencies. Mastra's CLI generates this structure, along with a starter agents/agent.ts, index.ts, and tools/schedule-tools.ts files.
npm create mastra@latest
Follow the prompts to name the project and pick your LLM provider. The CLI installs @mastra/core and its dependencies for you. Then add zod if it isn't already there:
npm install zod
Next, create a .env file in the root of your project and add your API keys. Then load the environment variables in your application. Also add .env to your .gitignore file so your credentials aren't accidentally committed to version control. You only need the key for the provider you plan to use.
ZENROWS_API_KEY=your_zenrows_key
OPENAI_API_KEY=your_openai_key
ANTHROPIC_API_KEY=your_anthropic_key
Mastra loads .env automatically, so there's no dotenv step. However, dotenv is used when running standalone test scripts outside Mastra's loader in this tutorial, so install it with the command below.
npm install dotenv --save
With the dependencies installed and your API keys configured, you're ready to build your web-aware market agent. All code in this tutorial is available on GitHub. Your project structure should be similar to this:
src/
└── mastra/
    ├── agents/
    │   └── agent.ts
    ├── tools/
    │   └── schedule-tools.ts
    └── index.ts
Run your agent with the command below.
npm run dev
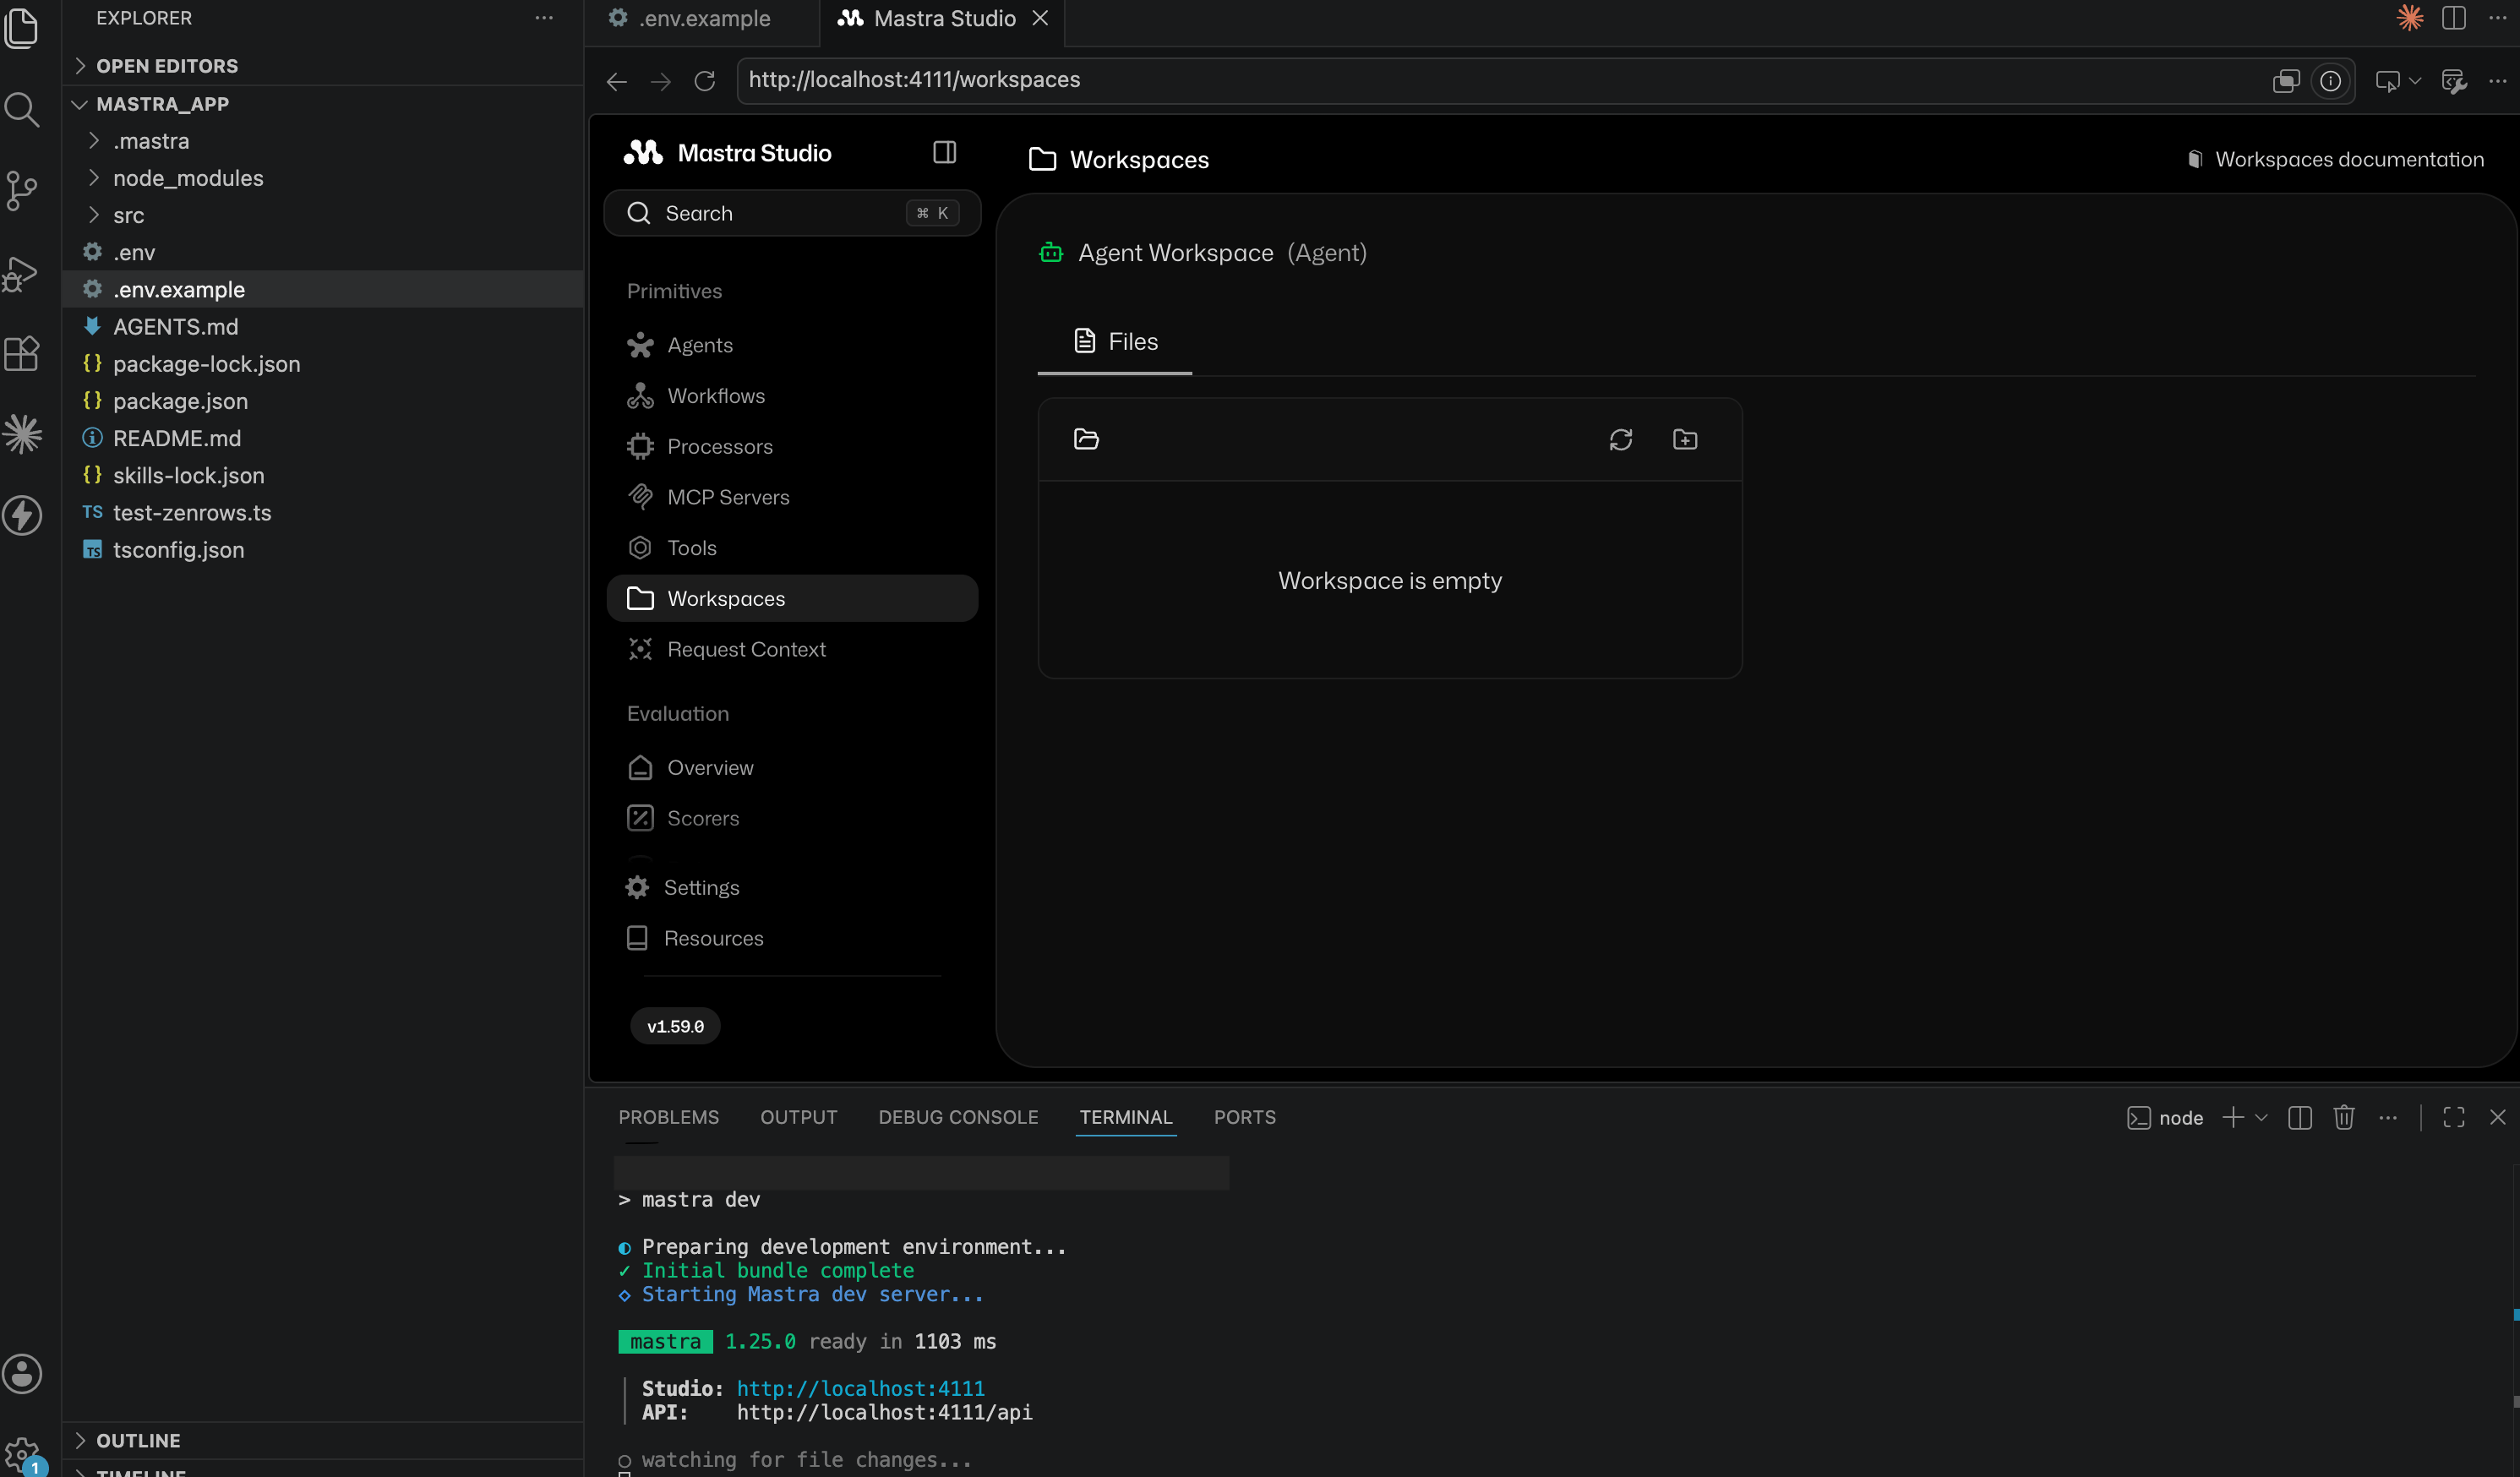
That command will start the Mastra local server running at http://localhost:4111. Open that URL in your browser or within VS Code. It will redirect you to the Mastra dashboard for testing agents. Mastra Studio reads registered agents from your Mastra instance and gives you a chat UI for interaction.
Building the Zenrows Fetch Tool Definition
The Zenrows fetch tool uses a single createTool definition. It needs an id, a description that the LLM uses to decide when to call it, an inputSchema to validate inputs, an outputSchema for the response, and an execute function that calls Zenrows Fetch via mode=auto. The mode=auto tells Zenrows to use its automated access flow for the target URL.
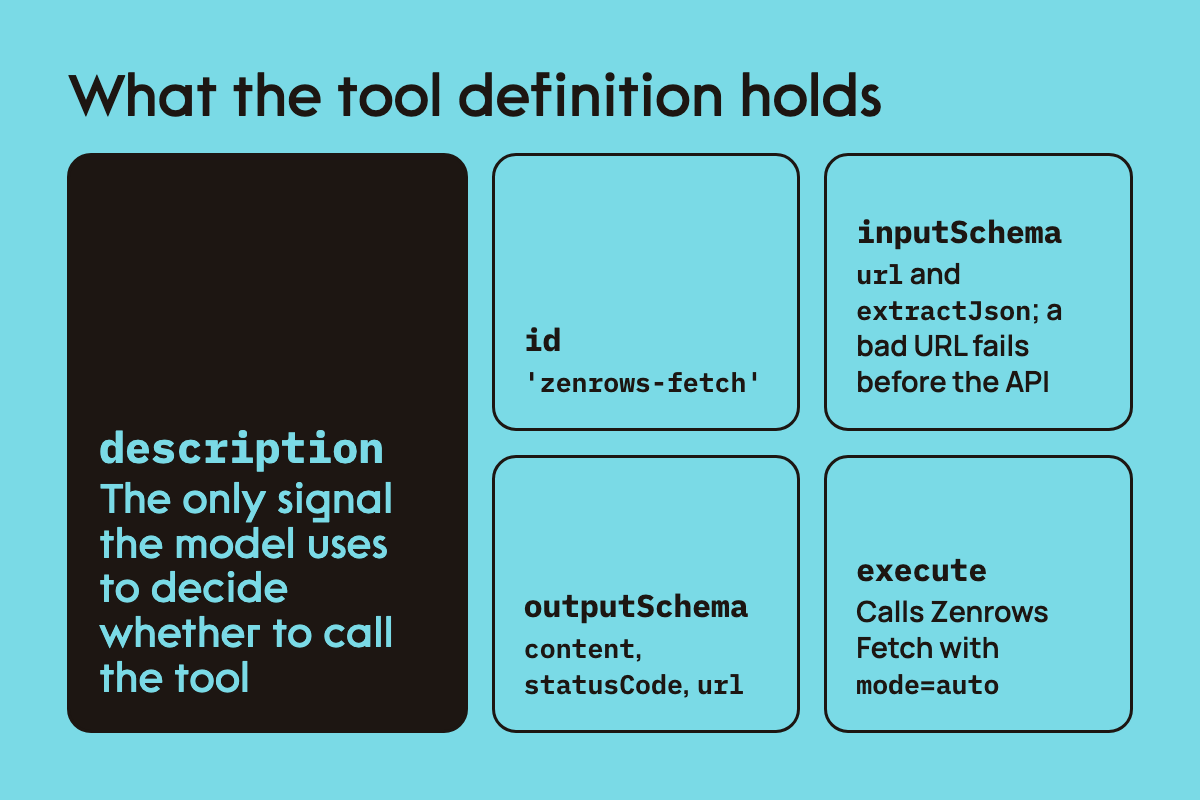
Keep the description brief and exact. It is the only signal the model uses to decide whether to call this tool. Your scaffolded project already has a src/mastra/tools directory holding the template's example tools. Create a new file alongside them at src/mastra/tools/zenrows-fetch.ts and add the following.
import { createTool } from '@mastra/core/tools';
import { z } from 'zod';

export const zenrowsFetchTool = createTool({
  id: 'zenrows-fetch',

  description:
  'Fetches web pages using Zenrows. Use this tool when you need information from a specific URL. Set extractJson to true when you need structured data such as product details, pricing, availability, ratings, or other fields. Leave extractJson false when you need the page content as Markdown.',

  inputSchema: z.object({
    url: z.string().url(),
    extractJson: z.boolean().optional(),
  }),

  outputSchema: z.object({
    content: z.union([z.string(), z.record(z.string(), z.unknown())]),
    statusCode: z.number(),
    url: z.string(),
  }),

  execute: async ({ url, extractJson }) => {
    const zenrowsUrl = new URL('https://api.zenrows.com/v1/');

    zenrowsUrl.searchParams.set('url', url);
    zenrowsUrl.searchParams.set(
      'apikey',
      process.env.ZENROWS_API_KEY!,
    );
    zenrowsUrl.searchParams.set('mode', 'auto');

    if (extractJson) {
      zenrowsUrl.searchParams.set('extract', 'auto');
    } else {
      zenrowsUrl.searchParams.set('response_type', 'markdown');
    }

    const response = await fetch(zenrowsUrl);

    if (!response.ok) {
      const error = await response.text();

      throw new Error(
        `Zenrows request failed with status ${response.status}: ${error}`,
      );
    }

    if (extractJson) {
      const body = await response.json();

      return {
        content: body.parsed,
        statusCode: response.status,
        url,
      };
    }

    const content = await response.text();

    return {
      content,
      statusCode: response.status,
      url,
    };
  },
});
The input schema is the validation layer. The z.string().url() ensures that malformed URLs fail validation before it reaches the API. extractJson is optional and defaults to undefined, which falls through to the Markdown path.
You can test the tool by creating a new file next to it, for example, src/mastra/tools/test-tool.ts. It doesn't need the Mastra dev server or agent to run. Let's test it on walmart.com.
import 'dotenv/config';
import { zenrowsFetchTool } from './zenrows-fetch';

if (!zenrowsFetchTool.execute) {
  throw new Error('Zenrows tool does not have an execute function');
}

const result = await zenrowsFetchTool.execute(
  {
    url: 'https://www.walmart.com/search?q=bike',
    extractJson: false,
  },
  {} as any
);

if (!result || 'statusCode' in result === false) {
  throw new Error('Zenrows tool returned an unexpected result');
}

console.log(result.statusCode);
console.log(
  typeof result.content === 'string'
    ? result.content.slice(0, 300)
    : result.content
);
And run it in your terminal.
npx tsx src/mastra/tools/test-tool.ts
The output prints the status code, then the page as Markdown (first lines shown):
200
[](https://www.walmart.com)
[Skip to Main Content](https://www.walmart.com#maincontent)
[](https://www.walmart.com/all-departments)[](https://www.walmart.com/)
[](https://www.walmart.com/)
While this works, if you would prefer not to maintain a custom tool, use the Zenrows MCP server as an alternative integration. To learn more, check out our article on the Zenrows MCP server and its implementation.
Extending the Tool With Structured Extraction
Markdown works when the agent needs to read a page and reason over it. For product listings, structured extraction is preferable because it returns fields rather than prose. For that, you can use extract=auto, which Extract handles server side and returns as named fields. The example uses it whenever extractJson is true.
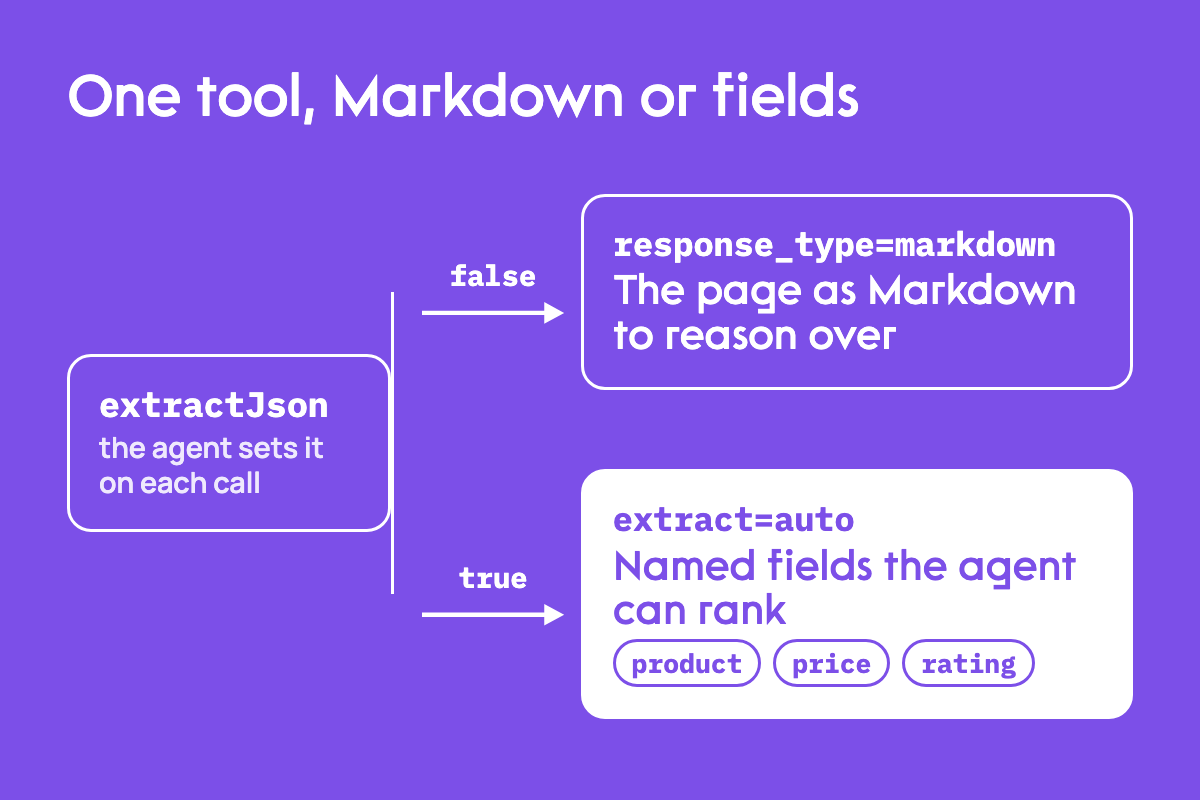
The extractJson branch in the execute function handles that path. The script below shows what part of the earlier script handles that.
// part of the previous script
zenrowsUrl.searchParams.set('mode', 'auto');

if (extractJson) {
  // server side parsing, returns fields instead of page text
  zenrowsUrl.searchParams.set('extract', 'auto');
} else {
  zenrowsUrl.searchParams.set('response_type', 'markdown');
}
And this part handles the changes by ensuring the Markdown path reads the body as text while the extract path parses it as JSON.
// parses as JSON
if (extractJson) {
  const body = await response.json();

  return {
    content: body.parsed,
    statusCode: response.status,
    url,
  };
}

const content = await response.text();

return {
  content,
  statusCode: response.status,
  url,
};
Likewise, you can extend the src/mastra/tools/test-tool.ts file created earlier or create a new test file for this. The file below shows a new file called src/mastra/tools/test-tool-extend-extract.ts.
import 'dotenv/config';
import { zenrowsFetchTool } from './zenrows-fetch';

if (!zenrowsFetchTool.execute) {
  throw new Error('Zenrows tool does not have an execute function');
}


const result = await zenrowsFetchTool.execute(
  {
    url: 'https://www.walmart.com/search?q=bike',
    extractJson: true,
  },
  {} as any,
);

if (!result || 'statusCode' in result === false) {
  throw new Error('Zenrows tool returned an unexpected result');
}

console.log(result.statusCode);
console.log(
  typeof result.content === 'string'
    ? result.content.slice(0, 300)
    : result.content
);
The parsed response is truncated below to two product records.
{
  "products": [
    {
      "badge": null,
      "current_price": 149.99,
      "fulfillment_label": null,
      "is_sponsored": true,
      "item_id": "10479873441",
      "low_stock": null,
      "options_from_price": 149.99,
      "original_price": 207.99,
      "rating": 3.9,
      "review_count": 130,
      "title": "Ktaxon 20\" Mountain Bike, 7 Speed Bike with Disc Brakes, White",
      "walmart_plus_savings": null
    },
    {
      "badge": null,
      "current_price": 227,
      "fulfillment_label": null,
      "is_sponsored": true,
      "item_id": "475992717",
      "low_stock": null,
      "options_from_price": null,
      "original_price": null,
      "rating": 4.4,
      "review_count": 739,
      "title": "Mongoose Rebel X1 BMX Bike, 20-in. Wheels, Kids Ages 7-14 Years, Gray Child Bicycle",
      "walmart_plus_savings": null
    }
  ],
  "search_query": {
    "query": "bike",
    "total_results": null
  }
}
Wiring the Tool Into a Mastra Agent
Now, it is time to create a Mastra agent connected to the Zenrows tools.
The first step is to add an agent file under src/mastra/agents/, then wire the tool into it. The script below imports the tool and passes it in the tools object.
import { Agent } from '@mastra/core/agent';
import { zenrowsFetchTool } from '../tools/zenrows-fetch';

export const marketResearchAgent = new Agent({
  id: 'market-research-agent',
  name: 'Market Research Agent',

  description:
    'An agent that researches and compares products using live web data.',

  instructions: `
You are a product market research agent.

Your job is to research and compare products using the zenrows_fetch tool.

When the user provides one or more product URLs:

1. Fetch each URL using zenrows_fetch.
2. When product information such as name, price, availability, or rating is needed, use structured extraction.
3. Extract the relevant product information from each result.
4. Never invent or assume information that was not returned by the tool.
5. If information is missing, clearly state that it is unavailable.
6. Preserve the currency returned by the source.
7. Do not directly compare prices when the products use different currencies unless a reliable currency conversion is available.
8. When comparing products, present the results clearly in a table when appropriate.
9. After presenting the data, provide useful observations based only on the retrieved information.

Do not use web search when the user asks you to use zenrows_fetch only.
`,

  model: 'openai/gpt-5.6-terra',

  tools: {
    zenrows_fetch: zenrowsFetchTool,
  },
});
The instruction tells the agent what to do, so it needs to be specific. A vague prompt gives you a confident answer with a training-data price, but no way to tell which fields came from the page. You can use any supported model by changing the provider. Ensure you have the right and matching key in your .env file.
// changing model. Replace it in the previous script
// openai
model: 'openai/gpt-5.6-terra',

// anthropic
model: 'anthropic/claude-sonnet-4-5',
Next, register the agent by adding it to your Mastra instance in src/mastra/index.ts. Registration exposes the agent to the dev playground and server.
import { Mastra } from '@mastra/core/mastra';
import { LibSQLStore } from '@mastra/libsql';
import { DuckDBStore } from '@mastra/duckdb';
import { MastraCompositeStore } from '@mastra/core/storage';
import {
  MastraStorageExporter,
  MastraPlatformExporter,
  Observability,
  SensitiveDataFilter,
} from '@mastra/observability';
import { agent } from './agents/agent';
import { marketResearchAgent } from './agents/market-research-agent';
import { startScheduleTool, stopScheduleTool } from './tools/schedule-tools';

export const mastra = new Mastra({
  bundler: {
    externals: ['@duckdb/node-bindings'],
  },
  agents: {
    agent,
    marketResearchAgent,
  },
  tools: { startScheduleTool, stopScheduleTool },
  storage: new MastraCompositeStore({
    id: 'composite-storage',
    default: new LibSQLStore({
      id: 'mastra-storage',
      url: process.env.TURSO_DATABASE_URL || 'file:./mastra.db',
      authToken: process.env.TURSO_AUTH_TOKEN || undefined,
    }),
    domains: {
      observability: await new DuckDBStore().getStore('observability'),
    },
  }),
  observability: new Observability({
    configs: {
      default: {
        serviceName: 'mastra',
        exporters: [new MastraStorageExporter(), new MastraPlatformExporter()],
        spanOutputProcessors: [new SensitiveDataFilter()],
      },
    },
  }),
});
Next, test the agent with a standalone script. Below is src/mastra/tools/test-agent.ts, the test script for the market research agent.
import 'dotenv/config';
import { mastra } from '..';

const agent = mastra.getAgent('marketResearchAgent');

const result = await agent.generate(
  'Compare the bikes on https://www.walmart.com/search?q=bike. Give me the five cheapest with their ratings, and flag any that are sponsored.',
);

console.log(JSON.stringify(result.toolCalls, null, 2));
console.log(result.text);
Run it:
npx tsx src/mastra/tools/test-agent.ts
The output shows that the agent made a call and chose structured extraction. It also ranked the five cheapest bikes with ratings and other information, all from the live page. Where is_sponsored came back null, it said so instead of guessing. It is important to note that this run occurred at a different time than the first run, so the value differs.
The script first prints the tool call the agent made:
[
  {
    "type": "tool-call",
    "runId": "018d9545-eddd-4fde-8cd1-1884316f4212",
    "from": "AGENT",
    "payload": {
      "toolCallId": "call_3H76SowFUi3SRknDFYXrJu7W",
      "toolName": "zenrows_fetch",
      "args": {
        "url": "https://www.walmart.com/search?q=bike",
        "extractJson": true
      },
      "providerMetadata": {
        "openai": {
          "itemId": "fc_06708f1f9910751e006a84956972bc81a084b7ebc5cc25f70d"
        }
      }
    }
  }
]
Then the agent's answer:
The five lowest-priced bikes in the retrieved Walmart search results are:

| Rank | Bike | Price* | Rating | Reviews | Sponsored |
|---:|---|---:|---:|---:|---|
| 1 | Dynacraft 16 Inch Suspect Boys BMX Bike for Child 5-7 Years | 108 | 4.2/5 | 772 | No sponsorship flag returned |
| 2 | 18" Kent Bicycle Abyss Boy's Freestyle BMX Child Bicycle, Blue | 128 | 4.2/5 | 2,325 | No sponsorship flag returned |
| 3 | 20" Kent Tempest BMX Bicycle, Fits Riders 4'2"-5', Black/Aqua, Child, Unisex | 138 | 4.3/5 | 1,496 | No sponsorship flag returned |
| 4 | Ktaxon 24" Women's 7-Speed Cruiser Bike with Basket & Rack, Green | 189.99 | 4.2/5 | 78 | **Sponsored** |
| 5 | Mongoose Rebel X1 BMX Bike, 20-in. Wheels, Kids Ages 7-14, Gray | 227 | 4.4/5 | 740 | **Sponsored** |
Testing the Web-Aware Agent via the Mastra Studio UI
Test the agent in Mastra Studio. Run your Mastra application with the command below.
npm run dev
It will present the Mastra local server running at http://localhost:4111. Open that URL in your browser and navigate to the agent. Click the market research agent and prompt it with the same test instruction we used earlier. The prompt is below.
Compare the bikes on Walmart. Give me the five cheapest with their ratings, and flag any that are sponsored.
Run it, and you should see an output like this. Mastra called the tools and returned relevant results for our prompt, and the structured output confirms the agent is working.
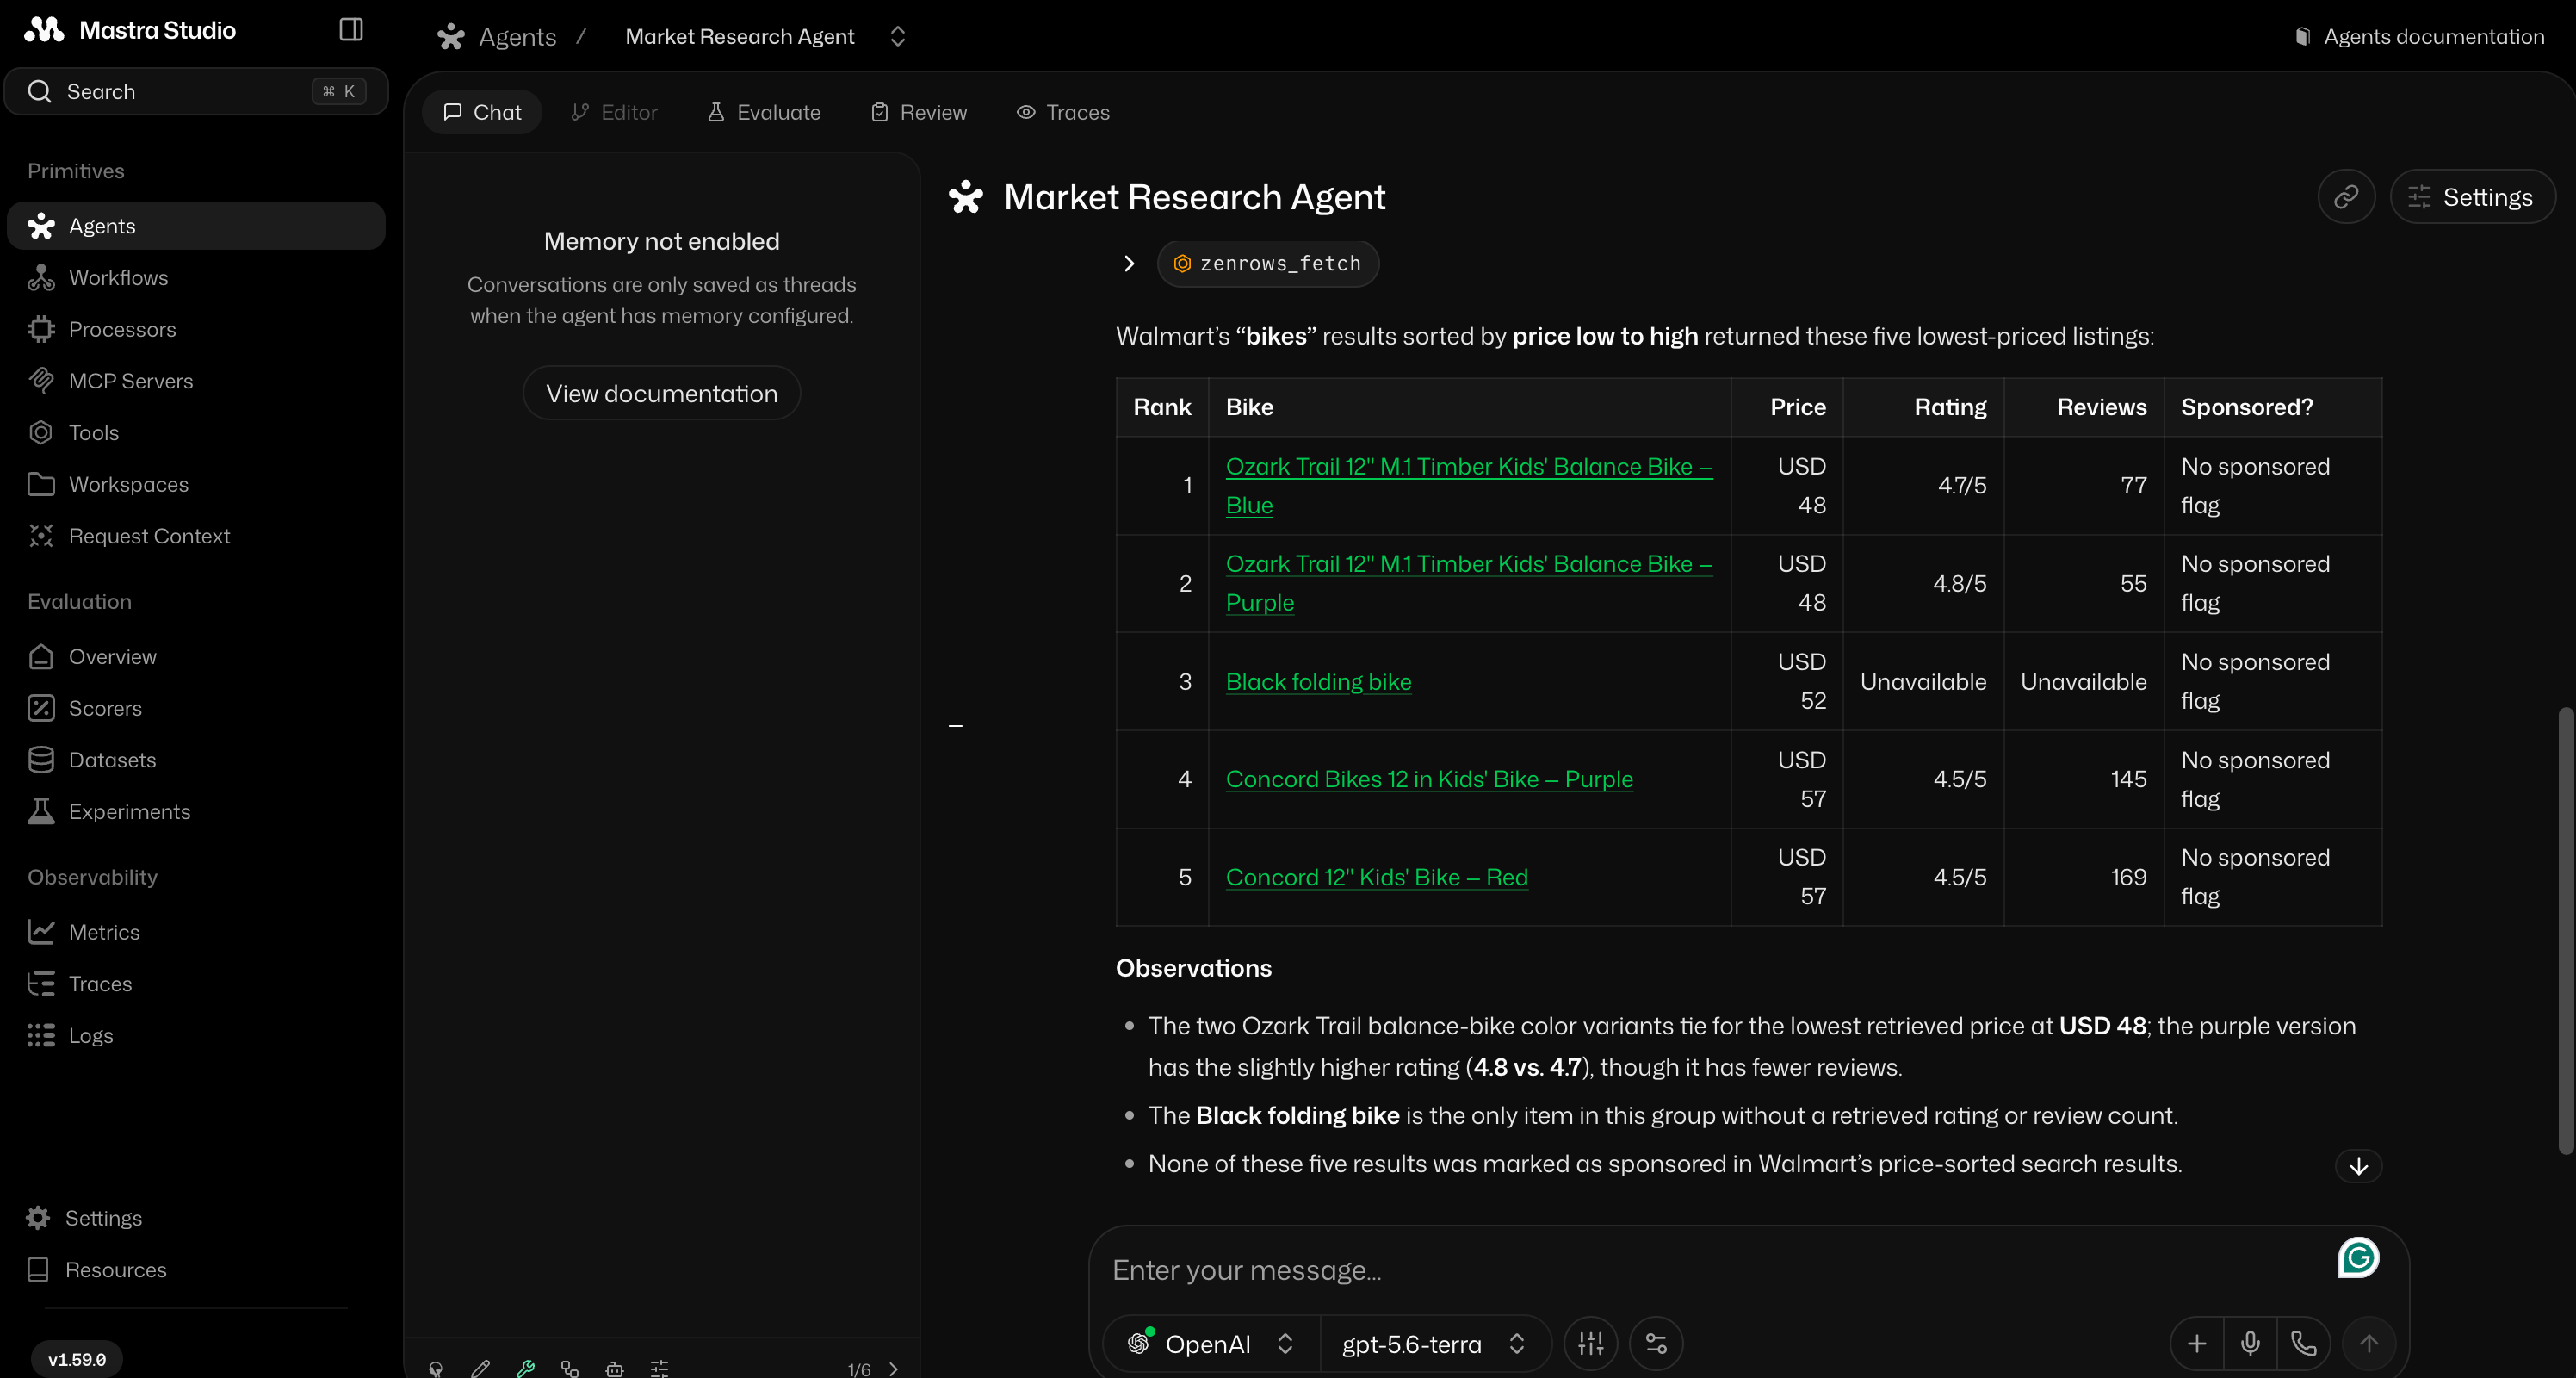
You can take this further by incorporating memory by following the steps in the official Mastra documentation. The full code is available on our GitHub if you want to compare your implementation against the finished version.
Adding a Workflow for Bulk URL Processing
Mastra workflows are deterministic, so you can define steps and have your agent check multiple targets at once before returning an output.
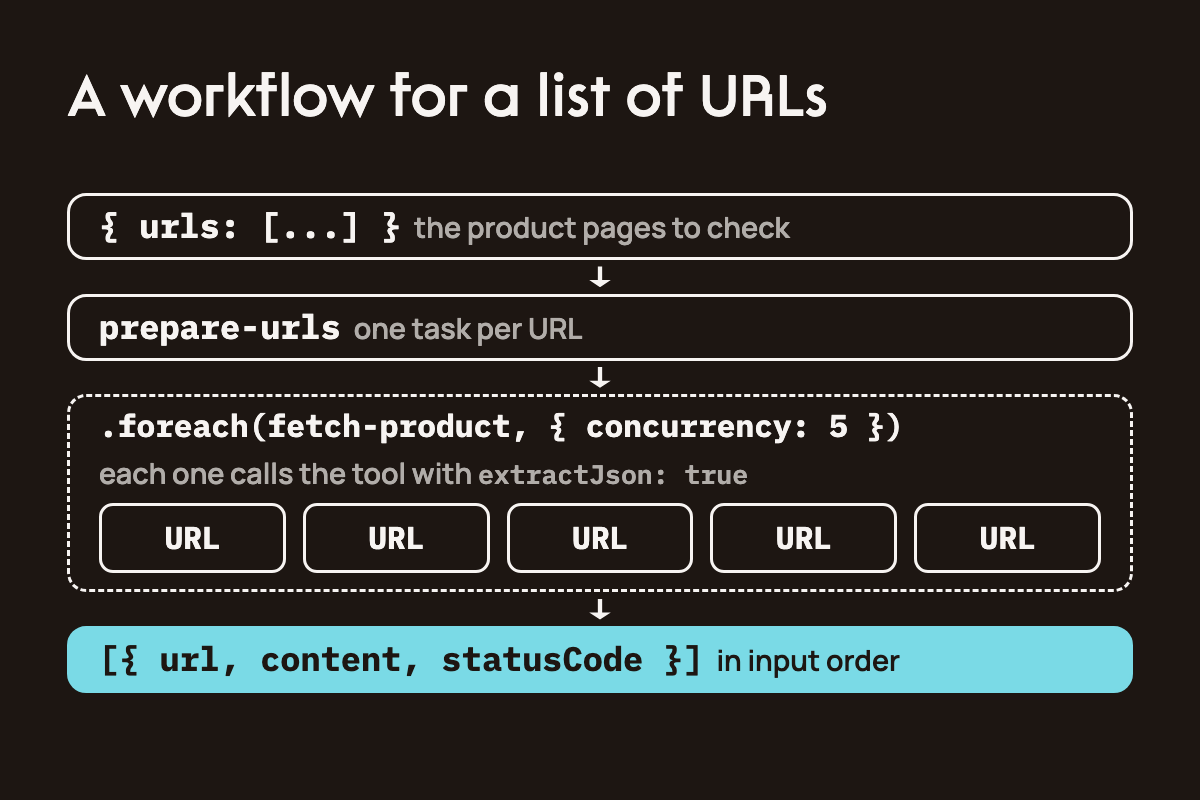
To do this, create a workflow folder in the src/mastra/workflow/ path. Then create a bulk-fetch.ts file. This workflow will be called productResearchWorkflow.
import { createStep, createWorkflow } from '@mastra/core/workflows';
import { z } from 'zod';
import { zenrowsFetchTool } from '../tools/zenrows-fetch';

const prepareUrlsStep = createStep({
  id: 'prepare-urls',

  inputSchema: z.object({
    urls: z.array(z.string().url()),
  }),

  outputSchema: z.array(
    z.object({
      url: z.string().url(),
    }),
  ),

  execute: async ({ inputData }) => {
    return inputData.urls.map(url => ({
      url,
    }));
  },
});

const fetchProductStep = createStep({
  id: 'fetch-product',

  inputSchema: z.object({
    url: z.string().url(),
  }),

  outputSchema: z.object({
    url: z.string(),
    content: z.record(z.string(), z.unknown()),
    statusCode: z.number(),
  }),

  execute: async ({ inputData }) => {
    // createTool types execute as optional, so narrow it before calling
    if (!zenrowsFetchTool.execute) {
      throw new Error('Zenrows tool does not have an execute function');
    }

    const result = await zenrowsFetchTool.execute(
      {
        url: inputData.url,
        extractJson: true,
      },
      {} as any,
    );

    if (!result || 'statusCode' in result === false) {
      throw new Error('Zenrows tool returned an unexpected result');
    }

    return {
      url: inputData.url,
      // the tool returns a union, this workflow always extracts
      content: result.content as Record<string, unknown>,
      statusCode: result.statusCode,
    };
  },
});

export const productResearchWorkflow = createWorkflow({
  id: 'product-research-workflow',

  inputSchema: z.object({
    urls: z.array(z.string().url()),
  }),

  outputSchema: z.array(
    z.object({
      url: z.string(),
      content: z.record(z.string(), z.unknown()),
      statusCode: z.number(),
    }),
  ),
})
  .then(prepareUrlsStep)
  // concurrency controls how many urls run at once
  .foreach(fetchProductStep, { concurrency: 5 })
  .commit();
createTool types execute as optional and as taking two arguments, so the step narrows it before calling it and passes both. Calling it with the input alone does not compile.
Next, register the workflow in your Mastra instance in src/mastra/index.ts. Registration exposes the workflow to Mastra Studio and the server. The file below shows everything that was added to index.ts.
// add to the imports
import { productResearchWorkflow } from './workflow/bulk-fetch';

// add to the Mastra constructor, alongside agents
workflows: {
  productResearchWorkflow,
},
Next, write the test script for the workflow.
import 'dotenv/config';
import { mastra } from '..';

const workflow = mastra.getWorkflow('productResearchWorkflow');

const run = await workflow.createRun();

const result = await run.start({
  inputData: {
    urls: [
      'https://www.walmart.com/search?q=tanktop',
      'https://www.walmart.com/search?q=shirts',
      'https://www.walmart.com/browse/home/shop-water-bottles/4044_623679_639999_7751805_4269055_2976621',
    ],
  },
});

console.log(JSON.stringify(result, null, 2));
Then run it:
npx tsx src/mastra/workflow/test-workflow.ts
The truncated output below shows two of the three outputs, all with status code 200, in the same order as the input.
{
  "result": [
    {
      "url": "https://www.walmart.com/search?q=tanktop",
      "content": {
        "products": [
          {
            "badge": "rollback",
            "current_price": 11.98,
            "original_price": 29.98,
            "fulfillment_label": "Shipping, arrives today",
            "is_sponsored": true,
            "item_id": "342153793",
            "low_stock": true,
            "rating": 4.5,
            "review_count": 15482,
            "title": null
          }
          // 8 more products
        ],
        "search_query": { "query": "tanktop", "total_results": null }
      },
      "statusCode": 200
    },
    {
      "url": "https://www.walmart.com/browse/home/shop-water-bottles/...",
      "content": {
        "products": [
          {
            "badge": null,
            "current_price": 15.95,
            "original_price": 17.98,
            "is_sponsored": null,
            "item_id": "1604723",
            "rating": 4.7,
            "review_count": 19927,
            "title": "Brita Standard Replacement Water Filter (3 Pack)"
          }
          // 11 more products
        ],
        "search_query": null
      },
      "statusCode": 200
    }
  ]
}
You can also visit Mastra Studio and test the agent.
What You Built
You now have a Zenrows-powered Mastra agent that can fetch web data from protected sites and return structured results. If you want to go further, the Mastra documentation is the best place to explore advanced patterns. Alternatively, if you want a different integration path, the Zenrows MCP server is another option.
FAQs
What Is Mastra and Why Use It for AI Agents?
Mastra is an open-source TypeScript framework for building AI agents, with built-in support for tools, workflows, memory, tool calling, and observability.
Why Does Mastra's Built-In webFetchTool Fail on Some Sites?
This is because its HTTP request works without a browser and without anti-bot handling capabilities. So, Cloudflare-protected targets hit a challenge page or block page and raise no exception. Thus, the agent reasons over a challenge copy or empty markup and returns an incomplete output.
Does the Zenrows Tool Work With Both OpenAI and Anthropic Models?
Yes, only the agent's model configuration changes when you switch between OpenAI and Anthropic. The tool definition doesn't change, as Mastra passes your Zod inputSchema to the AI SDK in any tool-calling format the provider expects.
// openai
model: 'openai/gpt-5.6-terra',

// anthropic
model: 'anthropic/claude-sonnet-4-5',
Can I Use This Tool in a Mastra Workflow as Well as an Agent?
Yes. You can call zenrowsFetchTool.execute() from a workflow step, as shown in the bulk URL processing example, when you want deterministic fetching across a known list of URLs.
Does Zenrows Fetch Handle JavaScript-Rendered Pages?
Yes, Zenrows Fetch uses mode=auto to help handle JavaScript-rendered and protected pages without you having to manage the fetch configuration manually.
How Do I Handle Rate Limits When the Agent Calls the Zenrows Tool Frequently?
Handle 429s by limiting concurrency, queueing requests, and retrying with exponential backoff and jitter. If the workload is large, use Zenrows Batch instead of firing every request from the agent at once. The Zenrows documentation covers Batch and how you can use it to submit your first job.
Can I Connect Zenrows via MCP Instead of a Custom Tool?
Yes, Zenrows has an official MCP server, and Mastra's MCPClient can work with it like any other MCP server. The server supports Streamable HTTP and Local MCP server transport. It also gives agents access to Fetch without writing a tool wrapper, alongside browser tools for browser sessions. You still need an API key, however.