Selenium is a popular open-source library for web scraping that uses the WebDriver protocol to control browsers like Chrome, Firefox, and Safari. But why is that useful?
Traditional scraping tools struggle to collect data from websites that rely on JavaScript. That's because you need to run JS, and Selenium enables that.
The library also provides several methods to interact with a page like a human user would, meaning you gain extra functionality and are more prepared to avoid being blocked. Some examples of actions are:
- Scrolling down.
- Clicking buttons.
- Filling out forms.
- Taking screenshots.
Let's dig into web scraping with Selenium and Python!
Getting Started
First of all, we'll go through the steps to have everything ready to follow this Selenium web scraping tutorial and run a headless browser.
Prerequisites
You'll need Python 3 installed. Since many systems already have it configured, you might not even need to install it. Verify that by running the command below in your terminal:
python --version
BoldIf yours does, the command will print something like this:
Python 3.11.2
If the returned version is 2.x or it terminates in error, you must install Python. Download Python 3.x from the official website and follow the installation wizard to set it up.
Selenium supports several browsers, but we'll use Google Chrome because it's the most popular one with a 65%+ market share. Thus, you'll need to install:
- Google Chrome: The latest version of the browser will do.
- ChromeDriver: Download the one that matches your Chrome version.
Next, set up a new Python project and install the Selenium Python binding package:
pip install selenium
You are now ready to start controlling Chrome via Selenium. Initialize a scraper.py file as follows:
from selenium import webdriver

# initialize an instance of the chrome driver (browser)
driver = webdriver.Chrome()
# visit your target site
driver.get('https://scrapingclub.com/')

# scraping logic...

# release the resources allocated by Selenium and shut down the browser
driver.quit()
This Python snippet contains the basic logic required to get started with Selenium. It initializes a ChromeWebDriver instance and uses it to visit ScrapingClub, the target site we'll use.
Selenium WebDriver is a web automation tool enabling control over web browsers. Although it supports various browsers, we'll use Chrome.
Installing WebDriver used to be a requirement, but that's no longer the case. Selenium version 4 or higher now includes it by default. If you have an earlier Selenium version, update it to access the latest features and functionality. To check your current version, use pip show selenium, and install the latest version with use pip install --upgrade selenium.
As seen, our code no longer involves any path to ChromeDriver.
FYI: You can use webdriver_manager with other browsers as well. At the time of writing, it also supports GeckoDriver, IEDriver, OperaDriver, and EdgeChromiumDriver.
Verify that your scraper.py Selenium script works using the following code:
python scraper.py
Verify that your scraper.py Selenium script works using the following code:

Note the ''Chrome is being controller by automated test software'' message, an extra alert section to inform you that Selenium is controlling the Chrome instance.
Great! Your Python script works as expected. But is it really necessary to open a Chrome window?
Let's dig into this.
Chrome Headless Mode
Selenium is well known for its headless browser capabilities. A headless browser is one without a graphical user interface (GUI) but with all the functionality of a real one.
Enable the headless mode for Chrome in Selenium by defining a proper Options object and passing it to the WebDriver Chrome constructor. Additionally, you must set headless=new to activate the headless mode starting from Chrome 109.
from selenium import webdriver
from selenium.webdriver.chrome.options import Options

# enable headless mode in Selenium
options = Options()
options.add_argument('--headless=new')

driver = webdriver.Chrome(
    options=options,
    # other properties...
)
This is how you could enable it on previous versions of the browser:
from selenium import webdriver
from selenium.webdriver.chrome.options import Options

options = Options()
# enable headless mode
options.headless = True

driver = webdriver.Chrome(
    options=options,
    #...
)
Selenium will now launch a headless Chrome instance. So, you'll no longer see a Chrome window if you run the script again. That's the ideal setting for production when running the scraping script on a server, as you don't want to waste resources on the GUI.
At the same time, seeing what happens in Chrome windows is useful while testing your scraper because it allows you to observe the effects of your script directly in the browser.
The setup part is complete. Time to get your hands dirty with some Python Selenium web scraping logic and extract data!
How to Find Web Page Elements
Web scraping requires selecting HTML elements from the DOM (Document Object Model) to extract their data. For that, Selenium offers two main methods to locate the elements on a page:
-
find_element: To find a specific, single element. -
find_elements: To find all the elements that match the selection strategy.
Both support seven different approaches to locating HTML elements. Here's a summary table:
| Approach | Description | HTML Sample Code | Selenium Examples |
|---|---|---|---|
By.ID |
Selects HTML elements based on their id attribute |
<div id="s-437">...</div> |
find_element(By.ID, "s-437") |
By.NAME |
Selects HTML elements based on their name attribute |
<input name="email" /> |
find_element(By.NAME, "email") find_elements(By.NAME, "email") |
By.XPATH |
Selects HTML elements that match an XPath expression | <h1>My <strong>Fantastic</strong> Blog</h1> |
find_element(By.XPATH, "//h1/strong") find_elements(By.XPATH, "//h1/strong") |
By.LINK_TEXT |
Selects <a> HTML elements that contain a specific link text |
<a href="/">Home</a> |
find_element(By.LINK_TEXT, "Home") find_elements(By.LINK_TEXT, "Home") |
By.TAG_NAME |
Selects HTML elements based on their tag name | <span>...</span> |
find_element(By.TAG_NAME, "span") find_elements(By.TAG_NAME, "span") |
By.CLASS_NAME |
Selects HTML elements based on their class attribute |
<div class="text-center">Welcome!</div> |
find_element(By.CLASSNAME, "text-center")find_elements(By.CLASSNAME, "text-center") |
By.CSS_SELECTOR |
Selects HTML elements that match a CSS selector | <div class="product-card"><span class="price"\>$140</span></div> |
find_element(By.CSS_SELECTOR, ".product-card .price")find_elements(By.CSS_SELECTOR, ".product-card .price") |
Since the query can identify more than one element, the two methods behave as follows:
-
find_element: Returns the first HTML element that matches the search condition. -
find_elements: Returns all that match the search condition in an array.
You might be wondering how to define an effective location strategy, and this is the answer: Use the browser's developer tools on your target page. For that, right-click on an HTML element and select ''Inspect'' to open DevTools:

Then, analyze the page's DOM and figure out a working selection strategy. You can also get XPath expressions and CSS selectors directly: right-click on an element, open the ''Copy'' menu, and choose either ''Copy selector'' or ''Copy XPath'' to get one related to the selected element.
This feature is beneficial when using the XPATH or CSS_SELECTOR approach. At the same time, remember that you must consider these auto-generated selectors only as a starting point. Most of them aren't good for scraping, but they can still help you understand how selectors work.
Let's see some of the search strategies in action! Assume you want to select the ''Exercise #1'' card shown in the screenshot above. You can achieve that with find_element():
from selenium.webdriver.common.by import By
#...

exercise1_card = driver.find_element(By.CLASS_NAME, 'w-full.rounded.border')
# or
exercise1_card = driver.find_element(By.CSS_SELECTOR, '.w-full.rounded.border')
# or
exercise1_card = driver.find_element(By.XPATH, '/html/body/div[3]/div[2]/div/div[1]')
These are all effective methods to reach the goal.
Now, if you want to get all the exercise cards on the page, use find_elements():
from selenium.webdriver.common.by import By
# ...

exercise_cards = driver.find_elements(By.CLASS_NAME, 'w-full.rounded.border')
# or
exercise_cards = driver.find_elements(By.CSS_SELECTOR, '.w-full.rounded.border')
# or
exercise_cards = driver.find_elements(By.XPATH, '/html/body/div[3]/div[2]/div/div[1]')
Fantastic! Once again, all options work like a charm.
If you want to find a single HTML element, you can opt for By.ID. Yet, not all of them have the id attribute. Instead, By.CSS_SELECTOR and By.XPath allow you to select any HTML element in the DOM. That's why using CSS selectors or XPath expressions is the recommended approach.
find_element() and find_elements() return one or many Selenium WebElement objects, respectively. But what's a WebElement in Selenium, and what can you do with it? Find out below!
How to Interact with a Web Page as in a Browser
When users visit a web page in a browser, they interact with it through its HTML elements: they click on them, read their data, use them to enter information, etc. These are just a few actions you can take on a page through its elements.
A Selenium WebElement object represents an HTML node in the DOM, while WebElement exposes several methods for interacting with the underlying element. This allows you to play with the DOM nodes as a human user would.
Let's see an example! Connect to ScrapeClub's login form page in Selenium. This is what the login <form> looks like:

Some of the most common actions you can perform on WebElement objects are:
- Clicking on an HTML element:
submit_button = driver.find_element(By.CSS_SELECTOR, 'form button')
submit_button.click()
This snippet clicks the ''Log In'' button and submits the form. The click() method allows you to click on the selected element.
- Typing data in an HTML text element:
name_input = driver.find_element(By.ID, 'id_name')
name_input.send_keys('Serena')
This code fills out the ''Name'' input element with ''Serena.'' The WebElement's send_keys() method simulates the typing.
- Getting the text contained in an HTML element:
name_label = driver.find_element(By.CSS_SELECTOR, 'label[for=id_name]')
print(name_label.text)
That prints:
Name*
Here, the text attribute gives you the text content.
- Getting the data contained in the attributes of the HTML element:
hidden_input = driver.find_element(By.CSS_SELECTOR, 'input[type=hidden]')
hidden_input_value = hidden_input.get_attribute('value')
print(hidden_input_value)
That snippet returns:
VanmxjKNMqfYxyAj7AonjpsAWmCq87Pkg2IjbUeXeV7E9wxpFuqkua3DXTly2dgc
The get_attribute() method of a WebElement returns the string value of the specified attribute.
The last two examples are especially useful when it comes to Python Selenium web scraping. Keep in mind that you can also call find_element() and find_elements() on a WebElement. This will restrict the search to the children of the selected HTML element.
Now, there are many other things you can do with Selenium. Keep reading!
Wait for an Element to Appear
Most sites rely on API calls to get the data they need. After the first load, they perform many async XHR requests via AJAX in JavaScript. Thus, they retrieve some content and then use it to populate the DOM on-the-fly with new HTML elements. That's how popular client-side rendering technologies like React, Vue, and Angular work.
When you inspect a web page, chances are that some time has passed since the first load, so it should've already performed the most important API requests, and the page's DOM is most likely definitive.
Take a look at the ''Network'' tab of the DevTools window. In the ''Fetch/XHR'' section, you can see the AJAX requests performed by the page:

Compare the HTML source code with the current DOM to study the differences. Use the developer tools to understand what a target page does and how it uses JavaScript to manipulate the DOM. Keep in mind that a website can rely on JavaScript to completely render its pages or only parts of them.
With JS-rendered pages, you can't immediately start scraping data. That's because the DOM will only be complete after some time. In other words, you have to wait until JavaScript does its work.
You have two ways to scrape data from such pages using Selenium:
-
time.sleep()stops the Python Selenium web scraping script for a few seconds before selecting elements from the DOM. -
WebDriverWaitwaits for specific conditions before proceeding further in the code.
Using the time.sleep() Python function works most of the time. But how long should you wait? There's no absolute answer, as it all depends on the specific case and network conditions. What's for sure is that waiting too long or too little isn't ideal in either case.
That's why you should prefer the second approach based on the Selenium WebDriverWait class. This allows you to wait only as long as required. See it in action below:
Use Selenium to connect to ScrapeClub's Mimicking Ajax requests page, which is a good example of a page that relies on AJAX calls.

The page calls an API request to retrieve the content shown in the highlighted card. Use WebDriver to scrape its data as follows:
from selenium.webdriver.support.wait import WebDriverWait
from selenium.webdriver.support import expected_conditions as EC
# ...

# wait up to 3 seconds until there is the 'Jersey Dress' string
# in the '.card-title' element
element = WebDriverWait(driver, 3).until(
    EC.text_to_be_present_in_element((By.CSS_SELECTOR, '.card-title'), 'Jersey Dress')
)

# you are now sure that the card has been loaded
# and can scrape data from it
product_name = driver.find_element(By.CSS_SELECTOR, '.card-title').text
product_image = driver.find_element(By.CSS_SELECTOR, '.card-img-top').get_attribute('src')
product_price = driver.find_element(By.CSS_SELECTOR, '.card-price').text
product_description = driver.find_element(By.CSS_SELECTOR, '.card-description').text

print(f'Product title: {product_name}')
print(f'Product image: {product_image}')
print(f'Product price: {product_price}')
print(f'Product description: {product_description}')
This code waits up to three seconds until the card title HTML element contains the expected text. As soon as the condition is met, it scrapes data from the card. However, if the expected condition doesn't occur in the specified timeout, a TimeoutException is raised.
The Selenium web scraping Python code above prints this:
Product title: Jersey Dress
Product image: https://scrapingclub.com/static/img/96113-C.jpg
Product price: $19.99
Product description: Fitted dress in jersey with long, straight sleeves. Unlined. 72% polyester, 23% rayon, 5% spandex. Machine wash...
BoldYou can wait for several ExpectedConditions. The most popular ones are:
-
title_contains: Until the page title contains a specific string. -
presence_of_element_located: Until an HTML element is present in the DOM. -
visibility_of: Until an element that's already in the DOM becomes visible. -
text_to_be_present_in_element: Until the element contains a particular text. -
element_to_be_clickable: Until an HTML element is clickable. -
alert_is_present: Until a JavaScript native alert shows up.
It should be clear by now: Selenium allows you to scrape web pages that heavily depend on JavaScript. After all, you have a full browser at your disposal.
Next, let's learn how you can leverage JavaScript further using Selenium.
How to Run JavaScript Using Selenium in Python
If your spider runs JavaScript, then it can retrieve data from any type of web page. Thus, your Python Selenium script will be able to scrape both server-side and client-side rendered websites.
Your target site may use JavaScript to retrieve data asynchronously, add or remove elements following specific actions, or implement anti-scraping challenges. For your Python web scraper using Selenium, none of these will represent a problem in most cases.
On the contrary, a spider based on Beautiful Soup or similar technologies couldn't scrape that kind of site. That's because only a browser can run JavaScript, which is what Selenium is about. Here lies the real power of web scraping with Selenium!
With Python and Selenium, web scraping has no limit! Let's look at some examples where the ability to run JavaScript plays a key role.
Infinite Scroll
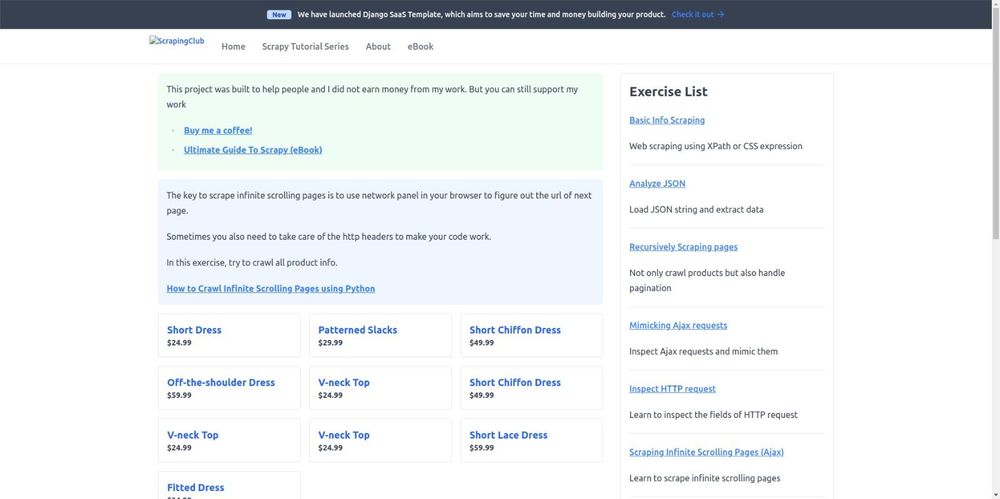
With infinite scroll, an effective approach used by websites to avoid pagination and therefore dropping the need for users to click to load next pages, new content gets loaded dynamically via AJAX as the user scrolls down. Visit Scraping Infinite Scrolling Pages (Ajax) for an example.

To scrape a page that uses an infinite scroll to load data, you need to instruct a browser to scroll down. How? With the space bar, ''Page Down'', or ''End'' keys.
To simulate pressing the “End” key on the web page, you first have to select an element (e.g., the <body>) and send the key there:
from selenium.webdriver import Keys
# ...

driver.find_element(By.TAG_NAME, 'body').send_keys(Keys.END)
When it comes to infinite scroll, you have to apply this logic several times as all elements load. Also, you have to wait for the new one to appear, as explained earlier. You can achieve that in Selenium with Python as below:
cards = []
old_card_size = len(cards)
while True:
    # reach the end of the scroll bar
    driver.find_element(By.TAG_NAME, 'body').send_keys(Keys.END)

    # wait 3 seconds for new elements to load
    time.sleep(3)

    # retrieve all cards
    cards = driver.find_elements(By.CSS_SELECTOR, '.w-full.rounded.border')

    # if no new cards were found
    if (old_card_size == len(cards)):
        # break the cycle since the scroll
        # is over
        break

    # keep track of the number of cards
    # currently discovered
    old_card_size = len(cards)

# scrape data from cards...
This while loop allows you to scrape all the information from the appearing content. However, keep in mind that you can't know in advance what elements will load, which results in not knowing what condition to expect in WebDriverWait. Thus, it's best to choose time.sleep() in this case.
Fill Out a Form
This is how you can use Selenium to fill out the form on ScrapingClub's login form page:
# retrieve the form elements
name_input = driver.find_element(By.ID, 'id_name')
password_input = driver.find_element(By.ID, 'id_password')
submit_button = driver.find_element(By.CSS_SELECTOR, 'form button[type=submit]')

# filling out the form elements
name_input.send_keys('scrapingclub')
password_input.send_keys('scrapingclub')

# submit the form and log in
submit_button.click()
This comes in handy when scraping pages protected by a login.
Take Screenshots with Selenium
Besides scraping text data, Selenium enables you to take screenshots, a feature useful for debugging, supporting your thesis with visual evidence, or crawling UI choices. For example, you might want to take screengrabs to check how competitors present products on their sites.
Take a screenshot of the entire page this way:
driver.save_screenshot('screenshot.png')
Here's the result:

You can also take screenshots of a single element:
# select the desired element
card = driver.find_element(By.CSS_SELECTOR, '.w-full.rounded.border')
# take a screenshot of the selected element
card.screenshot("card_screenshot.png")
This will get you the following:

Built-In Methods
In the browser console, you can launch JavaScript instructions on the page. Don't forget that Selenium provides access to all browser functionality, meaning you can send commands through the browser's JS engine.
The execute_script() method enables you to synchronously execute JavaScript instructions. That's particularly helpful when the features exposed by Selenium aren't enough to achieve your goal.
Let's assume you want to take a screenshot of an element placed at the center of the page. If it isn't in the viewport at the time of the screenshot, the result will be a blank image.
To avoid that, use the window.scrollBy() JavaScript function. Scroll to the element position before taking the screenshot:
# select the desired element
card = driver.find_element(By.CSS_SELECTOR, '.w-full.rounded.border')
# retrieve the y position on the page
# of the selected element
card_y_location = card.location["y"]
# "-100" to give some extra space and make
# make sure the screenshot will be taken correctly
javaScript = f'window.scrollBy(0, {card_y_location}-100);'
driver.execute_script(javaScript)
execute_script() can also pass values to your script thanks to the return JavaScript keyword. See how it works:
title = driver.execute_script('return document.title')
print(title) # "ScrapingClub | Learn Web Scraping Using Python for free"
BoldThe code above passes the value of the page's title read from JavaScript to the title Python variable.
Customize Windows Size
Nowadays, most sites are responsive, meaning they adapt their layout according to the size of the user's screen or browser window. In some cases, they even show or hide elements via JavaScript, depending on the space available. That's an important aspect to consider when scraping, and Selenium allows you to change the initial size of the browser window in two ways:
-
options.add_argument("--window-size=<width>,<height>"). -
set_window_size(<width>, <height>).
See them in action in the example below:
options = Options()

# set the initial window size
options.add_argument('--window-size=800,600')
driver = webdriver.Chrome(
    options=options,
    # ...
)
# print the current window size
print(driver.get_window_size()) # {"width": 800, "height": 600}

# change the window size in a
# different way
driver.set_window_size(1920, 1200)

# scraping logic...

# print the new window size
print(driver.get_window_size()) # {"width": 1400, "height": 1200}
BoldWe used get_window_size() to check the width and height of the current window. That comes in handy in several scenarios, like making sure the browser window has the right size before taking a screenshot.
Get Around Anti-Scraping Protections with Selenium in Python
You know how to do web scraping using Selenium in Python. Yet, retrieving data from the web isn't that easy, as some sites adopt anti-scraping technologies that might detect your script as a bot and block it.
Let's elaborate with an example!
Try to scrape data from a G2 product page with Selenium:
driver.get('https://www.g2.com/products/zenrows/reviews')
# scraping logic...
Its block technology will detect your script and prevent it from accessing the site:

You may build the best Selenium Python web scraping script possible. However, if it gets detected and blocked, it'll be a pointless effort!
Anti-scraping may represent a huge challenge for your data retrieval process. Find out some valuable tips and techniques to perform web scraping without getting blocked.
As an alternative, consider adopting ZenRows to save you the headache and easily get around all anti-scraping protections.
Add Real Headers
One of the essential headers anti-bot technologies typically examine is the User-Agent. You can change Selenium's default User-Agent to a custom one and increase your chances of not getting blocked:
options = Options()
# Chrome 104 Android User Agent
custom_user_agent = "Mozilla/5.0 (Linux; Android 11; 100011886A Build/RP1A.200720.011) AppleWebKit/537.36 (KHTML, like Gecko) Chrome/104.0.5112.69 Safari/537.36"
options.add_argument(f'user-agent={custom_user_agent}')
driver = webdriver.Chrome(
    options=options,
    # ...
)

# visit a page
driver.get("https://scrapingclub.com/")

# print the user agent used to perform the request
print(driver.execute_script("return navigator.userAgent")) # "Mozilla/5.0 (Linux; Android 11; 100011886A Build/RP1A.200720.011) AppleWebKit/537.36 (KHTML, like Gecko) Chrome/104.0.5112.69 Safari/537.36"
Note: Changing the User-Agent might be counterproductive if you forget to adjust other headers. For instance, the sec-ch-ua header usually sends your browser's version as well, meaning it must match the User-Agent.
This is what sec-ch-ua looks like on Google Chrome version 110:
"Chromium";v="110", "Not A(Brand";v="24", "Google Chrome";v="110"
At the same time, older versions don't send that header at all, so adding it might be suspicious.
In the snippet above, you set the User-Agent in the browser configuration but not through a Selenium method because Selenium doesn't support setting custom headers. Here's where a third-party Python library like Selenium Wire comes into play.
It extends Selenium to give you access to the underlying processes made by the browser and let you intercept requests, update the headers, or add new ones. Install it with the following command:
pip install selenium-wire
Use Selenium Wire to set custom headers as below:
from seleniumwire import webdriver
# ...

user_agent = 'Mozilla/5.0 (Linux; Android 11; 100011886A Build/RP1A.200720.011) AppleWebKit/537.36 (KHTML, like Gecko) Chrome/104.0.5112.69 Safari/537.36'
sec_ch_ua = '"Google Chrome";v="104", " Not;A Brand";v="105", "Chromium";v="104"'
referer = 'https://www.google.com'

def interceptor(request):
    # delete the "User-Agent" header and
    # set a new one
    del request.headers["user-agent"]  # Delete the header first
    request.headers["user-agent"] = user_agent
    # set the "Sec-CH-UA" header
    request.headers["sec-ch-ua"] = sec_ch_ua
    # set the "referer" header
    request.headers["referer"] = referer

options = Options()
# setting options...

driver = webdriver.Chrome(
    options=options,
    # ...
    service=ChromeService(ChromeDriverManager().install())
)
# set the Selenium Wire interceptor
driver.request_interceptor = interceptor

# a page that gives you the HTTP headers
# of the request
driver.get("http://httpbin.org/anything")

# print the headers used to perform the request
# they will match the ones set with Selenium Wire
print(driver.find_element(By.TAG_NAME, "body").text)
Note: When changing a header with the library, you must delete the original one first. That will avoid sending duplicates.
Learn more in our guide to Selenium Wire.
Change IP Using a Proxy
Selenium's proxy support is limited, but this is how you implement one with Free Proxy List:
from selenium import webdriver
# ...

# free proxy IP
options = Options()
# free proxy server
proxy_server_ip = "143.198.228.250"
options.add_argument(f'--proxy-server={proxy_server_ip}')

driver = webdriver.Chrome(
    options=options
    # ...
)
# to get the IP the request comes from
driver.get('http://httpbin.org/ip')
print(driver.find_element(By.TAG_NAME, "body").text)  # { "origin": "143.198.228.250" }
Note: Keep in mind that those are unreliable and short-lived, so the one we used probably won't work for you at all.
For more complex solutions or proxies that need authentication, Selenium Wire can once again assist you. Configure it to use the proxy server API offered by ZenRows, which offers a premium IP pool:
proxy_username = 'YOUR_ZENROWS_API_KEY'
selenium_wire_options = {
    'proxy': {
        'http': f'http://{proxy_username}:@proxy.zenrows.com:8001',
        'verify_ssl': False,
    },
}

driver = webdriver.Chrome(
    options=options,
    seleniumwire_options=selenium_wire_options
    # ...
)
driver.get('http://httpbin.org/ip')
print(driver.find_element(By.TAG_NAME, 'body').text)
You can get your ZenRows API key by signing up for free.
If your proxy server doesn't rotate IPs automatically and you need a new identity, overwrite driver.proxy as below:
#...

# using the proxy set initial
driver.get(url)
# set a new proxy
driver.proxy = {
        "http": "http://<PROXY_USER>:<PROXY_PASSWORD>@<PROXY_IP>:<PROXY_PORT>",
}
# the request will use the new proxy
driver.get(url)
Repeat this action as many times as necessary. Or instead, for convenience and reliability, prefer a premium proxy with IP rotation functionality.
Hidden Elements to Detect Scrapers
Some websites rely on honeypot traps, elements that aren't visible to real users but are for bots, to detect and block scrapers.
Suppose your site involves an invisible honeypot link as below:
<a href="https://your-target-site/honeypot-page" style="display: none">Click here</a>
You may want to retrieve all <a> elements in the page and extract their URLs for crawling purposes. However, when following the honeypot link, your Selenium web scraper will be detected as a bot.
WebElement exposes a is_displayed() method that allows you to verify whether the HTML element is visible to the user. In the scenario above, you could use it to filter out non-visible links this way:
a_elements = driver.find_elements(By.TAG_NAME, "a")
# filter out non-visible a elements
visible_a_elements = list(filter(lambda e: (e.is_displayed()), a_elements))
Save Resources While Web Scraping with Selenium
Selenium gives you access to the complete range of standard browser capabilities that help you take your scraping process to the next level. However, you may not need all those features at all times.
For instance, if you don't need to perform screenshots, there's little value in loading images because that'd be a waste of network resources. Actually, images make up a significant percentage of the page's total weight! Thankfully, Selenium offers a solution to that and similar issues.
By blocking certain resources, you improve the performance and bandwidth and avoid being tracked. These operations are especially beneficial when scaling your Selenium Python scraping operations.
Find out some real-world examples next.
Block Images
Prevent the browser from loading images in Selenium this way:
options = Options()
# block image loading
options.experimental_options['prefs'] = {
    'profile.managed_default_content_settings.images': 2
}

driver = webdriver.Chrome(
    options=options
)
# load a page that involves several images
driver.get('https://scrapingclub.com/exercise/list_infinite_scroll/')

# take a screenshot
driver.save_screenshot('screenshot.png')
The code produces the following screenshot:
Block JavaScript
Similarly, you can stop the browser controlled by Selenium from running JavaScript like this:
options = Options()
# block image loading
options.experimental_options['prefs'] = {
    'profile.managed_default_content_settings.javascript': 2
}

driver = webdriver.Chrome(
    options=options
)
Intercept Requests
Thanks to Selenium Wire, you can programmatically intercept and stop requests. This means that you can effectively block some images while allowing others! Let's see how:
def interceptor(request):
        # block only GIF images
        if request.path.endswith((".png", ".gif")):
                request.abort()

driver = webdriver.Chrome(
    options=options,
    seleniumwire_options=selenium_wire_options
    # ...
)
You can also block domains using the exclude_hosts option or allow only specific requests based on URLs matching against a regex with driver.scopes.
These were just a few examples, but there's much more to know. Follow our guide to dig into intercepting XHR requests in web scraping.
Conclusion
This step-by-step tutorial covered the most important knowledge on web scraping in Python using Selenium. You now know:
- How to set up Selenium in Python.
- The basics of locating elements on a web page in Selenium.
- How to use Selenium to interact with web elements on a page in a browser.
- How to run JavaScript code in the browser through Selenium.
- How to avoid some anti-scraping methods in Selenium.
As seen, data extraction involves many challenges, primarily due to the anti-scraping technologies websites employ. Bypassing them is complex and cumbersome, but you can forget about all of them with an advanced Python web scraping API like ZenRows. Use it to run data scraping via API requests and avoid anti-bot protections.
Frequent Questions
What Is Selenium in Web Scraping?
Selenium is a popular solution in web scraping that allows you to create scripts that interact with web pages as a browser does. Its headless browser capabilities are useful to render JavaScript and avoid getting blocked.
Can Selenium Be Used for Web Scraping?
Even though Selenium was created for automated testing, you can use it for web scraping. Its ability to interact with web pages and simulate human behavior makes it a popular tool for data extraction.
How to Use Selenium in Python for Web Scraping?
Using Selenium in Python for web scraping involves the following steps:
- Install the Selenium binding for Python with
pip install selenium, and download the web driver compatible with your browser. - Import the Selenium library in your Python code and create a new
WebDriverinstance. - Use the driver instance to navigate to the target page.
- Implement the scraping logic and extract data from it.
Is Selenium Good for Web Scraping?
Selenium is an excellent option for web scraping, especially true for websites that rely on JavaScript to render the whole page or has dynamic content. At the same time, it can be slower and more resource-intensive than other scraping solutions when not configured correctly.
How to Scrape a Web Page Using Selenium?
To scrape web pages using Selenium, you'll need to create a WebDriver instance and use it to navigate to your target. Next, employ the methods offered by the library to interact with the page and extract the desired information from it.
Did you find the content helpful? Spread the word and share it on Twitter, or LinkedIn.