JavaScript Instructions
ZenRows provides a way to interact with the pages you want to scrape. Using JavaScript Instructions, you will be able to click on items, fill in form inputs, submit them, or wait for a selector to appear. You can combine them as you want, offering endless possibilities like clicking on “read more” buttons or submitting forms. You will need JS Rendering active for this functionality to work.
As you can see below, you will need two parameters: js_render and js_instructions. That last one needs to be encoded, don’t worry if you see a weird string, we will explain it soon. The instructions are an array that needs to be stringified and encoded (if you are not using one of our SDKs or clients that encode it). You can use our Builder or an online tool to encode it.
The instructions that will run in the example below are [{"click":".button-selector"}]. ZenRows will load the page and then find the first element that matches the .button-selector CSS Selector and click on it. This parameter accepts an array of commands, and ZenRows will execute them in order.
Here is a summary of the actions you can run. Below is an explanation for each of them and an example of its usage.
{"click": ".button-selector"} // Click on the first element that matches the CSS Selector
{"wait_for": ".late-selector"} // Wait for a given CSS Selector to load in the DOM
{"wait": 2000} // Wait an exact amount of time in ms
{"fill": [".input-selector", "value"]} // Fill in an input
{"check": ".checkbox-selector"} // Check a checkbox input
{"uncheck": ".checkbox-selector"} // Uncheck a checkbox input
{"select_option": [".select-selector", "option_value"]} // Select an option by its value
{"scroll_y": 1500} // Vertical scroll in pixels
{"scroll_x": 1500} // Horizontal scroll in pixels
{"evaluate": "document.body.style.backgroundColor = '#c4b5fd';"} // Execute JavaScript code
Click on an element
You can click on any element on the page, the most common ones being buttons or links. This action is commonly used with wait_for to allow the lazy loading of some components. Read more, view reviews, or item details are some examples of what can be achieved.
[
	{"click": ".read-more-selector"}
]
Wait For Selector
Wait for an element to be present by the provided CSS Selector. Useful for cases when the initial load does not contain the needed data, like Singles Page Applications (i.e., Twitter). Or, as seen above, to wait for elements to load after clicking on an item or submitting a form.
[
	{"wait_for": ".late-selector"}
]
Wait Amount of Milliseconds
Wait for a given amount of time in milliseconds. "wait": 1000 will wait for a second.
[
	{"wait": 1000}
]
Fill in an Input
Fill in an input with any given value. Contrary to the previous instructions, fill accepts an array with two strings. The first will be the CSS Selector on the input you want to fill in. And the second is the value you want to set.
Run this command with forms, for example, for logging in. The code below will locate an input with the name username. A second one for the password and then clicking on the submit button would be valid instructions.
[
	{"fill": ["input[name='username']", "MyUsername"]}
]
Check a Checkbox Input
Checks an element matching the provided CSS Selector. It will work for checkbox and radio inputs.
Calling check on an already checked input will not uncheck it. See the next section for that.
[
	{"check": "input[name='remember']"}
]
Uncheck a Checkbox Input
Unchecks an element matching the provided CSS Selector. It will work for checkbox and radio inputs.
[
	{"uncheck": "input[name='remember']"}
]
Select an Option by its Value
Select an option from a dropdown by its value. As with fill, an array with two strings is required. The first is the selector, and the second is the option’s value.
[
	{"select_option": ["input[name='countries']", "USA"]}
]
Scroll Y
Scroll the page vertically by the given amount of pixels. Below is the example for scrolling 1500 px.
[
	{"scroll_y": 1500}
]
Scroll X
Scroll the page horizontally by the given amount of pixels. Below is the example for scrolling 1500 px.
[
	{"scroll_x": 1500}
]
Execute JavaScript Code
Use these instructions to execute custom JavaScript on the page. If none of the previous ones fits your needs, you can write JavaScript code, and ZenRows will run it. Let’s say you want to scroll to a given element to trigger a “load more” event. And then, you can add another instruction to wait for the new part to load.
[
	{"evaluate": "document.querySelector('.load-more-item').scrollIntoView();"}
]
Solve CAPTCHAs
ZenRows already bypasses CAPTCHAs that get in your way to prevent you from accessing web pages. But you can integrate a paid solver (2Captcha) if you encounter an in-page CAPTCHA, like for submitting a form. You will need to add your solver’s API Key on the integrations section.
Solve a CAPTCHA given the type, currently supported ones are hCaptcha and reCAPTCHA. For invisible CAPTCHAs, send solve_inactive set as true inside options.
[
	{"solve_captcha": {"type": "hcaptcha"}},
	{"solve_captcha": {"type": "recaptcha"}},
	{"solve_captcha": {"type": "hcaptcha", "options": {"solve_inactive": true}}},
	{"solve_captcha": {"type": "recaptcha", "options": {"solve_inactive": true}}}
]
For more details on the resolution, you can add JSON Response to get a detailed summary of the JS Instructions.
{
    "instruction": "solve_captcha",
    "success": true,
    "params": {
        "options": null,
        "type": "hcaptcha"
    },
    "result": [
        {
            "id": "xxxxxxxxx",
            "solved": true,
            "solved_at": "2024-01-01T00:00:00.000Z"
        }
    ],
    "duration": 12345
}
Instructions Inside Iframes
The instructions mentioned above won’t work inside iframes. We need a new set for that and they will be prefixed with frame_. The syntax is similar but with an extra parameter to choose the iframe.
[
	{"frame_click": ["#iframe", ".read-more-selector"]}
]
For security, iframe’s content isn’t returned on the response. To get than content, use frame_reveal. It will append a node with the content encoded in base64 to avoid problems with JS or HTML inyection. The new node will have an attribute data-id with the given param and a iframe-content-element class.
[
	{"frame_reveal": "#iframe"}
	// <div class="iframe-content-element" style="display: none;" data-id="#iframe">...</div>
]
Debug JS Instructions
To see a detailed report of the JS Instructions’ execution, set json_response to true. That will return the result in JSON format, one of the fields being js_instructions_report. Useful for testing and debugging. For more details, check the JSON Response documentation.
Here is an example report:
{
	"html": "...",
	"xhr": [],
	"js_instructions_report": {
		"instructions_duration": 1041,
		"instructions_executed": 2,
		"instructions_succeeded": 2,
		"instructions_failed": 0,
		"instructions": [{
			"instruction": "wait_for_selector",
			"params": {
				"selector": "div"
			},
			"success": true,
			"duration": 40
		}, {
			"instruction": "wait",
			"params": {
				"timeout": 1000
			},
			"success": true,
			"duration": 1001
		}]
	}
}
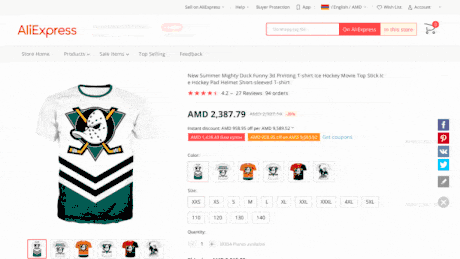
Example Using Instructions
What does a real example look like? We will use an AliExpress product page for a demo. We can summarize the process in a few steps:
- We wait for the selectors to appear and choose the color and size.
- Add to cart and wait for the cart modal to appear. We click on “View Shopping Cart,” which redirects us to a different page.
- Wait for the Cart page to load and check the added element.
- Click on “Buy” and fill in the registration form with an email and password.
[
	{"wait_for": ".sku-property-list .sku-property-image"},
	{"click": ".sku-property-list .sku-property-image"},
	{"click": ".sku-property-list .sku-property-text"},

	{"click": ".product-action button.addcart"},
	{"wait_for": ".addcart-result"},
	{"click": "button.view-shopcart"},

	{"wait_for": ".shopping-cart-list"},
	{"check": ".shopping-cart-product input[type='checkbox']"},

	{"click": "#checkout-button"},
	{"wait_for": ".batman-channel-other"},
	{"click": ".batman-channel-other"},
	{"wait_for": "#batman-dialog-overlay-wrap input"},
	{"fill": ["#batman-dialog-overlay-wrap input", "user@example.com"]},
	{"fill": ["#batman-dialog-overlay-wrap input[type='password']", "myPass1234"]},
]
It shows only part of the potential that this functionality adds. You could calculate different shipping prices by changing the shipping address. Or execute custom JavaScript logic with evaluate to click an element from a list. The possibilities are endless.
Although we show examples with login forms, we discourage this usage. It would require you to log in to every request. If you need to scrape content as a logged-in user, don’t hesitate to contact us.