Selenium Integration with ZenRows
Selenium is the most popular headless browser library, but anti-scraping technologies can identify and block it. You can avoid that with a ZenRows Selenium integration.
Here, you’ll learn:
Option 1: Integrate Selenium with ZenRows’ Proxies to Avoid Getting Blocked
When performing requests with Selenium, ZenRows will equip you with premium proxies from 195+ countries that auto-rotate your IP address and User Agent header. That anonymizes your requests and increases your chances of flying under the radar when web scraping.
For this tutorial, we’ll use httpbin.io/get as the target page to show that your IP and User Agent are auto-rotated with ZenRows. As a starting point, suppose you have the most basic Selenium scraper you can write. It visits the site in Chrome and retrieves the content page from it.
# installed selenium 4.11+
from selenium import webdriver
from selenium.webdriver.chrome.service import Service

from selenium.webdriver.common.by import By

# initialize a controllable Chrome instance
# in headless mode
service = Service()
options = webdriver.ChromeOptions()
options.add_argument("--headless=new")
driver = webdriver.Chrome(service=service, options=options)

# visit the target site in the browser
driver.get("https://httpbin.io/get/")

# get the page content and print it
response = driver.find_element(By.TAG_NAME, "body").text
print(response)

driver.quit()
Follow the steps below to integrate it with ZenRows premium proxies!
Step 1: Sign Up for ZenRows
Create a ZenRows account to get your API key and 1,000 free credits right away. You’ll also gain access to a support chat 24/7 by experienced developers.
If you already have an account, log in.
Step 2: Set Up Your Proxy
You’ll get to the Request Builder page:
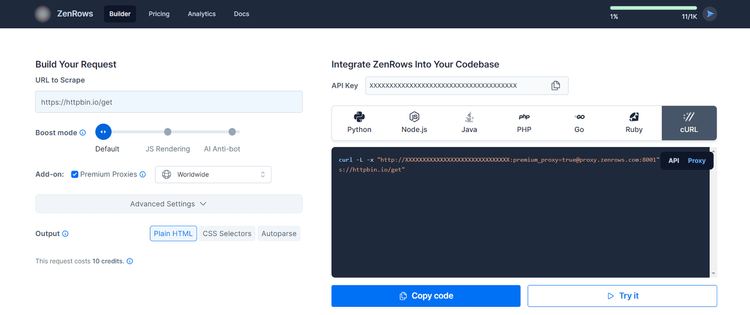
Here, paste your target URL (https://httpbin.io/get) and activate the Premium Proxy add-on. Then, select “cURL” to get your proxy URL to set in Selenium, and naturally select the “Proxy” connection mode.
Copy the endpoint (the one in between quotation marks). As seen in the screenshot, it looks like this:
http://<YOUR_ZENROWS_API_KEY>:premium_proxy=true@proxy.zenrows.com:8001
You’re ready to integrate the ZenRows proxy into Selenium.
Step 3: Set the Premium Proxy Endpoint in Selenium
Since Chrome doesn’t support authenticated proxies, you’ll need selenium-wire. Install it:
pip install selenium-wire
Use the proxy setting to configure a proxy at the browser level in Selenium. Below, replace <ZENROWS_PREMIUM_PROXY_URL> with the URL of the proxy generated in the previous step.
service = Service()
options = webdriver.ChromeOptions()
options.add_argument("--headless=new")
# configure the ZenRows proxy
proxy_url = "<ZENROWS_PREMIUM_PROXY_URL>"
seleniumwire_options = {
    "proxy": {
        "http": f"{proxy_url}"
    },
}
driver = webdriver.Chrome(
    service=service,
    seleniumwire_options=seleniumwire_options,
    options=options
)
Put it all together in your script (e.g., scraper.py):
from seleniumwire import webdriver
from selenium.webdriver.chrome.service import Service
from selenium.webdriver.common.by import By

# initialize a controllable Chrome instance
# in headless mode with a proxy
service = Service()
options = webdriver.ChromeOptions()
options.add_argument("--headless=new")
# configure the ZenRows proxy
proxy_url = "<ZENROWS_PREMIUM_PROXY_URL>"
seleniumwire_options = {
    "proxy": {
        "http": f"{proxy_url}"
    },
}
driver = webdriver.Chrome(
    service=service,
    seleniumwire_options=seleniumwire_options,
    options=options
)

# visit the target site in the browser
driver.get("https://httpbin.io/get")

# get the page content and print it
response = driver.find_element(By.TAG_NAME, "body").text
print(response)

driver.quit()
Next, run the code:
python scraper.py
It’ll print an output as follows. You can see origin is the IP the request comes from, and User-Agent is the header string used. Every time you launch the script, you’ll see different ones.
{
    "args": {},
    "headers": {
    "Accept": [
        "text/html,application/xhtml+xml,application/xml;q=0.9,image/avif,image/webp,image/apng,*/*;q=0.8,application/signed-exchange;v=b3;q=0.7"
    ],
    #... omitted for brevity...
    "User-Agent": [
        "Mozilla/5.0 (Windows NT 10.0; Win64; x64) AppleWebKit/537.36 (KHTML, like Gecko) Chrome/114.0.0.0 Safari/537.36"
    ]
    },
    "origin": "154.13.125.147:28627",
    "url": "http://httpbin.io/get"
}
Well done! You just integrated ZenRows’ premium rotating proxies into Selenium. 🎉
Next, you’ll get some pieces of advice to make the most of your integration and see how to solve any errors that might appear.
Best Practice: Block Resources
To save time and machine resources on page rendering, a best practice is to block all resources you can happily ignore: Prevent the browser from loading fonts, images, JavaScript scripts, and any you don’t need.
Keep also in mind that ZenRows charges for each successful request. So, reducing the requests performed by Selenium also helps you save API credits. That’s because Selenium will make a lot of them to render the page, but you usually only need a few of them for web scraping.
For example, you can block image loading and JS scripts this way:
options = webdriver.ChromeOptions()
options.add_experimental_option(
    "prefs", {
        # block image loading
        "profile.managed_default_content_settings.images": 2,
        # block JavaScript
        "profile.managed_default_content_settings.javascript": 2
    }
)
Learn how to block resources in Selenium in our guide.
Error Solving: SSL Certificate
Visiting a site through a proxy might introduce some SSL certificate errors as below:
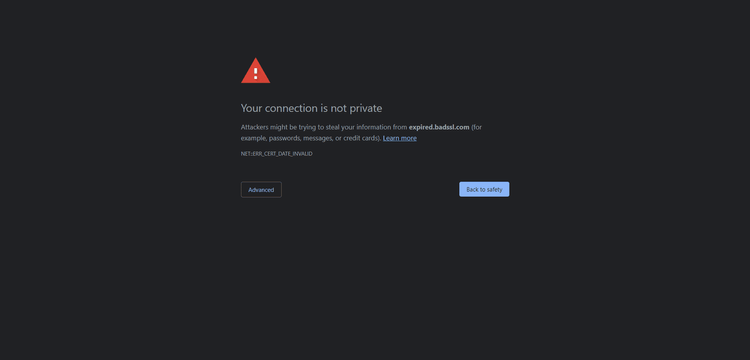
Instruct Chrome to ignore SSL/certificate errors by setting the accept_insecure_certs option to True:
options = webdriver.ChromeOptions()
options.accept_insecure_certs = True
Selenium will now be able to access the real page content.
Error Solving: Concurrent Requests
On a free trial, ZenRows allows 5 concurrent requests with no queuing or auto-retry. The problem with that is the browser controlled by Selenium might need to perform several calls at the same time to load the target page. Thus, some of them might end up in a 429 Too Many Requests error.
To avoid this issue:
- Configure Selenium to avoid loading unnecessary resources.
- Switch to a ZenRows paid plan to gain access to a higher level of concurrency.
FAQ: What Happens if You Use ZenRows’s JavaScript Rendering with Selenium?
If you configure a ZenRows proxy with JavaScript rendering while using Selenium, the following will happen:
- Both ZenRows and Selenium will render the page: ZenRows will render the original page and execute the optional JS instructions. Selenium will then render the resulting HTML page returned by ZenRows. That only introduces a useless overhead.
- You’ll lose the session: The original session ends when ZenRows returns the page to Selenium. So, interacting with the page in the headless browser will be seen by the target site as an action coming from a new entity. That makes interaction with the page unnatural and may also trigger anti-bot systems.
In short, double rendering doesn’t make sense because it leads to performance and effectiveness issues.
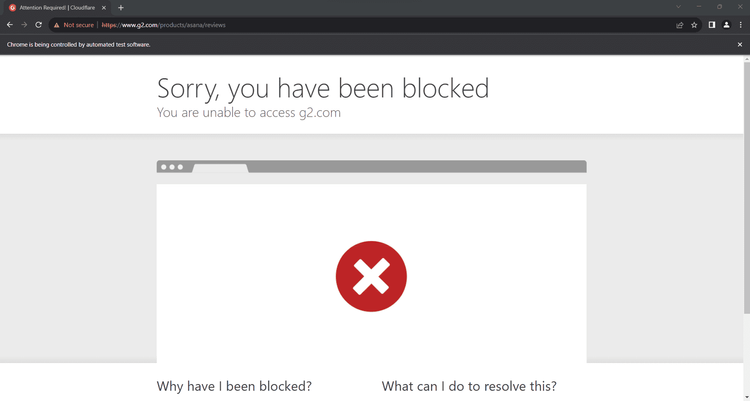
Anti-bot Bypass Limitations: CAPTCHA and Beyond
Many real-world sites like G2.com protect their pages with advanced anti-bot systems. These can detect and block automated requests, preventing your script from accessing the site.
Bypassing their measures with proxies isn’t easy (some of them even use machine learning!), and tweaking Selenium with extra logic isn’t enough. The solution is to replace Selenium with ZenRows.
ZenRows provides the same JavaScript rendering and interaction capabilities as Selenium but comes with the most complete toolkit to avoid getting blocked. As you’ll see in the section below, this makes it the ideal Selenium alternative.
Option 2: Replace Selenium with ZenRows to Unlock the Best Anti-bot Toolkit
ZenRows is more efficient and effective than Selenium and reduces maintenance because the provider keeps it up to date for you. Also, don’t forget that Selenium is costly in terms of both money and server scalability.
Now, let’s see how to replace Selenium with ZenRows and prove you can scrape everything with it.
Step 1: Get Your ZenRows Account
Create a ZenRows account to get your API key and 1,000 free credits, or log in.
Step 2: Configure Your Request
Reach the Request Builder page.
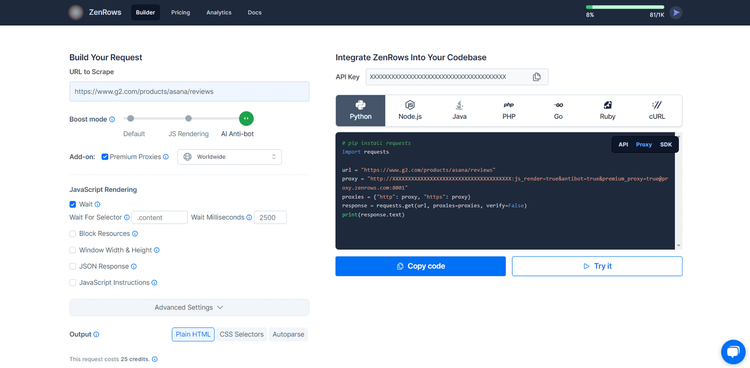
Here, paste your target URL (use https://www.g2.com/products/asana/reviews to test advanced anti-bot bypass), activate JS rendering and add Premium Proxies. Additionally, it’s recommended to use the “Wait For Selector” option with a CSS Selector.
Next, choose your programming language. If your desired language isn’t in the list, select “cURL” to get the full endpoint that you can call with any HTTP client.
Lastly, select the “API” connection mode, as it’s ideal for developers looking to use ZenRows with any programming language. When available, “SDK” is also a suitable option.
Let’s scrape the page now.
Step 3: Scrape Using the API
You can test the API directly in the Request Builder by clicking the “Try it” button. Once you’ve seen it works, go ahead and integrate it into your codebase.
ZenRows executes the request, including web page interactions, and returns the HTML content of the page. In other words, it provides an equivalent result to Selenium, but without getting blocked!
Click the “Copy code” button to retrieve your Python code (but again, ZenRows works with any programming language) and paste it into your codebase:
# pip install requests
import requests

url = "https://www.g2.com/products/asana/reviews"
apikey = "<YOUR_ZENROWS_API_KEY>"
params = {
    "url": url,
    "apikey": apikey,
    "js_render": "true",
    "premium_proxy": "true",
    # 'js_instructions': your JS instructions...,
}
response = requests.get("https://api.zenrows.com/v1/", params=params)
print(response.text)
Then, install the request library (any other HTTP request library will also work):
pip install requests
Now, execute your script:
python scraper.py
It’ll print the output below:
<!DOCTYPE html>
<head>
<meta charset="utf-8" />
<link href="https://www.g2.com/assets/favicon-fdacc4208a68e8ae57a80bf869d155829f2400fa7dd128b9c9e60f07795c4915.ico" rel="shortcut icon" type="image/x-icon" />
<title>Asana Reviews 2023: Details, Pricing, & Features | G2</title>
<!-- omitted for brevity ... -->
That’s the HTML content of the target page. Selenium would be blocked, but not ZenRows!
Fantastic! You just overcome the limitations of Selenium with ZenRows. 👏
Pricing
ZenRows charges for successful requests only, not per bandwidth. That means requests that don’t produce a successful result are free.
Integrating ZenRows in Selenium will cost you as low as 10 credits per successfully loaded page.
To maximize the success rate of your scraper, we recommend using ZenRows. And since pages on the same site may have different levels of protection, we recommend using the parameters mentioned above to cover all scenarios. In this case, each successful request will cost 25 credits.
ZenRows offers several plans starting as low as $49 per month. For detailed information, check out our pricing page.