You're about to learn how to do web scraping with Cheerio in NodeJS.
This tutorial will take you through how to use Cheerio to scrape Pokémon data from an example website, and then create a JSON file from the data. Here we aim to teach you how you can use Cheerio in NodeJS to scrape any kind of web page, using Axios as an HTTP request client.
Are you ready to learn? Let's get right into it!
What Is Cheerio?
Cheerio is a fast and flexible JavaScript library built over htmlparser2, with a similar implementation to jQuery that's specifically designed for server-side DOM manipulation. It also provides robust APIs for parsing and traversing markup data.
For all newbies out there, read this introduction to web scraping with JavaScript and Node.js. And if you're unfamiliar with the jQuery syntax, a good Cheerio scraping alternative is Puppeteer.
Prerequisites
To follow this guide, you need to meet some important prerequisites!
You have to be fluent in JavaScript and Node.js. Also, make sure you have these installed on your device:
- Node.js
- npm
- Code editor (e.g., VS Code or Atom)
If you're unsure whether you have these on your computer, you can check that by running node -v and npm -v in your terminal.
Cheerio Example Usage
Let's explore precisely how the tool works:
To get your scraping project started, you need to pass markup data for Cheerio to load and build a DOM. This is performed by the load function. After loading in the markup and initializing Cheerio, you can begin manipulating and traversing the resulting data structure with its API.
Here's an example:
const cheerio = require('cheerio');

const $ = cheerio.load('<h2 class="title">Hello world</h2>') // Load markup

// Use a selector to grab the title class from the markup and change its text
$('h2.title').text('Hello there!');
$('h2').addClass('welcome'); // Add a 'welcome' class to the markup

console.log($.html()); // The html() method renders the document
This logs the following to the console:
<html><head></head><body><h2 class="title welcome">Hello there!</h2></body></html>
Note that Cheerio will automatically include <html>, <head>, and <body> elements in the rendered markup, just like we have in browser contexts (only if they aren't already present). However, you can disable this behavior by adding false as a third argument to the load. See how it works:
// ...
const $ = cheerio.load('<h2> class="title">Hello world</h2>', null, false)
// ...
Cheerio's selector API
Time to dive deeper into Cheerio's selectors that can be used to traverse and manipulate markup data! If you've used jQuery before, you'll find that the selector API implementation is quite similar to it.
The function has the following structure: $(selector, [context], [root]).
-
selector: Used for targeting specific elements in markup data. It's the starting point for traversing and manipulating the information. It can be a string, a DOM element, an array of elements, or Cheerio objects. -
context: Defines the scope or where to begin looking for the target elements. It's optional and can also take the same forms as the above element. -
root: The markup string you want to traverse or manipulate.
You can load the markup data directly with the selector API. See what that looks like below:
const cheerio = require('cheerio');

const $ = cheerio.load('')

// This loads the HTML data, selects the last list item and returns its text content.
console.log($('li:last', 'ul', '<ul id="fruits"><li class="apple">Apple</li><li class="orange">Orange</li><li class="pear">Pear</li></ul>').text())
Note that the above method isn't recommended for loading data. This means that you should only use it in rare cases. For example, given the following HTML markup:
<ul id="fruits">
	<li class="apple">Apple</li>
	<li class="orange">Orange</li>
	<li class="pear">Pear</li>
</ul>
We can target the list item with a class name of apple:
const cheerio = require('cheerio');

const $ = cheerio.load('<ul id="fruits"><li class="apple">Apple</li><li class="orange">Orange</li><li class="pear">Pear</li></ul>', null, false) // Load markup

// Target the list item with 'apple' class name, then return its text content
console.log($('li.apple').text())
Here are additional selectors you can try:
-
$('li:last'): Returns the last list item. -
$('li:even'): Returns all even<li>elements.
Almost all jQuery selectors are compatible, so you aren't limited to what you can 'find' in a given markup data. You can refer to a comprehensive list here.
Extracting Data With Regex
Another option is using Regex patterns with JavaScript's string match() method.
Understand how this works with an example:
Given the following HTML markup, which contains a list of usernames:
<ul class='usernames'>
	<li>janedoe</li>
	<li>maxweber</li>
	<li>greengoblin</li>
	<li>maxweber34</li>
	<li>alpha123</li>
	<li>chrisjones</li>
	<li>amelia</li>
	<li>mrjohn34</li>
	<li>matjoe212</li>
	<li>eliza</li>
	<li>commando007</li>
</ul>
We can search and return all that include digits like this:
const cheerio = require('cheerio');

const markup = '<ul class="usernames"><li>janedoe</li><li>maxweber</li><li>greengoblin</li<li>maxweber34</li><li>alpha123</li><li>chrisjones</li><li>amelia</li><li>mrjohn34</li><li>matjoe212</li><li>eliza</li><li>commando007</li></ul>'

const $ = cheerio.load(markup); // Load markup and initialize Cheerio

const usernames = $('.usernames li'); // Get all list items

const usernamesWithDigits = [];

usernames.each((index, el) => {
	const regex = /\d/; // Search for usernames that contain digits
	const hasNumber = $(el).text().match(regex);
	if (hasNumber !== null) {
		usernamesWithDigits.push(hasNumber.input)
	}
})

console.log(usernamesWithDigits) // Log usernames that contain digits to the console.
The above code logs the following to the console:

How to Use Cheerio to Scrape a Web Page
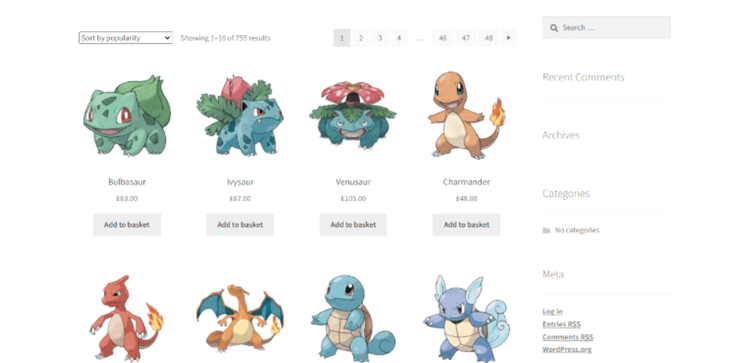
Get ready! You're all set to use Cheerio for some real-live scraping. We'll use ScrapeMe as a playground to test our skills:

Let's get started!
Step #1: Create a Working Directory
First things first, you'll need a project repository. Run the command below to create one:
mkdir cheerio-web-scraping && cd cheerio-web-scraping
We decided to name our project cheerio-web-scraping. If you wish, you can always for a more creative approach.
Step #2: Initialize a Node Project
While in the project directory, run the following command:
npm init -y
It'll create a new project with a package.json file for configuration.
Note that using the -y flag will automatically skip the interactive prompts and configure the project.
Step #3: Install Project Dependencies
Time to install the necessary dependencies for our project. Running the command below will install the packages:
npm install cheerio axios
Those would be:
- Cheerio: The main package we'll use for scraping.
- Axios: A promise-based HTTP client for browsers and Node.js.
Step #4: Inspect the Target Website
Before anything, it's crucial to get familiar with your target site's structure and content. This will be your guide when coding, so you shouldn't waste time with useless information. Use your browser's Developer Tools for the purpose.
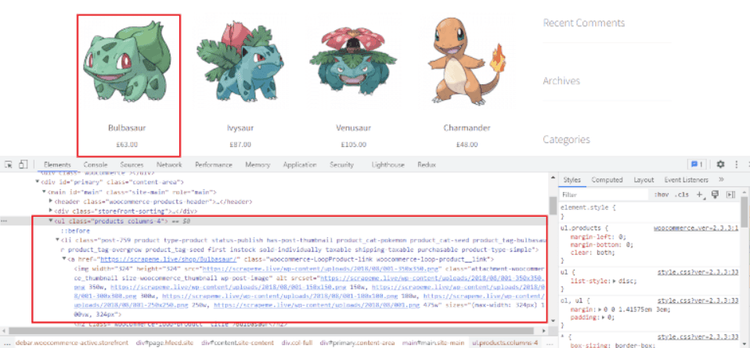
We're using Chrome's DevTools to inspect ScrapeMe. We want to scrape three characteristics from every Pokémon: picture URL, name, and price.
Let's first inspect our website using DevTools:

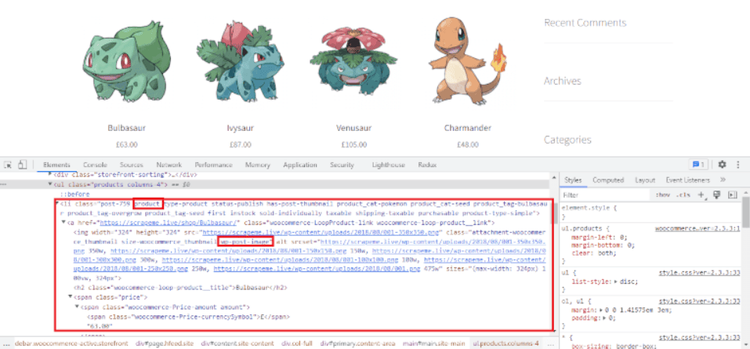
As shown, a <ul> element with a class name of products contains a list of all Pokémons. We can also see that each list element has a class name of product and contains all the data we want to scrape.

We're all set! Let's write some code:
Step #5: Write the Code
Create an index.js file in your project root directory. Open it and paste the code:
const axios = require('axios');
const cheerio = require('cheerio');
const fs = require('fs');

const targetURL = 'https://scrapeme.live/shop/';

const getPokemons = ($) => {
	// Get all list items from the unodered list with a class name of 'products'
	const pokemons = $('.products li');
	const pokemonData = [];
	// The 'each()' method loops over all pokemon list items
	pokemons.each((index, el) => {
		// Get the image, name, and price of each pokemon and create an object
		const pokemon = {}

		// Selector to get the image 'src' value of a pokemon
		pokemon.img = $(el).find('a > img').attr('src');
		pokemon.name = $(el).find('h2').text(); // Selector to get the name of a pokemon
		pokemon.price = $(el).find('.amount').text(); // Selector to get the price of a pokemon
		pokemonData.push(pokemon)
	})

	// Create a 'pokemon.json' file in the root directory with the scraped pokemonData
	fs.writeFile("pokemon.json", JSON.stringify(pokemonData, null, 2), (err) => {
		if (err) {
			console.error(err);
			return;
		}
		console.log("Data written to file successfully!");
	});
}

// axios function to fetch HTML Markup from target URL
axios.get(targetURL).then((response) => {
	const body = response.data;
	const $ = cheerio.load(body); // Load HTML data and initialize cheerio
	getPokemons($)
});
Don't worry! We'll explain what's going on above:
Our scraper code contains a major function scraper(). In it, we have another one named getPokemons. We're writing the actual scraping code in that one. Our script uses Cheerio's selectors to search for the target Pokémon data.
To do so, we use the selector $('.products li') to get all <li> items from the element with a .products class name (in this case, a <ul> element). This returns a Cheerio object containing all list items. We then use Cheerio's each()` method to iterate over the object and run a callback function that executes for each list item in it.
Here are the selectors searching through the markup for our target data. Let's go through them:
-
$(el).find('a > img').atrr('src'): This selector goes through a list item, searches for an<img>element with thefind()traversing method and returns the value of thesrcattribute using Cheerio'sattr()method. All that to get the Pokémon's img URL. -
$(el).find('h2').text(): This retrieves the product's name. To do so, it searches for an<h2>element in a list item using thefind()traversing method and returns the text content. -
$(el).find('.amount').text(): All that's left is the price. To get it, this selector finds an element with a class name of.amount(in this case, a<span>element) and returns its text content.
The pokemon object holds the data for each one. That's later pushed into a pokemonData array containing all scraped products.
All that's left to do is create a JSON file from the array. For this, we use fs.writeFile, which writes data to a file asynchronously. It takes a callback function, and in it, we use the JSON.stringify() method to convert the pokemonData array into a JSON string.
Open the package.json file and paste the code:
// ...
"scripts": {
	"dev": "node index.js"
},
// ...
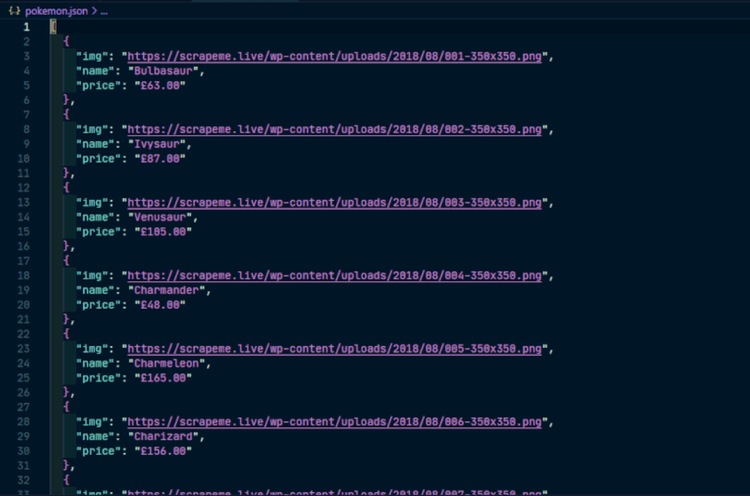
If you run npm run dev in your terminal, then a pokemon.json file should be created automatically. The message "Data written to file successfully!" should also be logged to the console.
This is what our file looks like:

Congratulations! You just built a spider with Cheerio and Node.js. You're now ready to take on every piece of data!
Conclusion
Today, you learned how to scrape data using Cheerio and Axios in Node.js. We've talked you through the process, explained key terminology, and gave you the tools to execute your project's goals.
Still, scraping is quite a challenging endeavor. There are many hoops to jump through, starting with anti-bot detection technologies. You might want to take a look at our guide on web scraping without getting blocked. Or just try ZenRows' premium service—it handles all anti-bot bypass for you, from rotating proxies and headless browsers to CAPTCHAs. Sign up for free today!
Did you find the content helpful? Spread the word and share it on Twitter, or LinkedIn.