Scrapy is a Python library that provides a powerful toolkit to extract data from websites and is popular among beginners because of its simplified approach. In this tutorial, you'll learn the fundamentals of how to use Scrapy and then jump into more advanced topics.
Let's dive in!
What Is Scrapy in Web Scraping?
Scrapy is an open-source Python framework whose goal is to make web scraping easier. You can build robust and scalable spiders with its comprehensive set of built-in features.
While the stand-alone options are libraries like Requests for HTTP requests, BeautifulSoup for data parsing and Selenium to deal with JavaScript-based sites, Scrapy offers all their functionality.
It includes:
- HTTP connections.
- Support for CSS Selectors and XPath expressions.
- Data export to CSV, JSON, JSON lines, and XML.
- Ability to store data on FTP, S3, and local file system.
- Middleware support for integrations.
- Cookie and session management.
- JavaScript rendering with Scrapy Splash.
- Support for automated retries.
- Concurrency management.
- Built-in crawling capabilities.
Additionally, its active community has created extensions to further enhance its capabilities, allowing developers to tailor the tool to meet their specific scraping requirements.
Prerequisites
Before getting started, make sure you have Python 3 installed on your machine.
Many systems already have it, so you might not even need to install anything. Verify you have it with the command below in the terminal:
python --version
_Italic_If you do, the command will print something like this:
Python 3.11.3
Note: If you get version 2.x or it terminates in error, you must install Python. Download Python 3.x installer, double-click on it, and follow the wizard. And if you are a Windows user, don't forget to check the “Add python.exe to PATH” option.
You now have everything required to follow this Scrapy tutorial in Python!
How to Use Scrapy in Python: Tutorial from Zero to Hero
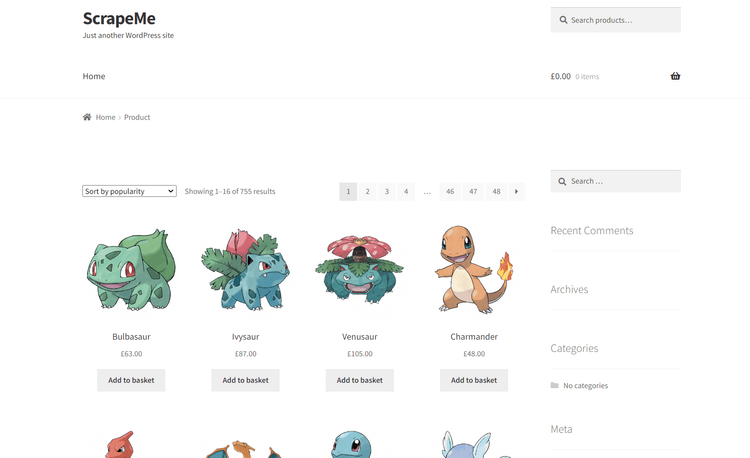
We'll build a Python spider with Scrapy to extract the product data from ScrapeMe, an e-commerce website with a list of Pokémon to buy.
Step 1: Install Scrapy and Start Your Project
Start by setting up a Python project using the below commands to create a scrapy-project directory and initialize a Python virtual environment.
    mkdir scrapy-project
    cd scrapy-project
    python -m venv env
Activate the environment. On Windows, run:
env\Scripts\activate.ps1
On Linux or macOS:
env/bin/activate
Next, install Scrapy using pip install scrapy.
This may take a while, so be patient.
Test that Scrapy works as expected by typing this command:
scrapy
You should get a similar output:

    Scrapy 2.9.0 - no active project

    Usage:
      scrapy <command> \[options\] [args]

    Available commands:
      bench         Run quick benchmark test
      fetch         Fetch a URL using the Scrapy downloader
      genspider     Generate new spider using pre-defined templates
      runspider     Run a self-contained spider (without creating a project)
      settings      Get settings values
      shell         Interactive scraping console
      startproject  Create new project
      version       Print Scrapy version
      view          Open URL in browser, as seen by Scrapy

      [ more ]      More commands available when run from project directory

    Use "scrapy <command> -h" to see more info about a command
Note: The available commands may change depending on the version of Scrapy.
Fantastic! Scrapy is working and ready to use.
Launch the command with the syntax below to initialize a Scrapy project:
scrapy startproject <project_name>
Since the scraping goal is ScrapeMe, you can call the project scrapeme_scraper (or any other name you prefer).
scrapy startproject scrapeme_scraper
Open the project folder in your favorite Python IDE. Visual Studio Code with the Python extension or PyCharm Community Edition will do.
That command will create the folder structure below inside scrapy-project:
├── scrapy.cfg
└── scrapeme_scraper
    ├── __init__.py
    ├── items.py
    ├── middlewares.py
    ├── pipelines.py
    ├── settings.py
    └── spiders
        └── __init__.py
As you can see, a Scrapy web scraping project consists of the following elements:
-
scrapy.cfg: Contains the Scrapy configuration parameters in INI format. Many Scrapy projects may share this file. -
items.py: Defines the item data structure that Scrapy will populate during scraping. Items represent the structured data you want to scrape from websites. Each item is a class that inherits fromscrapy.Itemand consists of several data fields. -
middlewares.py: Defines the middleware components. These can process requests and responses, handle errors, and perform other tasks. The most relevant ones are about User-Agent rotation, cookie handling, and proxy management. -
pipelines.py: Specifies the post-processing operations on scraped items. That allows you to clean, process, and store the scraped data in various formats and to several destinations. Scrapy executes them in the definition order. -
settings.py: Contains the project settings, including a wide range of configurations. By changing these parameters, you can customize the scraper's behavior and performance. -
spiders/: The directory where to add the spiders represented by Python classes.
Great! Time to create your first Scrapy spider!
Step 2: Create Your Spider
In Scrapy, a spider is a Python class that specifies the scraping process for a specific site or group of sites. It defines how to extract structured data from pages and follow links for crawling.
Scrapy supports various types of spiders for different purposes. The most common ones are:
-
**Spider**: Starts from a predefined list of URLs and applies the data parsing logic on them. -
**CrawlSpider**: Applies predefined rules to follow links and extract data from multiple pages. -
**SitemapSpider**: For scraping websites based on their sitemaps.
For now, a default Spider will be enough. Let's create one!
Enter the web scraping Scrapy project directory in the terminal:
cd scrapeme_scraper
Launch the command below to set up a new Scrapy Spider:
scrapy genspider scrapeme scrapeme.live/shop/
Note: The syntax of this instruction is: scrapy genspider <spider_name> <target_web_page>
The scrapeme_spider/spiders folder will now contain the following scrapeme.py file:
import scrapy

 class ScrapemeSpider(scrapy.Spider):
     name = "scrapeme"
     allowed_domains = ["scrapeme.live"]
     start_urls = ["https://scrapeme.live/shop/"]

     def parse(self, response):
         pass
The genspider command has generated a template Spider class, including:
-
allowed_domains: An optional class attribute that allows Scrapy to scrape only pages of a specific domain. This prevents the spider from visiting unwanted targets. -
start_urls: A required class attribute containing the first URLs to start extracting data from. -
parse(): The callback function runs after receiving a response for a specific page from the server. Here, you should parse the response, extract data, and return one or more item objects.
The ScrapemeSpider class will:
- Get the URLs from
start_urls. - Perform an HTTP request to get the HTML document associated with the URL.
- Call
parse()to extract data from the current page.
Run the spider from the terminal to see what happens:
scrapy crawl scrapeme
Underline
    DEBUG: Crawled (200) <GET https://scrapeme.live/robots.txt> (referer: None)
    DEBUG: Crawled (200) <GET https://scrapeme.live/shop/> (referer: None)
    INFO: Closing spider (finished)
First, Scrapy started by fetching the robots.txt file and then connected to the https://scrapeme.live/shop/ target URL. Since parse() is empty, the spider didn't perform any data extraction operation.
You can check out our guide on robots.txt for web scraping to learn more.
Scrapy also logged some useful execution stats:
    {
      'downloader/request_bytes': 487,
      'downloader/request_count': 2,
      'downloader/request_method_count/GET': 2,
      'downloader/response_bytes': 9493,
      'downloader/response_count': 2,
      'downloader/response_status_count/200': 2,
      'elapsed_time_seconds': 1.906444,
      'finish_reason': 'finished',
      'httpcompression/response_bytes': 52669,
      'httpcompression/response_count': 2,
      'log_count/DEBUG': 5,
      'log_count/INFO': 10,
      'response_received_count': 2,
      'robotstxt/request_count': 1,
      'robotstxt/response_count': 1,
      'robotstxt/response_status_count/200': 1,
      'scheduler/dequeued': 1,
      'scheduler/dequeued/memory': 1,
      'scheduler/enqueued': 1,
      'scheduler/enqueued/memory': 1
    }
Note: elapsed_time_seconds is especially useful to keep track of the running time.
Perfect, everything works as expected! The next step is to define parse() to start extracting the data you want.
Step 3: Parse HTML Content
You need to devise an effective selector strategy to find HTML elements in the tree to extract information from them.
First, open the page in the browser, right-click on a product area, and select the "Inspect" option. The DevTools section will open:
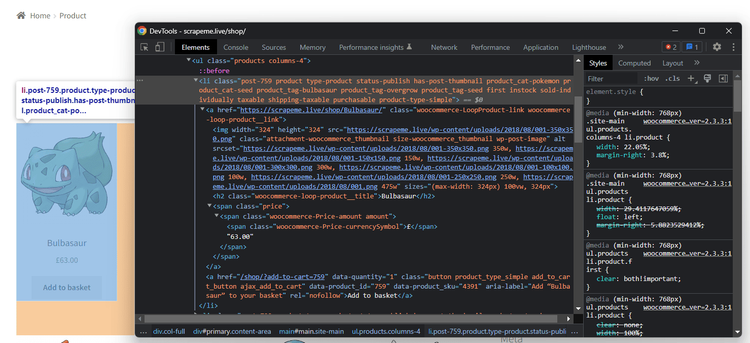
Then, take a look at the HTML code and note that you can get all product elements with this CSS selector:
li.product
Note: li is a list element, and product is a class.
Given a product node, the useful information to collect is:
- The product URL is in the
<a>. - The product image is in the
<img>. - The product name is in the
<h2>. - The product price is in the
.price<span>.
To test CSS expressions or XPath, you can use Scrapy Shell. Run this command to launch an interactive shell where you can debug your code without having to run the spider:
scrapy shell
Then, connect to the target site:
fetch("https://scrapeme.live/shop/")
Wait for the page to be downloaded:
DEBUG: Crawled (200) <GET https://scrapeme.live/shop/> (referer: None)
And test the CSS selector:
response.css("li.product")
This will print:
    [
      <Selector query="descendant-or-self::li[@class and contains(concat(' ', normalize-space(@class), ' '), ' product ')]" data='<li class="post-759 product type-prod...'>,
      <Selector query="descendant-or-self::li[@class and contains(concat(' ', normalize-space(@class), ' '), ' product ')]" data='<li class="post-729 product type-prod...'>,
      # ...
      <Selector query="descendant-or-self::li[@class and contains(concat(' ', normalize-space(@class), ' '), ' product ')]" data='<li class="post-742 product type-prod...'>,
      <Selector query="descendant-or-self::li[@class and contains(concat(' ', normalize-space(@class), ' '), ' product ')]" data='<li class="post-743 product type-prod...'>
    ]
Verify it contains all the product nodes:
len(response.css("li.product")) # 16 elements will print
Now, create a variable to test the selector strategy on a single product:
product = response.css("li.product")[0]
For example, retrieve the URL of a product image:
product.css("img").attrib["src"] # 'https://scrapeme.live/wp-content/uploads/2018/08/001-350x350.png'
Play with Scrapy Shell until you're ready to define the data retrieval logic. Otherwise, achieve your scraping goal with the following parse() implementation:
    def parse(self, response):
        # get all HTML product elements
        products = response.css(".product")
        # iterate over the list of products
        for product in products:
            # get the two price text nodes (currency + cost) and
            # contatenate them
            price_text_elements = product.css(".price *::text").getall()
            price = "".join(price_text_elements)

           # return a generator for the scraped item
            yield {
                "name": product.css("h2::text").get(),
                "image": product.css("img").attrib["src"],
                "price": price,
                "url": product.css("a").attrib["href"],
            }
The function first gets all the product nodes with the [css()](https://docs.scrapy.org/en/latest/topics/selectors.html?highlight=css#scrapy.selector.Selector.css) Scrapy method. This accepts a CSS selector and returns a list of matching elements. Next, it iterates over the products and retrieves the desired information from each of them.
parse() is asynchronous and must return a generator of scrapy.Request or scrapy.Item objects through the yield Python statement. In this case, it returns the generators for the scraped items.
Execute the spider again:
scrapy crawl scrapeme
And you'll see this in the log:
    {'name': 'Bulbasaur', 'image': 'https://scrapeme.live/wp-content/uploads/2018/08/001-350x350.png', 'price': '£63.00', 'url': 'https://scrapeme.live/shop/Bulbasaur/'}
    {'name': 'Ivysaur', 'image': 'https://scrapeme.live/wp-content/uploads/2018/08/002-350x350.png', 'price': '£87.00', 'url': 'https://scrapeme.live/shop/Ivysaur/'}
    # ...
    {'name': 'Beedrill', 'image': 'https://scrapeme.live/wp-content/uploads/2018/08/015-350x350.png', 'price': '£168.00', 'url': 'https://scrapeme.live/shop/Beedrill/'}
    {'name': 'Pidgey', 'image': 'https://scrapeme.live/wp-content/uploads/2018/08/016-350x350.png', 'price': '£159.00', 'url': 'https://scrapeme.live/shop/Pidgey/'}
Wonderful! These represent the Scrapy items and prove that the scraper is extracting the data you wanted from the page correctly.
Step 4: Extract Data in CSV
Scrapy supports some export formats, like CSV and JSON, out of the box. Launch the spider with the -o <file_name>.csv option to export the scraped items to CSV:
scrapy crawl scrapeme -O products.csv
Wait for the spider to complete, and a file named products.csv will appear in your project's folder root:
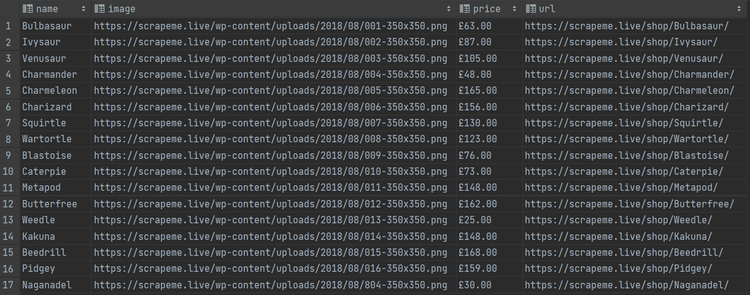
Well done! You now master the Python Scrapy fundamentals for extracting data from the web!
Advanced Scrapy Web Scraping
Now that you know the basics, you're ready to explore more advanced techniques for complex Scrapy tasks.
Avoid Being Blocked While Scraping with Scrapy
The biggest challenge when doing web scraping with Scrapy is getting blocked because many sites adopt measures to prevent bots from accessing their data. Anti-bot technologies can detect and block automated scripts, stopping your spider.
These procedures involve rate limits, fingerprinting, and IP reputation-based bans, among many others. Explore our in-depth guide about popular anti-scraping techniques to learn how to fly under the radar and overcome them.
A critical strategy is requesting access to target sites through proxy servers. By rotating through a proxy pool, you can fool the anti-bot system into thinking you are a different user each time. Take a look at your guide to learn how to integrate proxies in Scrapy.
Customizing your HTTP headers is another necessary aspect for avoiding blocks like Cloudflare in Scrapy since anti-scraping technologies often read the User-Agent header to distinguish between regular users and scrapers. By default, Scrapy uses the User-Agent Scrapy/2.9.0 (+https://scrapy.org), which is easy to spot as non-human. Learn to change and rotate your User Agent in Scrapy with our guide.
Also, many sites adopt CAPTCHAs, WAFs, and JS challenges, to mention some other anti-bot measures. It can get tough and frustrating, but you can bypass all measurs by integrating ZenRows with Scrapy in a few minutes. It gives you rotating premium proxies, User Agent auto-rotation, anti-CAPTCHA and everything you need to succeed.
Web Crawling with Scrapy
You just saw how to go through a single page, but ScrapeMe consists of a paginated list. It's time to put in place some crawling logic to get all products.
Right-click on a pagination number HTML element and select “Inspect.” You'll see this:
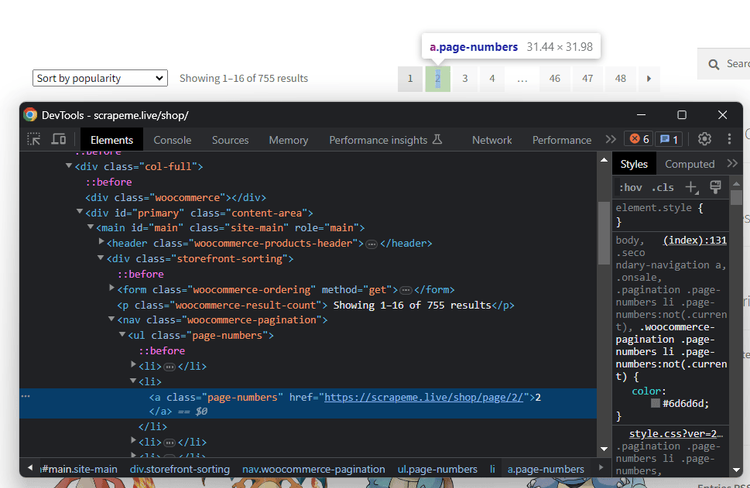
You can select all pagination link elements with the a.page-numbers CSS selector. Retrieve them all with a for loop and add the URL to the list of pages to visit:
    pagination_link_elements = response.css("a.page-numbers")

    for pagination_link_element in pagination_link_elements:
        pagination_link_url = pagination_link_element.attrib["href"]
        if pagination_link_url:
            yield scrapy.Request(
                response.urljoin(pagination_link_url)
            )
By adding that snippet to parse(), you're making a promise to execute those requests soon. In other words, you're adding URLs to the crawling list.
To avoid overloading the target server with a flood of requests and getting your IP banned, add the following instruction to setting.py to limit the pages to scrape to 10. CLOSESPIDER_PAGEACCOUNT specifies the maximum number of responses to crawl.
CLOSESPIDER_PAGECOUNT = 10
Here's what the new parse() function looks like:
    def parse(self, response):
        # get all HTML product elements
        products = response.css("li.product")
        # iterate over the list of products
        for product in products:
            # since the price elements contain several
            # text nodes
            price_text_elements = product.css(".price *::text").getall()
            price = "".join(price_text_elements)

            # return a generator for the scraped item
            yield {
                "name": product.css("h2::text").get(),
                "image": product.css("img").attrib["src"],
                "price": price,
                "url": product.css("a").attrib["href"],
            }

        # get all pagination link HTML elements
        pagination_link_elements = response.css("a.page-numbers")

        # iterate over them to add their URLs to the queue
        for pagination_link_element in pagination_link_elements:
            # get the next page URL
            pagination_link_url = pagination_link_element.attrib["href"]
            if pagination_link_url:
                yield scrapy.Request(
                    # add the URL to the list
                    response.urljoin(pagination_link_url)
                )
Run the spider again, and you'll notice that it crawls many pages:
    DEBUG: Crawled (200) <GET https://scrapeme.live/shop/page/48/> (referer: https://scrapeme.live/shop/)
    DEBUG: Crawled (200) <GET https://scrapeme.live/shop/page/3/> (referer: https://scrapeme.live/shop/)
    DEBUG: Crawled (200) <GET https://scrapeme.live/shop/page/2/> (referer: https://scrapeme.live/shop/)
    # ...
As you can see from the logs, Scrapy identifies and filters out duplicated pages for you:
DEBUG: Filtered duplicate request: <GET https://scrapeme.live/shop/page/2/>
That's because Scrapy doesn't visit already crawled pages by default. Thus, no extra logic is needed.
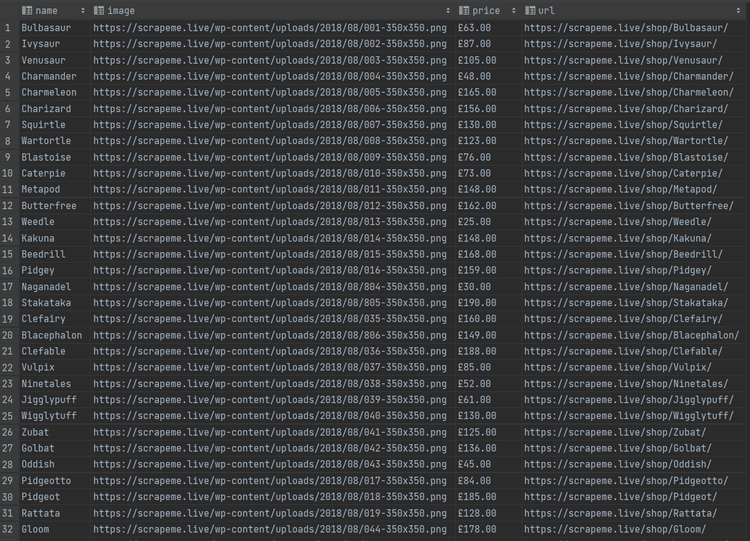
This time, products.csv contains many more records:
An equivalent way to achieve the same result is via a CrawlSpider. This type of crawler provides a mechanism to follow links that match a set of rules. You can omit the crawling logic thanks to its rules section, and the spider will automatically follow all pagination links.
    from scrapy.spiders import CrawlSpider, Rule
    from scrapy.linkextractors import LinkExtractor

    class ScrapemeSpider(CrawlSpider):
        name = "scrapeme"
        allowed_domains = ["scrapeme.live"]
        start_urls = ["https://scrapeme.live/shop/"]

        # crawling only the pagination pages, which have the
        # "https://scrapeme.live/shop/page/<number>/" format
        rules = (
            Rule(LinkExtractor(allow=r"shop/page/\d+/"), callback="parse", follow=True),
        )

        def parse(self, response):
            # get all HTML product elements
            products = response.css("li.product")
            # iterate over the list of products
            for product in products:
                # since the price elements contain several
                # text nodes
                price_text_elements = product.css(".price *::text").getall()
                price = "".join(price_text_elements)

                # return a generator for the scraped item
                yield {
                    "name": product.css("h2::text").get(),
                    "image": product.css("img").attrib["src"],
                    "price": price,
                    "url": product.css("a").attrib["href"],
                }
Perfect! You now know how to perform web crawling with Scrapy.
Using Scrapy for Parallel Web Scraping
The sequential approach to web scraping works (scrape one page, then another, and so on), but it is inefficient and time-consuming in a real project. A better solution is to elaborate multiple pages at the same time.
Parallel computing is the solution, although it comes with several challenges. Definitely, data synchronization issues and race conditions can discourage most beginners. Luckily, Scrapy has built-in concurrent processing capabilities.
Control the parallelism with these two options:
-
CONCURRENT_REQUEST: Maximum number of simultaneous requests that Scrapy will make globally. The default value is
16. -
CONCURRENT_REQUESTS_PER_DOMAIN: Maximum number of concurrent requests that will be performed to any single domain. The default value is
16.
To understand the performance differences from a sequential strategy, set the parallelism level to 1. For that, open settings.py and add the following line:
CONCURRENT_REQUESTS_PER_DOMAIN = 1
If you run the script on 10 pages, it'll take around 25 seconds:
'elapsed_time_seconds': 25.067607
Now, set the concurrency to 4:
CONCURRENT_REQUESTS_PER_DOMAIN = 4
This time, it'll need just 7 seconds:
'elapsed_time_seconds': 7.108833
Wow, that's over 350% improvement! And imagine it at scale.
The right number of simultaneous requests to set changes from scenario to scenario. Keep in mind that too many requests in a limited amount of time could trigger anti-bot systems. Your goal is to scrape a site, not to perform a DDoS attack!
Ease Debugging: Separation of Concerns with Item Pipelines
In Scrapy, when a spider has performed scraping, the information is contained in an item (a predefined data structure that holds your data) and is sent to the Item Pipeline to process it.
An item pipeline is a Python class defined in pipelines.py that implements the process_item(self, item, spider) method. It receives an item as input, processes it, and decides whether it should follow the pipeline or not.
When a spider extracts data from a site, it generates some Scrapy elements. Each of them can go through a pipeline task, which might clean it, check its integrity, or change its format. This stepwise approach to information management helps ensure data quality and reliability.
Here's an example of a pipeline component. The class above makes sure to convert the product price from pounds to dollars. Instead of adding this logic to the scraper, you can separate it into a pipeline. This way, the spider becomes easier to read and maintain.
    from itemadapter import ItemAdapter
    from scrapy.exceptions import DropItem

    class PriceConversionToUSDPipeline:
        currency_conversion_factor = 1.28

        def process_item(self, item, spider):
            # get the current item values
            adapter = ItemAdapter(item)
            if adapter.get("price"):
                # convert the price from pounds to dollars
                adapter["price"] = adapter["price"] * self.currency_conversion_factor
                return item
            else:
                raise DropItem(f"Missing price in {item}")
Pipelines are particularly useful for splitting the scraping process into several simpler tasks. They give you the ability to apply standardized processing to scraped data.
To activate an item pipeline component, you must add its class to settings.py. Use the ITEM_PIPELINES setting:
    ITEM_PIPELINES = {
        "myproject.pipelines.PricePipeline": 300,
        "myproject.pipelines.JsonWriterPipeline": 800,
    }
The syntax is <project name>.pipelines.<component name>:<execution order>
The value assigned to each class determines the execution order. This can go from 0 to 1000, and items go through lower-valued classes first. Follow the docs to learn more about this technique.
Hyper Customization with Middlewares
A middleware is a class inside middlewares.py that acts as a bridge between the Scrapy engine and the spider. It enables you to customize requests and responses at various stages of the process.
There are two types of Scrapy middleware:
- Downloader Middleware: Handles requests and responses between the spider and the page downloader. It intercepts each request and can modify both the request and the response. For example, it allows you to add headers, change User Agents, or handle proxy settings.
- Spider Middleware: Sits between the downloader middleware and the spider. It can process the responses sent to the spider and the requests and items generated by the spider.
Follow the links from the official doc to see how to define them and set them up in your settings.py. Different execution sequences may produce different results, so you can choose which middleware Scrapy should execute and in what order.
Middleware helps you deal with common web scraping challenges. You can use them to build a proxy rotator, rotate User-Agents, and throttle or delay requests to avoid overwhelming the target server.
With the right middleware logic, handling errors, retries, and avoiding anti-bot becomes far more intuitive!
Scraping Dynamic-Content Websites
Scraping sites that rely on JavaScript to load and/or render content is challenging. The reason is that dynamic-content pages load data on-the-fly and update the DOM dynamically. Thus, traditional approaches aren't effective with them.
This is a problem as more and more sites and web apps are now dynamic. To get data from them, you need specialized tools that can run JavaScript.
Two popular options for scraping these sites with Scrapy are:
-
Scrapy Splash: Splash is a headless browser rendering service with an HTTP API. The
scrapy-splashmiddleware extends Scrapy by allowing JavaScript-based rendering. Thanks to it, you can achieve Scrapy JavaScript scraping. Check out our Scrapy Splash tutorial. - Scrapy with Selenium: Selenium is one of the most popular web automation frameworks. By combining Scrapy with Selenium, you can control web browsers. This approach enables you to render and interact with dynamic web pages.
Another option is using Playwright with Scrapy.
Conclusion
In this Python Scrapy tutorial, you learned the fundamentals of web scraping. You started from the basics and dove into more advanced techniques to become a Scrapy web scraping expert!
Now you know:
- What Scrapy is.
- How to set up a Scrapy project.
- The steps required to build a basic spider.
- How to crawl an entire site.
- The challenges in web scraping with Python Scrapy.
- Some advanced techniques.
Bear in mind that your Scrapy spider may be very advanced, but anti-bot technologies will still be able to detect and ban it. Avoid any blocks integrating with ZenRows, a web scraping API with premium proxies and the best anti-bot bypass toolkit. Try it for free!
Frequent Questions
What Does Scrapy Do?
What Scrapy does is give you the ability to define spiders to extract data from any site. These are classes that can navigate web pages, extract data from them, and follow links. Scrapy takes care of HTTP requests, cookies, and concurrency, letting you focus on the scraping logic.
Is Scrapy Still Used?
Yes, Scrapy is still widely used in the web scraping community. It has maintained its popularity thanks to its robustness, flexibility, and active development. It boasts nearly 50k GitHub stars and its last release was just a few months ago.
What Is Scrapy Python Used for?
Scrapy Python is mainly used for building robust web scraping tasks, and it provides a powerful and flexible framework to crawl sites in a structured way. Scrapy offers Python tools to navigate through pages, retrieve data using CSS Selectors or XPath, and export it in various formats. This makes it a great tool for dealing with e-commerce sites, news portals, or social media platforms, for example.
What Is the Disadvantage of Scrapy?
One disadvantage of Scrapy is that it has a steeper learning curve compared to other tools. For example, BeautifulSoup is easier to learn and use. In contrast, Scrapy requires familiarity with its unique concepts and components. You need to have a deep understanding of how it works before getting the most out of it.
Did you find the content helpful? Spread the word and share it on Twitter, or LinkedIn.