You'll need to run a browser while scraping to interact with web pages (clicking buttons, filling forms…) and load JavaScript-based elements. Playwright is a popular library that will allow you to do that and faster than other alternatives.
Let's learn Playwright web scraping in Python and Node.js!
What Is Playwright?
Playwright is an open-source framework built on Node.js, but compatible with most popular programming languages, that will help you automate web browsing tasks. And it works with Google Chrome, Microsoft Edge, Firefox and Safari.
With a user-friendly syntax, even those new to programming can easily learn the framework and accomplish their goals.
Playwright has a headless browser mode, which significantly shortens page loading and data extraction times. Due to the lack of a Graphical User Interface (GUI), it also uses fewer memory resources than a regular browser.
Install Playwright
Let's go through the installation process in Python and Node.js.
How To Install & Launch Playwright for Python
First, install the playwright package via pip and the necessary browser instances we'll use later. Remember that it can take some time to download Chromium, WebKit, and Firefox.
pip install playwright
playwright install
By default, the scraper runs in headless mode, which is the preferred one for scraping.
browser = await playwright.chromium.launch(headless=False)
Now, let's create a new browser session with browser.new_context(), which won't share internal information (such as cookies or cache) with other browser contexts. We'll navigate to any URLs using the page.goto() function right after that.
To finish, we'll close both context and browser after completing the Playwright scraping process with context.close() and browser.close().
async def run(playwright: Playwright) -> None:
	# Launch the headed browser instance (headless=False)
	# To see the process of playwright scraping
	# chromium.launch - opens a Chromium browser
	browser = await playwright.chromium.launch(headless=False)
	context = await browser.new_context() # Creates a new browser context
	page = await context.new_page() # Open new page
	await page.goto("https://scrapeme.live/shop/") # Go to the chosen website

	# You scraping functions go here

	# Turn off the browser and context once you have finished
	await context.close()
	await browser.close()

async def main() -> None:
	async with async_playwright() as playwright:
		await run(playwright)

asyncio.run(main())
Once we do that, we can start defining the structure of your web scraper!
For a Python-based crawler, you can go synchronous or asynchronous, whereas Node.js solely works asynchronously. In this tutorial, we focus on asynchronous Playwright web scraping, so we have to call the asyncio and async_playwright packages together with playwright itself.
# Import libraries to deploy into scraper
import asyncio
from playwright.async_api import Playwright, async_playwright
Asynchronous scraping is called through async and/or await parameters. It allows you to process multiple workflows together. Generally, that's much more efficient than synchronously executing one operation after another. Additionally, await returns the thread of control back to the event loop.
How to Install & Launch Playwright in Node.js
Use the following commands to install Playwright dependencies for Node.js:
npm init -y
npm install playwright
Next, you'll find playwright.config.ts file in the specified directory. This is where you can set up the scraping environment, determine the type of browser you want to use, and so on. We've covered Node.js scraping in depth, so let's move on to real web scraping examples!
How to Use Playwright for Web Scraping
When building a Playwright crawler, we have different approaches:
- Text scraping.
- Image scraping.
- CSV export.
- Page navigation.
- Screengrabs. Let's explore them in detail.
Step 1: Locate Elements and Extract Text
In our first use case, we'll start with something simple to explore crawling options with ScrapeMe website.
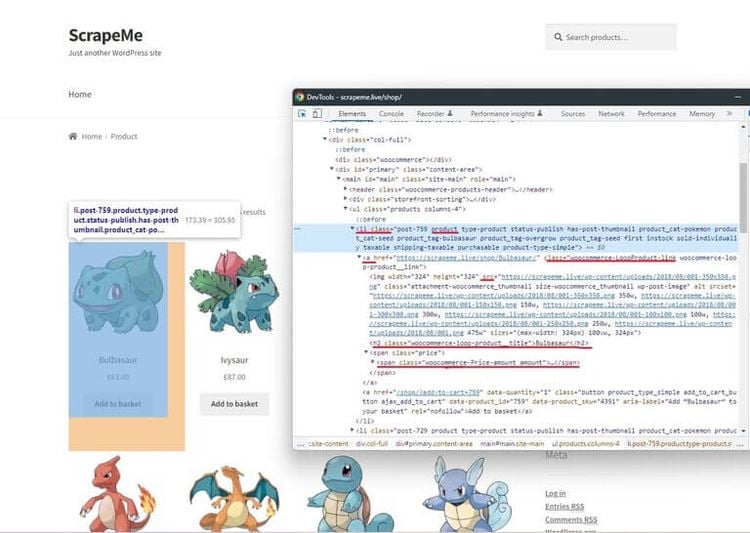
Playwright scraping typically requires developers to supply the browser with a desired destination URL and then use selectors to access specific DOM elements on the page.
The choice of selectors often depends on the location of the targeted element and the web architecture of the page. On pages with simple web architecture, it can be easily scraped via their unique identifiers. However, be prepared to search for your selector in nested structures.
Here, we'll try to get values for three variables (product, price, and img_link) using the element_handle.query_selector(selector) method to search for a corresponding CSS selector. Try selecting one of the Pokémon and viewing the data behind it in the DevTools browser.
Since each element is in the scope of the CSS tag <li> on our web page, with the same class name ("li.product"), we'll first create a common variable item that contains all the presented items.
items = await page.query_selector_all("li.product")

for i in items:
	scraped_element = {}

	# Product name
	el_title = await i.query_selector("h2")
	scraped_element["product"] = await el_title.inner_text()

	# Product price
	el_price = await i.query_selector("span.woocommerce-Price-amount")
	scraped_element["price"] = await el_price.text_content()
Then, looking closer at the selectors, you'll see that each variable has its own identifier assigned, such as "h2" for product, "span.woocommerce-Price-amount" for product price, and a.woocommerce-LoopProduct-link.woocommerce-loop-product__link for the image URL. That's why we'll call the query selection method again to find and extract the data values we're analyzing.
It's interesting to note that sometimes, with a JavaScript-based website, a scraper might return data long before the page is fully loaded. But, implementing await, we guarantee this won't happen. The Playwright web scraper will work only if the specified elements are fully loaded.
# Import libraries to deploy into scraper
import asyncio
from playwright.async_api import Playwright, async_playwright

# Start with playwright scraping here:
async def scrape_data(page):
	scraped_elements = []
	items = await page.query_selector_all("li.product")

	# Pick the scraping item
	for i in items:
		scraped_element = {}

		# Product name
		el_title = await i.query_selector("h2")
		scraped_element["product"] = await el_title.inner_text()

		# Product price
		el_price = await i.query_selector("span.woocommerce-Price-amount")
		scraped_element["price"] = await el_price.text_content()

		scraped_elements.append(scraped_element)
	return scraped_elements


async def run(playwright: Playwright) -> None:
	# Launch the headed browser instance (headless=False)
	# To see the process of playwright scraping
	# chromium.launch - opens a Chromium browser
	browser = await playwright.chromium.launch(headless=False)

	# Creates a new browser context
	context = await browser.new_context()

	# Open new page
	page = await context.new_page()

	# Go to the chosen website
	await page.goto("https://scrapeme.live/shop/")
	data = await scrape_data(page)

	print(data)

	await context.close()
	# Turn off the browser once you finished
	await browser.close()


async def main() -> None:
	async with async_playwright() as playwright:
		await run(playwright)


asyncio.run(main())
Step 2: Scraping Images with Playwright
How to extract the product images? You'll need to get the image attribute, which is usually written in HTML code as "src".
This is how you can do it:
# Start with playwright scraping here:
async def scrape_data(page):
	scraped_elements = []
	items = await page.query_selector_all("li.product")

	# Pick the scraping item
	for i in items:
		# ... same as before

		# Product image
		image = await i.query_selector(
			"a.woocommerce-LoopProduct-link.woocommerce-loop-product__link > img"
		)
		scraped_element["img_link"] = await image.get_attribute("src")
		scraped_elements.append(scraped_element)
	return scraped_elements
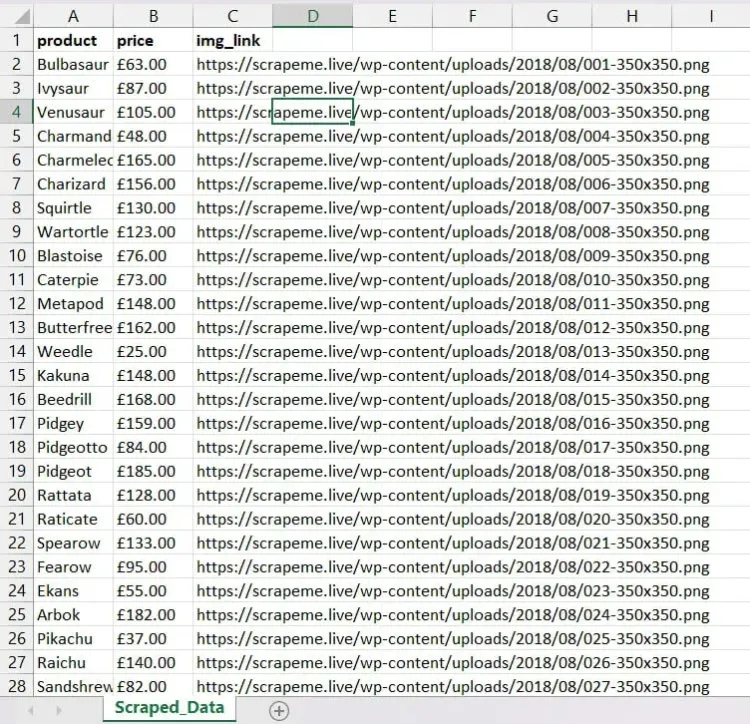
The final output for our use case until now will contain the product name, its price, and the link for the image asset:
[
	{
		"product": "Bulbasaur",
		"price": "63.00",
		"img_link": "https://scrapeme.live/wp-content/uploads/2018/08/001-350x350.png",
	},
	{
		"product": "Ivysaur",
		"price": "87.00",
		"img_link": "https://scrapeme.live/wp-content/uploads/2018/08/002-350x350.png",
	},
	{
		"product": "Venusaur",
		"price": "105.00",
		"img_link": "https://scrapeme.live/wp-content/uploads/2018/08/003-350x350.png",
	},
]
Step 3: Export data to CSV
Now when we see we succeeded in scraping the data, let's save it in a CSV. For that, start by importing the csv library on the top of the code.
# import a csv package to output the cleaned data to a .csv file
import csv
After that, write the data mapping logic in a new Python function:
# Optionally, you might want to store output data in a .csv format
def save_as_csv(data):
	with open("scraped_data.csv", "w", newline="") as csvfile:
		fields = ["product", "price", "img_link"]
		writer = csv.DictWriter(csvfile, fieldnames=fields, quoting=csv.QUOTE_ALL)
		writer.writeheader()
		writer.writerows(data)
Don't forget to call the specified function at the end of the code:
save_as_csv(data) # Save the retried data to csv
Here it goes! Now you can enjoy your table of elements obtained while Playwright scraping:
Step 4: Page Navigation
Our job isn't limited to scraping a single web page because websites organize product catalogs into multiple pages quite often.
Since one of the goals of Playwright is automation, we can easily add pagination scraping to our code with just one additional cycle. Using the DevTools, we'll need to search for the ID of the next link and then insert this value into the page.locator function.
The page.locator() method will output the element locator, which we can further employ in clicking, tapping, or filling functions. This way, we pass the CSS selector to the location function with page.locator("text=→").nth(1) and click on the element using .click() as soon as it's fully loaded with page.wait_for_selector("li.product").
# Go through different pages
for i in range(2):
	await page.locator("text=→").nth(1).click()
	data.extend(await scrape_data(page))
	await page.wait_for_selector("li.product")
Step 5: Taking Screenshots with Playwright
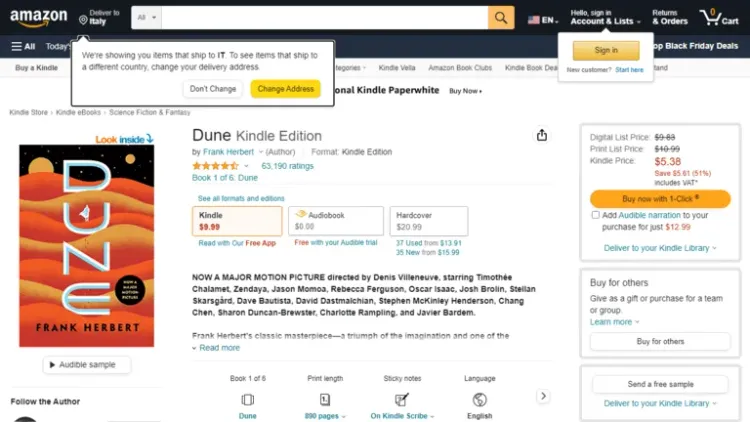
Let's add visuals to our data extraction by taking screenshots of product pages. For this Playwright example, we'll target a popular online retailer: Amazon.
After we launch the Chromium browser in headless mode and define elements based on their selectors, we'll launch the screenshots API from Playwright.
With page.screenshot() method, you can capture:
- A full screen:
page.screenshot({ path: 'screenshot.png', fullPage: true }). - A single element of the page:
page.locator('.header').screenshot({ path: 'screenshot.png' }). Then save the final screenshot to a specified directory.
from playwright.sync_api import sync_playwright

with sync_playwright() as p:
	browser = p.chromium.launch()
	page = browser.new_page()
	page.goto("https://www.amazon.com/dp/B00B7NPRY8/")

	# Create a dictionary with the scraped data
	item = {
		"item_title": page.query_selector("#productTitle").inner_text(),
		"author": page.query_selector(".contributorNameID").inner_text(),
		"price": page.query_selector(".a-size-base.a-color-price.a-color-price").inner_text(),
	}

	print(item)

	page.screenshot(path="item.png")
	browser.close()
After that, you should see the following output in your terminal, as well as the .png file of the page saved in your working directory.
{"item_title": "Dune", "author": "Frank Herbert", "price": "$9.99"}
Playwright vs. Puppeteer vs. Selenium
How does Playwright compare with the Selenium and Puppeteer, the other two most popular headless browsers for web scraping?

Playwright can run seamlessly across multiple browsers using a single API and has extensive documentation to help you get going. It allows the use of different programming languages like Python, Node.js, Java, and .NET, but not Ruby.
Meanwhile, Selenium has a slightly wider range of language compatibility as it works with Ruby, but it needs third-party add-ons for parallel execution and video recording.
On the other hand, Puppeteer is a more limited tool but about 60% faster than Selenium, slightly faster than Playwright.
Let's take a look at this comparison table:
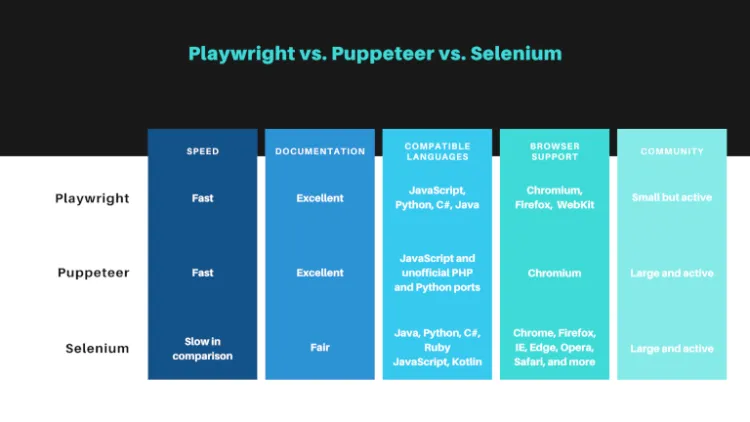
As you can see, Playwright certainly wins that competition for most use cases. But if you're still not convinced, here's a summary of Playwright features to consider:
- It has cross-browser, cross-platform and cross-language support.
- Playwright can isolate browser contexts for each test or scraping loop you run. You can customize settings like cookies, proxies, and JavaScript on a per-context basis to tailor the browser experience.
- Its auto-waiting feature determines when the context is ready for interaction. By complementing
await page.click()with Playwright APIs (such asawait page.waitForSelector()orawait page.waitForFunction()methods), your scraper will extract all data. - Playwright uses proxy servers to help developers disguise their IP addresses. That way, you can bypass anti-scraping blockers.
- It's also possible to lower your bandwidth by blocking resources. If you want to dig deeper, we wrote some direct comparisons: Playwright vs. Selenium, Puppeteer vs. Selenium, Playwright vs. Puppeteer.
Conclusion
We built a scraper using Playwright and covered the most common scenarios, such as text and image extraction. Now, you're ready to overcome new challenges!
Nevertheless, to save time on coding and money on resources, ZenRows is a library you might want to consider. Its user-friendly interface and powerful scraping algorithm will save you from studying Playwright documentation and avoid anti-bots like Cloudflare, allowing you to crawl large amounts of data in minutes.
Did you find the content helpful? Spread the word and share it on Twitter, or LinkedIn.