These days, websites use anti-bot systems that can detect scrapers. The best way to ensure a seamless scraping process is using proper masking methods, like headless browsers.
Puppeteer is a headless Chrome capable of simulating real user behavior to avoid anti-bots like Cloudflare while web scraping. So how do you go about it?
In this article, we'll discuss the best ways to avoid detection with Puppeteer while scraping. But before that...
What Is Puppeteer?
Puppeteer is a Node.js library that provides a high-level API to a Chromium headless browser programmatically.
You can easily install it using npm or Yarn, and one of its key benefits is its ability to access and manipulate DevTools Protocol.
Can Puppeteer be Detected by Anti-Bots?
Yes, these anti-bots are capable of detecting headless browsers like Puppeteer or Selenium.
Let's prove that with a quick scraping example of trying to crawl NowSecure. It's a website with bots checking tests that tells you whether you have passed the protection.
To do that, we'll go ahead and install Node.js, and when that's done, we'll run the following basic command code to install Puppeteer.
npm install puppeteer
const puppeteer = require('puppeteer');

(async () => {
	// Initiate the browser
	const browser = await puppeteer.launch();

	// Create a new page with the default browser context
	const page = await browser.newPage();

	// Setting page view
	await page.setViewport({ width: 1280, height: 720 });

	// Go to the target website
	await page.goto('https://nowsecure.nl/');

	// Wait for security check
	await page.waitForTimeout(30000);

	// Take screenshot
	await page.screenshot({ path: 'image.png', fullPage: true });

	// Closes the browser and all of its pages
	await browser.close();
})();
So here's what we did in that example: we used the basic Puppeteer setup to create a new browser page and visit the target website. And then, we take a screenshot after the security check.
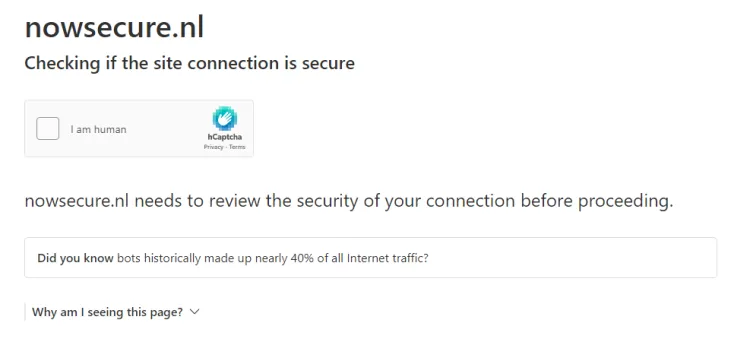
Here's the screenshot of the web page when we use Puppeteer only:

As you can see from the result, we didn't pass the check and couldn't prevent Puppeteer detection on the web page.
Six Tricks to Avoid Detection with Puppeteer
One of the best ways to ensure a smooth crawling process is to avoid Puppeteer bot detection. Here's how to prevent Puppeteer detection and avoid getting blocked while scraping:
1. Use Proxies
One of the most widely adopted anti-bot strategies is IP tracking, where the bot detection system tracks the website's requests. And when an IP makes many requests in a short period, the anti-bot can detect the Puppeteer scraper.
To avoid detection in Puppeteer, you can make use of proxies, which provide a gateway between users and the internet. So when a request is sent to the server, it's routed to the proxy, and then the response data is sent to us.
To do this, we can add a proxy to the args parameter while launching Puppeteer like this:
const puppeteer = require('puppeteer');
const proxy = ''; // Add your proxy here

(async () => {
	// Initiate the browser with a proxy
	const browser = await puppeteer.launch({args: ['--proxy-server=${proxy}']});

	// ... continue as before
})();
That's it! Your Puppeteer scraper can now avoid bot detection while scraping web pages.
2. Headers
Headers contain context and metadata information about the HTTP request. It identifies whether the tool is a normal web browser or a bot. You can help prevent detection by including the right headers in the HTTP request.
Since Puppeteer works under headlessChrome by default, you can take it further by adding custom headers like User-Agent. It's a popular header used in web scraping, and it identifies the application, operating system, vendor and version of the request.
const puppeteer = require('puppeteer');

(async () => {
	const browser = await puppeteer.launch();
	const page = await browser.newPage();

	// Add Headers
	await page.setExtraHTTPHeaders({
		'user-agent': 'Mozilla/5.0 (Windows NT 10.0; WOW64) AppleWebKit/537.36 (KHTML, like Gecko) Chrome/108.0.0.0 Safari/537.36',
		'upgrade-insecure-requests': '1',
		'accept': 'text/html,application/xhtml+xml,application/xml;q=0.9,image/avif,image/webp,image/apng,*/*;q=0.8',
		'accept-encoding': 'gzip, deflate, br',
		'accept-language': 'en-US,en;q=0.9,en;q=0.8'
	});

	// ... continue as before
})();
There are several methods to add a header in Puppeteer, but the easiest one is to add it while opening a new page.
3. Limit Requests
As previously discussed, an anti-bot can track a user's activity through the number of requests sent. And since normal users don't send hundreds of requests per second, limiting the number of requests and taking breaks between requests helps avoid Puppeteer detection.
To do this, you can use the .setRequestInterception() to limit the resources rendered in Puppeteer.
const puppeteer = require('puppeteer');

(async () => {
	const browser = await puppeteer.launch();
	const page = await browser.newPage();

	// Limit requests
	await page.setRequestInterception(true);
	page.on('request', async (request) => {
		if (request.resourceType() == 'image') {
			await request.abort();
		} else {
			await request.continue();
		}
	});

	// ... continue as before
})();
By setting the .setRequestInterception() = true, we ignore requests that Puppeteer makes for images. In this way, we can limit requests. Plus, we'll get faster scrapers since there are fewer resources to load and wait for.
4. Mimic User Behavior
Machine learning systems study all user behaviors and compare bot behaviors to users'. Mimicking this behavior can help bypass CAPTCHAs and bot detectors.
One way to achieve this is by waiting a random time before clicking or navigating to a new web page in Puppeteer. For example, this simple function generates a random time between five and 12 seconds.
The page.waitForTimeout uses the generated time before opening a new tab page.
const puppeteer = require('puppeteer');

(async () => {
	const browser = await puppeteer.launch();
	const page = await browser.newPage();

	// Wait for a random time before navigating to a new web page
	await page.waitForTimeout((Math.floor(Math.random() * 12) + 5) * 1000)

	// ... continue as before
})();
5. Puppeteer-Stealth
The stealth plugin is helpful for Puppeteer scrapers because it provides an API comparable to Puppeteer's. By removing the minute variations in browser fingerprints between Headless Chrome and real Chrome browsers, it can hide the browser's headless status.
Let's see how to prevent detection using Puppeteer-Stealth!
Step 1: Install Puppeteer-Stealth
You can do that with the following command code:
npm install puppeteer puppeteer-extra puppeteer-extra-plugin-stealth
Step 2: Configure Puppeteer-Stealth
To configure puppeteer-stealth, create a new JavaScript file called index.js and add the following code:
const puppeteer = require('puppeteer-extra')

// Add stealth plugin and use defaults
const pluginStealth = require('puppeteer-extra-plugin-stealth')
const {executablePath} = require('puppeteer');

// Use stealth
puppeteer.use(pluginStealth())

// Launch pupputeer-stealth
puppeteer.launch({ headless:false, executablePath: executablePath() }).then(async browser => {
Here's what happened in the code above:
First, we imported puppeteer and puppeteer-extra, a lightweight wrapper around Puppeteer. Then, we also imported puppeteer-extra-plugin-stealth to avoid Puppeteer detection. It's used with puppeteer.use(pluginStealth()).
puppeteer is saved in executablePath. That informs puppeteer-stealth where the code will be executed. And finally, we launched Puppeteer with the option headless:false to see what happens in the browser.
Step 3: Take a Screenshot
puppeteer.launch({ headless:false, executablePath: executablePath() }).then(async browser => {
	// Create a new page
	const page = await browser.newPage();

	// Setting page view
	await page.setViewport({ width: 1280, height: 720 });

	// Go to the website
	await page.goto('https://nowsecure.nl/');

	// Wait for security check
	await page.waitForTimeout(10000);

	await page.screenshot({ path: 'image.png', fullPage: true });

	await browser.close();
});
After launching the browser, create a new page using await browser.newPage() and set the browser view. Puppeteer was instructed to visit the target website and wait ten seconds for the security check. After that, a screenshot was taken, and the browser was closed.
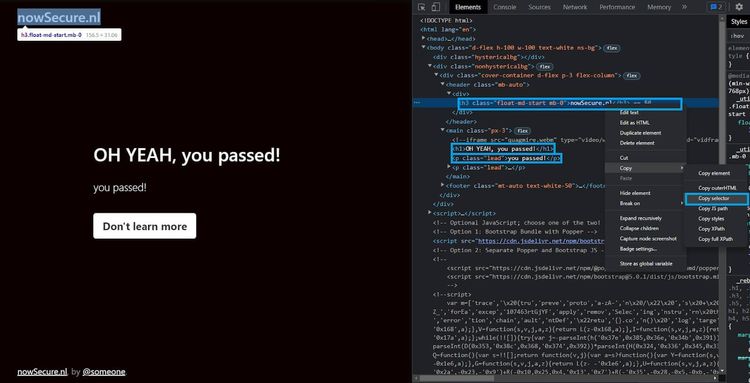
And here's what the result should look like:

Congratulations! You have prevented Puppeteer bot detection. Let's take it a step further and scrape the page.
Step 4: Scrape the Page 😀
Find the selector of each element you want to scrape, and to do this, right-click on an element and select "Inspect". That opens the Chrome DevTools, and you can get the selectors from the Elements tab.

Copy selectors and use each selector to get its text. The querySelector method works perfectly for this purpose:
	await page.goto('https://nowsecure.nl/');
	await page.waitForTimeout(10000);

	// Get title text
	title = await page.evaluate(() => {
		return document.querySelector('body > div.nonhystericalbg > div > header > div > h3').textContent;
	});

	// Get message text
	msg = await page.evaluate(() => {
		return document.querySelector('body > div.nonhystericalbg > div > main > h1').textContent;
	 });

	 // get state text
	state = await page.evaluate(() => {
		return document.querySelector('body > div.nonhystericalbg > div > main > p:nth-child(2)').textContent;
	});

	// print out the results
	console.log(title, '\n', msg, '\n', state);

	await browser.close();
});
The script uses the .textContent method to get the text for each element. The same process can be repeated for each element and saved to a variable.
After running the code here, this is what the output should look like:

Boom! You have solved your main problem and successfully prevented Puppeteer bot detection. Here's what the complete code should be:
const puppeteer = require('puppeteer-extra');

// Add stealth plugin and use defaults
const pluginStealth = require('puppeteer-extra-plugin-stealth');
const {executablePath} = require('puppeteer');

// Use stealth
puppeteer.use(pluginStealth());

// Launch pupputeer-stealth
puppeteer.launch({ headless:false, executablePath: executablePath() }).then(async browser => {
	// Create a new page
	const page = await browser.newPage();

	// Setting page view
	await page.setViewport({ width: 1280, height: 720 });

	// Go to the website
	await page.goto('https://nowsecure.nl/');

	// Wait for security check
	await page.waitForTimeout(10000);

	// Get title text
	title = await page.evaluate(() => {
		return document.querySelector('body > div.nonhystericalbg > div > header > div > h3').textContent;
	});

	// Get message text
	msg = await page.evaluate(() => {
		return document.querySelector('body > div.nonhystericalbg > div > main > h1').textContent;
	});

	 // get state text
	state = await page.evaluate(() => {
		return document.querySelector('body > div.nonhystericalbg > div > main > p:nth-child(2)').textContent;
	 });

	// print out the results
	console.log(title, '\n', msg, '\n', state);

	await browser.close();
});
Limitations of Puppeteer-Stealth
Puppeteer-Stealth is a good solution to avoid bot detection, but it has limitations:
- It can't avoid advanced anti-bots.
- Puppeteer works under headless mode, so it's difficult to scale and scrape large amounts of data.
- It's difficult to debug headless browsers such as Puppeteer.
Unfortunately, Puppeteer-Stealth fails against websites with advanced anti-bots. For example, we tried to scrape Okta with it:
// same as before
puppeteer.launch({ headless:true, executablePath: executablePath() }).then(async browser => {
	const page = await browser.newPage();
	await page.setViewport({ width: 1920, height: 1080 });

	// Go to the website
	await page.goto('https://okta.com/');

	// Wait for security check
	await page.waitForTimeout(10000);
	await page.screenshot({ path: 'image.png', fullPage: true });
	await browser.close();
});
Here's what we got:

We got blocked straight off! Fortunately, we have a solution that can bypass advanced anti-bots: ZenRows. That is our next tip to avoid detection.
6. ZenRows
ZenRows is an all-in-one web scraping tool that uses a single API call to handle all anti-bot bypassing. It helps with rotating proxies, headless browsers and CAPTCHAs.
Using ZenRows to scrape Okta, here's what we got:

Conclusion
There are different methods to avoid detection with Puppeteer, and we discussed the best and easiest ways to go about it in this article.
You can use proxies, headers, limit requests or Puppeteer-Stealth to get the job done but there are limitations. The common problem with these methods is that they fail when it comes to bypassing advanced anti-bots.
ZenRows handles all anti-bot bypass for you, from rotating proxies and headless browsers to CAPTCHAs with a single API call. And you can get started for free.
Did you find the content helpful? Spread the word and share it on Twitter, or LinkedIn.