Have you ever wondered why your Puppeteer web scraper gets blocked? The answer often lies in your HTTP header configuration.
In this article, you'll learn how to customize the Puppeteer HTTP request headers with the best strategies to go unnoticed.
What are Puppeteer Headers?
The HTTP request header influences how the server processes and responds to your request.
Upon receiving your request, the server responds with metadata called the response header, which details how the server handles your scraping request.
Puppeteer features default request headers. Replacing it with the top request headers for web scraping can reduce your chances of potentially getting blocked.
The default Puppeteer request header looks like this:
Request Headers: {
  'upgrade-insecure-requests': '1',
  'user-agent': 'Mozilla/5.0 (Windows NT 10.0; Win64; x64) AppleWebKit/537.36 (KHTML, like Gecko) HeadlessChrome/119.0.0.0 Safari/537.36',
  'sec-ch-ua': '"Chromium";v="119", "Not?A_Brand";v="24"',
  'sec-ch-ua-mobile': '?0',
  'sec-ch-ua-platform': '"Windows"'
}
Changing this with custom values can help you bypass CAPTCHAs in Puppeteer. How can you achieve that?
How to Set Up Custom Headers in Puppeteer
This section will show you how to set custom headers in Puppeteer. However, there are two main methods of doing so in Puppeteer.
Let's summarize each method in the table below before seeing how to use a more preferred global method.
| Method | Description | Pros | Cons | |
|---|---|---|---|---|
page.setExtraHTTPHeaders() |
Sets a custom global HTTP request header for every request initiated by a page. |
|
|
|
page.setRequestInterception() |
Intercepts individual requests on a page and sets custom headers per request before contacting the server. It returns a callback function (request.continue() to continue a request or request.abort() to halt a request) |
|
|
Let's quickly see how to set Puppeteer custom headers using the page.setExtraHTTPHeaders() method.
await page.setExtraHTTPHeaders({
  'custom-header': 'your-header'
});
To add custom headers, first specify the custom headers you want to set in Puppeteer. We've presented this as a variable (requestHeaders), as shown:
const puppeteer = require('puppeteer');

const requestHeaders = {
    'referer': 'www.google.com',
    'accept': 'text/html,application/xhtml+xml,application/xml;q=0.9,image/avif,image/webp,image/apng,*/*;q=0.8,application/signed-exchange;v=b3;q=0.7',
    'accept-language': 'en-US,en;q=0.9',
    'cache-control': 'max-age=0',
    'accept-encoding': 'gzip, deflate, br',
    'Authorization': `Basic ${encodedCredentials}`,
    'user-agent': randomUserAgent,
  };
If accessing a website that requires authentication, you can add your login credentials by updating the above headers like this:
const username = 'your_username';
const password = 'your_password';

// Encode the username and password in Base64
const encodedCredentials = Buffer.from(`${username}:${password}`).toString('base64');

// Include the encoded credentials in your request headers
const requestHeaders = {
  'referer': 'www.google.com',
  'accept': 'text/html,application/xhtml+xml,application/xml;q=0.9,image/avif,image/webp,image/apng,*/*;q=0.8,application/signed-exchange;v=b3;q=0.7',
  'accept-language': 'en-US,en;q=0.9',
  'cache-control': 'max-age=0',
  'accept-encoding': 'gzip, deflate, br',
  'Authorization': `Basic ${encodedCredentials}`,
  'user-agent': 'Mozilla/5.0 (Windows NT 10.0; Win64; x64) AppleWebKit/537.36 (KHTML, like Gecko) Chrome/120.0.0.0 Safari/537.36',
};
The only change to the above code is that we've buffered a base64-encoded version of the login credentials into the authentication header. This is a standard way to pass authentication credentials to the server.
Now let's add this header information to every request globally using page.setExtraHTTPHeaders() as shown in the following code.
We've only used https://httpbin.io/headers in the following code to display the current request headers. This won't work with regular websites. You should view the request headers for other websites using a Puppeteer request event.
(async () => {
  const browser = await puppeteer.launch({
    headless: 'new', // Set to true for headless mode, false for non-headless
  });

  const page = await browser.newPage();

  // Set extra HTTP headers
  await page.setExtraHTTPHeaders({...requestHeaders});


  await page.goto('https://httpbin.io/headers');

  const content = await page.content()

  console.log(content)

  await browser.close()
})();
And here's the code combined:
const puppeteer = require('puppeteer');

const username = 'your_username';
const password = 'your_password';

// Encode the username and password in Base64
const encodedCredentials = Buffer.from(`${username}:${password}`).toString('base64');

const requestHeaders = {
  'referer': 'www.google.com',
  'accept': 'text/html,application/xhtml+xml,application/xml;q=0.9,image/avif,image/webp,image/apng,*/*;q=0.8,application/signed-exchange;v=b3;q=0.7',
  'accept-language': 'en-US,en;q=0.9',
  'cache-control': 'max-age=0',
  'accept-encoding': 'gzip, deflate, br',
  'Authorization': `Basic ${encodedCredentials}`,
  'user-agent': 'Mozilla/5.0 (Windows NT 10.0; Win64; x64) AppleWebKit/537.36 (KHTML, like Gecko) Chrome/120.0.0.0 Safari/537.36',
};

(async () => {
  const browser = await puppeteer.launch({
    headless: 'new', // Set to true for headless mode, false for non-headless
  });

  const page = await browser.newPage();

  // Set extra HTTP headers
  await page.setExtraHTTPHeaders({...requestHeaders});


  await page.goto('https://httpbin.io/headers');

  const content = await page.content()

  console.log(content)

  await browser.close()
})();
But there's more than just adding custom headers while scraping with Puppeteer. How about best practices?
Header Strategies for Effective Scraping
Now that you know how to set custom headers, you want to implement some useful header-setting strategies for effective scraping. Let's see how to apply each in the sections that follow.
Using Tools to Fix Default Header Issues
Although it's an automation tool with built-in request headers, Puppeteer doesn't include all the headers required by a server in its request. This might result in blockage.
For instance, a missing header issue in Puppeteer remains open on GitHub at the time of writing. So don't be disappointed if you get blocked despite having high hopes for Puppeteer's headless browser capability.
The best solution is to sort the headers out using third-party tools like ZenRows, which you can integrate into Puppeteer and scrape on the go with a simple API call.
In addition to solving Puppeteer's header issues, it adds anti-bot bypass and premium proxy functionalities to your scraper.
Let's try to access https://www.g2.com/products/asana/reviews, a Cloudflare anti-bot-protected website using Puppeteer's default headers settings:
const puppeteer = require('puppeteer');

(async () => {
  const browser = await puppeteer.launch({
    headless: 'new', // Set to true for headless mode, false for non-headless
  });

  const page = await browser.newPage();

await page.goto(
  'https://www.g2.com/products/asana/reviews',
  { waitUntil: 'domcontentloaded' }
);

  const content = await page.content()

  console.log(content)

  await browser.close()
})();
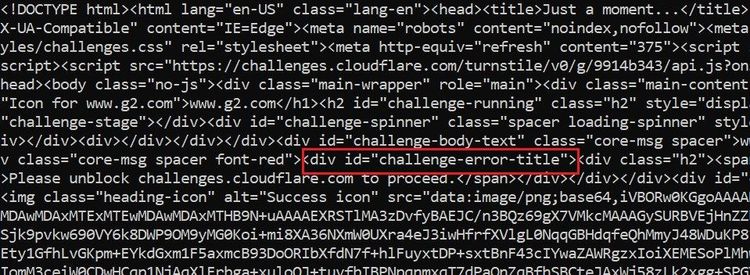
Puppeteer got bounced with a "challenge error":

Adding ZenRows functionality is a game-changer, helping you to handle custom headers and bypass this block.
To use ZenRows, sign up and log into your Request Builder.

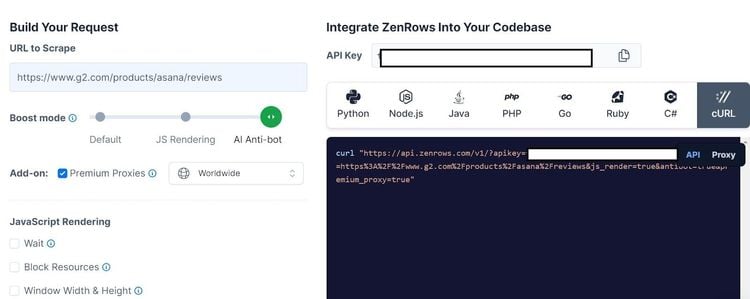
Paste the target URL in the "URL to Scrape" box. Then Set the "Boost mode" slider to "AI Anti-bot" and activate "Premium Proxies" to enable premium proxy rotation.
Since Puppeteer doesn't provide a direct way to add configuration parameters, we'll adapt the "cURL" format to process the scraping request. Select the "cURL" option and copy the generated string.
Let's see the cURL arrangement clearly in a code snippet:
curl "https://api.zenrows.com/v1/?apikey=<YOUR_ZENROWS_API_KEY>&url=https%3A%2F%2Fwww.g2.com%2Fproducts%2Fasana%2Freviews&js_render=true&antibot=true&premium_proxy=true"
Pay attention to how this format begins with the ZenRows API base URL and adds the selected options as parameters, including the API key. Create a URL variable in your scraper file using this same URL format, as shown:
const puppeteer = require('puppeteer');

const ZenRowsBaseURL = 'https://api.zenrows.com/v1/';
const targetWebsite = 'https://www.g2.com/products/asana/reviews'; // Replace with your target website


const fullURL = `${ZenRowsBaseURL}?` +
    `apikey=${<YOUR_ZENROWS_API_KEY>}&` +
    `url=${encodeURIComponent(targetWebsite)}&` +
    `js_render=true&` +
    `antibot=true&` +
    `premium_proxy=true`;
Next, request the fullURL via ZenRows API in your Puppeteer code.
//...
// Create a page instance and visit the URL
(async () => {
    const browser = await puppeteer.launch({
        headless: 'new'
    });
    const page = await browser.newPage();

    // Make the request to the target website
    const response = await page.goto(fullURL, {
        waitUntil: 'domcontentloaded',
    });

    // Capture and log the response text
    const responseBody = await response.text();
    console.log('Response Body:', responseBody);

    // Close the browser
    await browser.close();
})();
Let's merge the code and run it:
const puppeteer = require('puppeteer');
require('dotenv').config();

const ZenRowsBaseURL = 'https://api.zenrows.com/v1/';
const targetWebsite = 'https://www.g2.com/products/asana/reviews'; // Replace with your target website

// Replicate the cURL URL format
const fullURL = `${ZenRowsBaseURL}?` +
    `apikey=${<YOUR_ZENROWS_API_KEY>}&` +
    `url=${encodeURIComponent(targetWebsite)}&` +
    `js_render=true&` +
    `antibot=true&` +
    `premium_proxy=true`;

// Start a page instance and visit fullURL via ZenRows
(async () => {
    const browser = await puppeteer.launch({
        headless: 'new'
    });
    const page = await browser.newPage();

    // Make the request to the target website
    const response = await page.goto(fullURL, {
        waitUntil: 'domcontentloaded',
    });

    // Capture and log the response text
    const responseBody = await response.text();
    console.log('Response Body:', responseBody);

    // Close the browser
    await browser.close();
})();
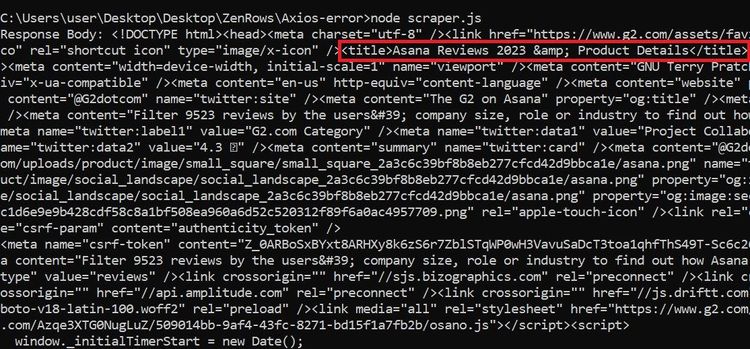
The above code logs the target website content with a valid title, confirming free access without blockage.

You just accessed an anti-bot-protected website using fewer lines of code in Puppeteer. Congratulations! Let's see other strategies you can consider.
Key Headers for Scraping: Focusing on User-Agent
The user agent is the most crucial header during scraping and can influence how the server processes your request. While Puppeteer features a default user agent, relying solely on it for frequent requests can result in blockage.
Although there's a proper way to set the Puppeteer user agent, misconfiguring the string can also block you. For example, a platform mismatch or invalid browser version can signal a website that you're a bot.
To avoid this, you can get your user agent string from the top list of user agents for web scraping. Another nifty way to enhance Puppeteer's scraping success is to rotate the user agent in the request headers.
To do this, create a list of user agents and define a function to randomize them:
const puppeteer = require('puppeteer');

// Create a list of custom user agents
const userAgents = [
    'Mozilla/5.0 (Windows NT 10.0; Win64; x64) AppleWebKit/537.36 (KHTML, like Gecko) Chrome/120.0.0.0 Safari/537.36',
    'Mozilla/5.0 (Windows NT 10.0; Win64; x64; rv:120.0) Gecko/20100101 Firefox/120.0',
    'Mozilla/5.0 (Windows NT 10.0; Win64; x64) AppleWebKit/537.36 (KHTML, like Gecko) Chrome/120.0.0.0 Safari/537.36 Edg/119.0.2151.97',
    'Mozilla/5.0 (Macintosh; Intel Mac OS X 14_1) AppleWebKit/605.1.15 (KHTML, like Gecko) Version/17.1 Safari/605.1.15'
  ];

  // Function to get a random user agent from the list
  const getRandomUserAgent = (userAgentsList) => {
    const randomIndex = Math.floor(Math.random() * userAgentsList.length);
    return userAgentsList[randomIndex];
  };
Apply the randomization to your Puppeteer page requests using page.setExtraHTTPHeaders, as shown:
...
// Call the randomization function in a variable
const randomUserAgent = getRandomUserAgent(userAgents);

(async () => {
  const browser = await puppeteer.launch({
    headless: 'new'
  });

  const page = await browser.newPage();

//   Set global HTTP headers
 await page.setExtraHTTPHeaders({
    'user-agent': randomUserAgent
  });

  await page.goto(
    'https://httpbin.io/user-agent',
    {waitUntil: 'domcontentloaded'}
    );

    const content = await page.content()

    console.log(content)

  await browser.close();
})();
Let's get it all together:
const puppeteer = require('puppeteer');
// Create a list of custom user agents
const userAgents = [
    'Mozilla/5.0 (Windows NT 10.0; Win64; x64) AppleWebKit/537.36 (KHTML, like Gecko) Chrome/120.0.0.0 Safari/537.36',
    'Mozilla/5.0 (Windows NT 10.0; Win64; x64; rv:120.0) Gecko/20100101 Firefox/120.0',
    'Mozilla/5.0 (Windows NT 10.0; Win64; x64) AppleWebKit/537.36 (KHTML, like Gecko) Chrome/120.0.0.0 Safari/537.36 Edg/119.0.2151.97',
    'Mozilla/5.0 (Macintosh; Intel Mac OS X 14_1) AppleWebKit/605.1.15 (KHTML, like Gecko) Version/17.1 Safari/605.1.15'
  ];

// Function to get a random user agent from the list
const getRandomUserAgent = (userAgentsList) => {
    const randomIndex = Math.floor(Math.random() * userAgentsList.length);
    return userAgentsList[randomIndex];
  };

const randomUserAgent = getRandomUserAgent(userAgents);

(async () => {
  const browser = await puppeteer.launch({
    headless: 'new'
  });

const page = await browser.newPage();

// Set global HTTP headers
 await page.setExtraHTTPHeaders({
    'user-agent': randomUserAgent
  });

  await page.goto(
    'https://httpbin.io/user-agent',
    {waitUntil: 'domcontentloaded'}
    );

    const content = await page.content()
    console.log(content)

  await browser.close();
})();
The above code will output a different user agent for each request. That works! You're now randomizing the user agent string in your scraper. Have you considered the essence of arranging your headers?
The Importance of Header Order
Although the order of request headers generally doesn't matter to servers, most automation tools have a consistent way of arranging headers. Maintaining such a format in your Puppeteer scraper can be a red flag to anti-bots.
One way to solve this problem is to replicate a real browser header format.
You can achieve this by copying the request headers of your target website.

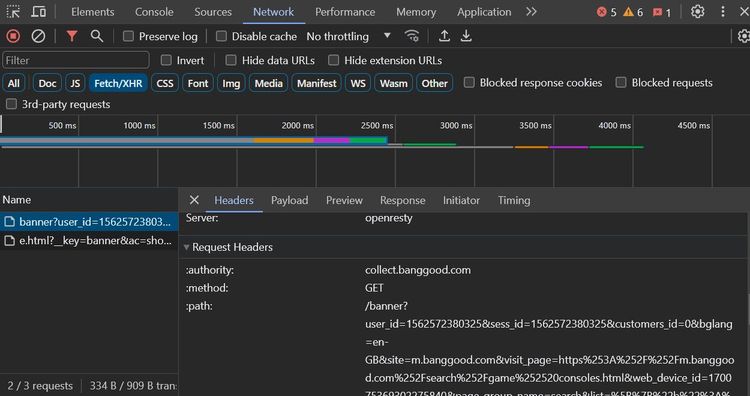
To do this, open the website via the Chrome browser and open the developer console.
Click the "Network" tab. Once there, reload the page and click "Fetch/XHR." Then, select a request from the traffic table.
Scroll down to the "Request Headers" section. Copy and paste the Request Headers string.
Paste this in your code in a key/value pair format. A complete browser header might look like this:
const puppeteer = require('puppeteer');

const requestHeaders = {
    'authority': 'www.google.com',
    'accept': 'text/html,application/xhtml+xml,application/xml;q=0.9,image/avif,image/webp,image/apng,*/*;q=0.8,application/signed-exchange;v=b3;q=0.7',
    'accept-language': 'en-US,en;q=0.9',
    'cache-control': 'max-age=0',
    'sec-ch-ua': '"Not/A)Brand";v="99", "Google Chrome";v="115", "Chromium";v="115"',
    'sec-ch-ua-arch': '"x86"',
    'sec-ch-ua-bitness': '"64"',
    'sec-ch-ua-full-version': '"120.0.0.0"',
    'sec-ch-ua-full-version-list': '"Not/A)Brand";v="120.0.0.0", "Google Chrome";v="120.0.0.0", "Chromium";v="120.0.0.0"',
    'sec-ch-ua-mobile': '?0',
    'sec-ch-ua-model': '""',
    'sec-ch-ua-platform': 'Windows',
    'sec-ch-ua-platform-version': '15.0.0',
    'sec-ch-ua-wow64': '?0',
    'sec-fetch-dest': 'document',
    'sec-fetch-mode': 'navigate',
    'sec-fetch-site': 'same-origin',
    'sec-fetch-user': '?1',
    'upgrade-insecure-requests': '1',
    'user-agent': 'Mozilla/5.0 (Windows NT 10.0; Win64; x64) AppleWebKit/537.36 (KHTML, like Gecko) Chrome/120.0.0.0 Safari/537.36',
    };
You can arrange this into a dedicated variable in Puppeteer, as shown. The code uses a request interceptor to view the added user agents.
(async () => {
  const browser = await puppeteer.launch({
    headless: 'new'
  });

  const page = await browser.newPage();

  // Enable request interception
  await page.setRequestInterception(true);

//   Set global HTTP headers
 await page.setExtraHTTPHeaders({
    ...requestHeaders
  });

  page.on('request', request => {
    const reqHeaders = request.headers();
    console.log('Request Headers:', reqHeaders);
    request.continue();
  });

  await page.goto(
    'https://httpbin.io/',
    {waitUntil: 'domcontentloaded'}
    );

  await browser.close();
})();
Here's the code combined:
const puppeteer = require('puppeteer');

const requestHeaders = {
    'authority': 'www.google.com',
    'accept': 'text/html,application/xhtml+xml,application/xml;q=0.9,image/avif,image/webp,image/apng,*/*;q=0.8,application/signed-exchange;v=b3;q=0.7',
    'accept-language': 'en-US,en;q=0.9',
    'cache-control': 'max-age=0',
    'sec-ch-ua': '"Not/A)Brand";v="99", "Google Chrome";v="115", "Chromium";v="115"',
    'sec-ch-ua-arch': '"x86"',
    'sec-ch-ua-bitness': '"64"',
    'sec-ch-ua-full-version': '"120.0.0.0"',
    'sec-ch-ua-full-version-list': '"Not/A)Brand";v="120.0.0.0", "Google Chrome";v="120.0.0.0", "Chromium";v="120.0.0.0"',
    'sec-ch-ua-mobile': '?0',
    'sec-ch-ua-model': '""',
    'sec-ch-ua-platform': 'Windows',
    'sec-ch-ua-platform-version': '15.0.0',
    'sec-ch-ua-wow64': '?0',
    'sec-fetch-dest': 'document',
    'sec-fetch-mode': 'navigate',
    'sec-fetch-site': 'same-origin',
    'sec-fetch-user': '?1',
    'upgrade-insecure-requests': '1',
    'user-agent': 'Mozilla/5.0 (Windows NT 10.0; Win64; x64) AppleWebKit/537.36 (KHTML, like Gecko) Chrome/120.0.0.0 Safari/537.36',
    };


(async () => {
  const browser = await puppeteer.launch({
    headless: 'new'
  });

  const page = await browser.newPage();

  // Enable request interception
  await page.setRequestInterception(true);

//   Set global HTTP headers
 await page.setExtraHTTPHeaders({
    ...requestHeaders
  });

  page.on('request', request => {
    const reqHeaders = request.headers();
    console.log('Request Headers:', reqHeaders);
    request.continue();
  });

  await page.goto(
    'https://httpbin.io/',
    {waitUntil: 'domcontentloaded'}
    );

  await browser.close();
})();
See what this code outputs below:

Your scraper now uses a typical Chrome header in Puppeteer adapted from the Network tab.
While implementing a fully ordered header strategy can reduce your likelihood of getting blocked, consider combining it with other methods of web scraping without getting blocked.
Conclusion
Effective web scraping requires stealth, and adjusting Puppeteer headers is essential to avoid blocks. With the right tweaks, from unique user agents to custom headers, your scraper can gather data more effectively.
However, overcoming web scraping hurdles like rate limits and CAPTCHAs requires more than header adjustments. That's where ZenRows shines. It offers a complete web scraping solution that makes data collection from any website easy. Try ZenRows for smoother, more efficient scraping!
Did you find the content helpful? Spread the word and share it on Twitter, or LinkedIn.