FlareSolverr is a Python library that'll help you get around Cloudflare's anti-bot challenges. And, in this tutorial, you'll learn how to set it up, as well as explore some techniques to get the best results.
Here's a breakdown of what you'll learn:
- How to install and use FlareSolverr.
- Control cookies.
- Manage sessions.
- Make POST requests.
- Overcome limitations.
What Is FlareSolverr
FlareSolverr is an open-source reverse proxy server library for accessing Cloudflare-protected websites. It emulates an actual browser that can solve challenges, pass security checks, and render website content.
What Does FlareSolverr Do?
FlareSolverr makes requests for you using Python Selenium and Undetected ChromeDriver, which allow FlareSolverr to mimic an actual browser and solve Cloudflare's challenges. After those, the HTML code and cookies are returned to the client. The cookies can integrate with other HTTP clients, such as Python Requests, to bypass Cloudflare.
How to Use FlareSolverr
FlareSolverr's installation is unique, as you can go about it differently. We'll make it easy with step-by-step instructions.
But before that, let's try to access a website without FlareSolverr. For this example, we'll use NowSecure, a test website that displays a "You Passed" message if you're successful against its challenges.
To follow along, ensure you have Python installed, then install Requests using the following command:
pip install requests
Now, let's import the Requests module, define our target URL, and use the requests.get() method to make a GET request to NowSecure.
import requests

url = "https://nowsecure.nl/"

response = requests.get(url)
You can verify if it works by printing the response status code and its HTML:
print("status_code: " + str(response.status_code)) # prints the response status code
print(response.text) # prints the response content as text
This is the response you'll get:
status_code: 403

<body class="no-js">
    <div class="main-wrapper" role="main">
    <div class="main-content">
        <noscript>
            <div id="challenge-error-title">
                <div class="h2">
                    <span class="icon-wrapper">
                        <div class="heading-icon warning-icon"></div>
                    </span>
                    <span id="challenge-error-text">
                        Enable JavaScript and cookies to continue
                    </span>
                </div>
            </div>
The 403 error code means the request is unauthorized, and the HTML is that of Cloudflare's challenge page. In a nutshell, we've been detected and blocked.
Luckily, we have FlareSolverr! Let's see it next.
Step 1: Install FlareSolverr with Docker, Jackett or Prowlarr
The easiest and recommended approach for setting up FlareSolverr is through a Docker container since the Chromium browser is included within the image. However, you can also configure Prowlarr and Jackett to that end.
For this tutorial, we'll show you the FlareSolverr Docker setup.
Note: To follow the other paths, go to Set up FlareSolverr with Jackett or Set up FlareSolverr with Prowlarr.
First, install Docker by downloading it from one of the following links:
Run the installation package and follow the instructions. You may need to restart your computer after the installation is complete.
To check if Docker is installed correctly, enter the following command prompt in your terminal:
docker
You should get something similar to this:
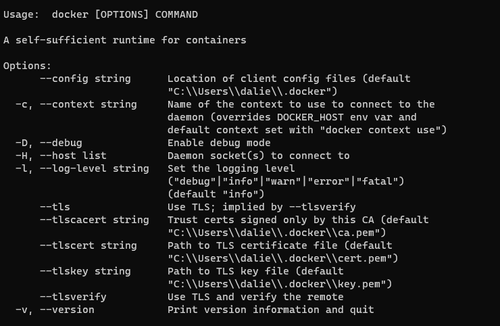
Otherwise, you'll get an error message if installed incorrectly.
On Linux systems like Ubuntu, you can run the following command to get the status of the Docker service.
systemctl status docker
Second, start the Docker engine by double-clicking on the Docker Desktop icon, and you'll be ready to integrate FlareSolverr. You may need to update or install Windows Subsystem for Linux (WSL) in Windows.
Next, download FlareSolverr from the Docker hub by running the following command in your terminal or Command Prompt:
docker pull flaresolverr/flaresolverr
If done correctly, you should see the FlareSolverr image in your Docker desktop's 'images' tab.
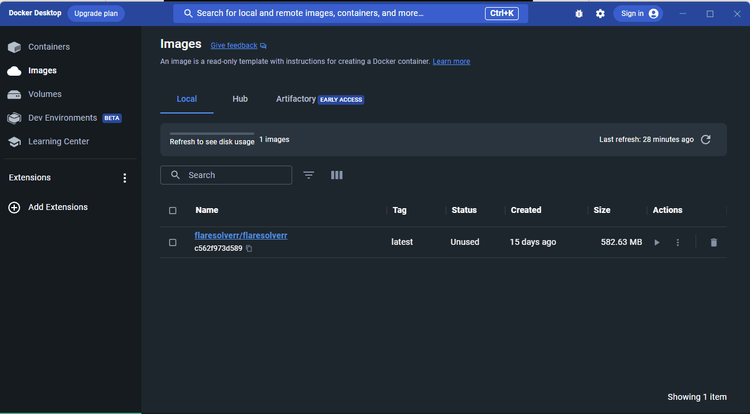
Finally, create a new container for FlareSolverr to make it run as an isolated service on your system using the following command:
docker create \
--name=flaresolverr \
-p 8191:8191 \
-v /path/to/flaresolverr/config:/app/config \
flaresolverr/flaresolverr
Replace /path/to/flaresolverr/config with the actual path to the directory you want to store your FlareSolverr configuration files.
The command above uses the flareSolverr/flareSolverr image to create a Docker container named "flareSolverr". It maps port 8191 in the container to the same port in your local machine to allow you access to services running inside the container from outside. Lastly, it mounts a volume from the host machine to the container using the '-v' option.
While the FlareSolverr Github repository doesn't explicitly mention the API endpoint URL, the default one is http://localhost:8191/v1 in most cases, as seen in the GitHub cURL example. Keep this URL in mind because we'll use it to make a request to FlareSolverr to enable it to handle Cloudflare challenges and grant us access to website content.
However, if the FlareSolverr container runs on a different host or port, the URL would differ from the default. You can inspect the container to see its host and port.
Step 2: Run FlareSolverr
To run FlareSolverr, start your container using the following command, replacing [container_name] with the actual name of your container.
docker start [container_name]
To confirm you're running Flaresolverr correctly, visit http://localhost:8191/ on your web browser, and you should get a response similar to this:
{
	"msg": "FlareSolverr is ready!",
	"version": "3.1.2",
	"userAgent": "Mozilla/5.0 (X11; Linux x86_64) AppleWebKit/537.36 (KHTML, like Gecko) Chrome/111.0.0.0 Safari/537.36"
}
Step 3: Scrape with FlareSolverr
If FlareSolverr runs correctly, you can easily send the URLs you want to scrape to its HTTP server to then expect the web content and cookies to be returned.
Therefore, to scrape with FlareSolverr, we need a tool that makes it easy to make HTTP requests. Since the Python Requests library is the de facto standard for making requests, we'll go with it.
To follow along, create a Python file, import Requests, define the FlareSolverr API URL, and specify the content type like this:
import requests

api_url = "http://localhost:8191/v1"
headers = {"Content-Type": "application/json"}
Next, define the payload to be sent in the request. In this case, it should contain the HTTP method, the URL we want to scrape, and the maximum timeout. We'll use NowSecure as a target URL once again, a Cloudflare-protected test website.
data = {
    "cmd": "request.get",
    "url": "https://nowsecure.nl/",
    "maxTimeout": 60000
}
Then, send a POST request to the FlareSolverr API, passing in the necessary parameters.
response = requests.post(api_url, headers=headers, json=data)
Lastly, verify it works:
print(response.content)
Putting it all together, you should have the following complete Python code.
import requests

api_url = "http://localhost:8191/v1"
headers = {"Content-Type": "application/json"}

data = {
    "cmd": "request.get",
    "url": "https://nowsecure.nl/",
    "maxTimeout": 60000
}

response = requests.post(api_url, headers=headers, json=data)

print(response.content)
Your response should contain values like these:
{
    "status": "ok",
    "message": "Challenge solved!",
    "solution": {"url": "https://nowsecure.nl/",
    "status": 200,
    "cookies": [{
        "domain": "nowsecure.nl",
        "expiry": 1681830200,
        "httpOnly": false,
        "name": "cf_chl_rc_m",
        "path": "/",
        "sameSite": "Lax",
        "secure": false,
        "value": "1"}],
    "userAgent": "Mozilla/5.0 (X11; Linux x86_64) AppleWebKit/537.36 (KHTML, like Gecko) Chrome/111.0.0.0 Safari/537.36",
    "headers": {},
    "response": "<html lang=\"en\"><head>\n    <!-- Required meta tags -->\n    <meta charset=\"utf-8\">\n ......// ..... <h1>OH YEAH, you passed!</h1>\n    <p class=\"lead\">you passed!</p> .....//...",
}
Below is what the actual terminal result looks like. The above response is the beautified version.

Well done!
Cookies with FlareSolverr
Remember that FlareSolverr also returns Cloudflare cookies after solving the challenge. You can retrieve and use them with an HTTP client, like Python Requests. This approach is more resource-efficient than making all requests via FlareSolverr, especially when scraping multiple pages.
To retrieve and use Cloudflare cookies with FlareSolverr and Requests, start by making a POST request to FlareSolverr as we did earlier. But also import JSON and define your target URL outside of the data' scope.
import requests
import json

url = "https://nowsecure.nl/"
api_url = "http://localhost:8191/v1"
headers = {"Content-Type": "application/json"}

data = {
    "cmd": "request.get",
    "url": url,
    "maxTimeout": 60000
}

response = requests.post(api_url, headers=headers, json=data)
Extract and clean the cookies, and then extract the User Agent used by FlareSolverr to access the target URL.
# retrieve the entire JSON response from FlareSolverr
response_data = json.loads(response.content)

# Extract the cookies from the FlareSolverr response
cookies = response_data["solution"]["cookies"]

# Clean the cookies
cookies = {cookie["name"]: cookie["value"] for cookie in cookies}

# Extract the user agent from the FlareSolverr response
user_agent = response_data["solution"]["userAgent"]
The above code retrieves the JSON response before extracting the cookies and User Agent. It also cleans the cookies by parsing them as a dictionary with only the cookie values.
Lastly, make a new GET request to the target URL using the cleaned cookies and FlareSolverr's User Agent.
response = requests.get(url, cookies=cookies, headers={"User-Agent": user_agent})
When you put everything together, your complete code should look like this:
import requests
import json

url = "https://nowsecure.nl/"
api_url = "http://localhost:8191/v1"
headers = {"Content-Type": "application/json"}

data = {
    "cmd": "request.get",
    "url": url,
    "maxTimeout": 60000
}

response = requests.post(api_url, headers=headers, json=data)

# retrieve the entire JSON response from FlareSolverr
response_data = json.loads(response.content)

# Extract the cookies from the FlareSolverr response
cookies = response_data["solution"]["cookies"]

# Clean the cookies
cookies = {cookie["name"]: cookie["value"] for cookie in cookies}

# Extract the user agent from the FlareSolverr response
user_agent = response_data["solution"]["userAgent"]

response = requests.get(url, cookies=cookies, headers={"User-Agent": user_agent})
Verify it works by printing the result:
print(response.content)
You should have a result similar to this:
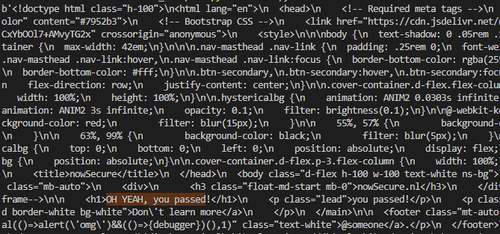
It worked!
Manage Sessions
Sessions are persistent connections with FlareSolverr that allow you to retain Cloudflare cookies until you're done with them. That way, you don't have to continuously solve challenges or send cookies to the browser with each request.
FlareSolverr allows you to create, list, and destroy sessions using the following commands: sessions.create, sessions.list, and session.destroy.
Create sessions
To create a session, use the session.create command in the cmd parameter of your Python script. That'll launch a browser instance and retain cookies until you destroy the session. Here's an example:
import requests

url = "http://localhost:8191/v1"
headers = {"Content-Type": "application/json"}

data = {
    "cmd": "sessions.create",
    "url": "https://www.google.com/",
    "maxTimeout": 60000
}

response = requests.post(url, headers=headers, json=data)

print(response.content)
Optionally, if you want to assign a specific session ID to the instance, use the session parameter. Remember to replace session_ID in the below code:
import requests

url = "http://localhost:8191/v1"
headers = {"Content-Type": "application/json"}

data = {
    "cmd": "sessions.create",
    "session": "session_ID",
    "url": "https://www.google.com/",
    "maxTimeout": 60000
}

response = requests.post(url, headers=headers, json=data)

print(response.content)
Run any of those, and you'll get the following result:
b'{"status": "ok", "message": "Session created successfully.", "session": "session_ID", "startTimestamp": 1691669692294, "endTimestamp": 1691669692847, "version": "3.1.2"}'
List sessions
FlareSolverr lets you keep track of the sessions you're currently running using the sessions.list command. This can aid in debugging and monitoring scraping processes as it provides insight into the state of each session.
Here's an example on how to use the command in your Python script:
curl -L -X POST 'http://localhost:8191/v1' \
-H 'Content-Type: application/json' \
--data-raw '{
  "cmd": "sessions.list",
  "url":"http://www.google.com/",
  "maxTimeout": 60000
}'
That'll return a list of session IDs like the example below.
{
  "sessions": [
    "session_id_a",
    "session_id_b",
    "session_id_c..."

    #..

  ]
}
Destroy sessions
Sessions can consume resources, especially when they involve browser instances. Therefore, sessions.destroy allows you to manage resources by closing sessions that are no longer needed.
That command shuts down the browser instance associated with the session ID and deletes all resources, including cookies. Here's how you can use it in your Python script.
curl -L -X POST 'http://localhost:8191/v1' \
-H 'Content-Type: application/json' \
--data-raw '{
  "cmd": "sessions.destroy",
  "session": "session_ID",
  "url":"http://www.google.com/",
  "maxTimeout": 60000
}'
Make POST Requests
If you're trying to solve a challenge requiring you to submit a form with POST data, you'll need to make a POST request. With FlareSolverr, that's similar to a GET request. You only need to replace request.get with request.post in the cmd section and include the postData parameter.
Here's an example:
import requests

api_url = 'http://localhost:8191/v1'
headers = {'Content-Type': 'application/json'}

data = {
  "cmd": "request.post",
  "url":"https://www.example.com/POST",
  "postData": POST_DATA,
  "maxTimeout": 60000
}

response = requests.post(api_url, headers=headers, json=data)

print(response.data)
postData must be a string with application/x-www-form-urlencoded, e.g., a=b&c=d.
FlareSolverr Alternative: Overcome Limitations
While FlareSolverr is a great tool for bypassing Cloudflare challenges, it's open-source, which rarely keeps up with Cloudflare's frequently evolving bot management system. It's easy to find FlareSolverr not working, and here's an example:
Let's try our previous code against a website with more advanced Cloudflare protection, like Glassdoor.
Our script looks like this:
import requests

url = "http://localhost:8191/v1"
headers = {"Content-Type": "application/json"}

data = {
    "cmd": "request.get",
    "url": "https://www.glassdoor.com/Overview/Working-at-Google-EI_IE9079.11,17.htm",
    "maxTimeout": 60000
}

response = requests.post(url, headers=headers, json=data)

print(response.content)
And we get the following error message:
b'{"status": "error", "message": "Error: Error solving the challenge. Timeout after 60.0 seconds.", "startTimestamp": 1681908319571, "endTimestamp": 1681908380332, "version": "3.1.2"}'
The result above confirms FlareSolverr can't solve advanced Cloudflare challenges.
Fortunately, there's a FlareSolverr alternative: ZenRows, a constantly evolving web scraping solution, offers a way out. Let's see how it does against Glassdoor, where FlareSolverr failed.
To use ZenRows, sign up to get your free API key. You'll also get the request builder page.
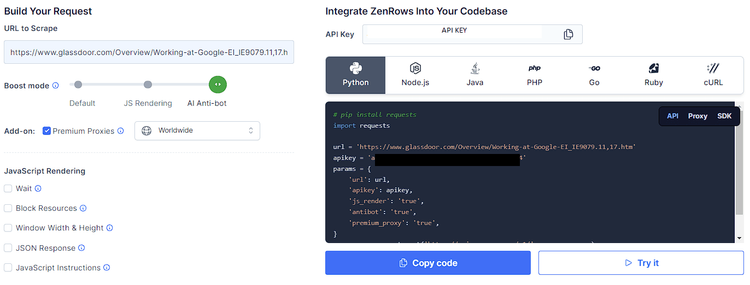
Input the target URL (Glassdoor), activate the Anti-bot boost mode, and the add-on Premium Proxies. That'll generate your request code on the right. Copy it, and use your preferred HTTP client. For example, Python Requests, which you can install using the following command:
pip install requests
Your code should look like this:
import requests

url = 'https://www.glassdoor.com/Overview/Working-at-Google-EI_IE9079.11,17.htm'
apikey = 'Your_API _KEY'
params = {
    'url': url,
    'apikey': apikey,
    'js_render': 'true',
    'antibot': 'true',
    'premium_proxy': 'true',
}
response = requests.get('https://api.zenrows.com/v1/', params=params)
print(response.text)
BoldRun it, and you'll get the following result.
<!DOCTYPE html>
#..

<title data-rh="true">Working at Google| Glassdoor</title>

#..
It's great to bypass any level of Cloudflare protection, right? ZenRows works as a FlareSolverr alternative.
Common Errors with FlareSolverr
When using FlareSolverr, users often encounter some frustrating errors. Let's see the most common ones and how to fix them!
The Cookies Provided by Flaresolverr Are Not Valid
This error occurs when the cookies returned by FlareSolverr don't work. That happens if cookies mismatch due to different IPs from Docker and FlareSolverr. In other words: when they're running on different networks.
That's often the case when using proxies or VPNs since FlareSolverr doesn't currently support them. To fix that, try disabling the proxy or VPN. If that's not possible, refer to this issue.
FlareSolverr Cloudflare Not Detected
The FlareSolverr Cloudflare not detected error means that FlareSolverr is unable to detect Cloudflare challenges. This can happen if the website uses other security measures unrecognized by FlareSolverr, or due to using an outdated FlareSolverr. So, ensure you're using the latest FlareSolverr version. If you're using Prowlarr or Jackett, try reinstalling everything.
Challenge Detected, but Flaresolverr Is Not Configured
This error is common with Jackett, where Cloudflare protects some indexers. To solve it, install the FlareSolverr service and configure the FlareSolverr API URL.
FlareSolverr CAPTCHA
The FlareSolverr CAPTCHA error means a CAPTCHA appeared and the request was blocked. FlareSolverr is designed to solve Cloudflare challenges, not CAPTCHAs. While v1 had CAPTCHA support, it was removed in subsequent versions because it didn't work well.
FlareSolverr frameId Not Supported
The actual cause of the FlareSolverr frameId not supported error is unknown, but it's a FlareSolverr v2 error that has been fixed in version 3.0.0. Therefore, to avoid it, ensure you're using v3 or higher.
More Installation Guides: Jacket and Prowlarr
We've seen how to set up FlareSolverr using Docker containers. Now, let's explore the other methods mentioned earlier: installing FlareSolverr with Jackett and Prowlar, two popular tools for finding and organizing website data.
Set up FlareSolverr with Jackett
Configuring FlareSolverr with Jackett allows you to solve possible Cloudflare challenges when interacting with indexers. Here are the steps you must follow:
Start by installing Jackett. There are different ways you can do this, but it's recommended to install it as a service.
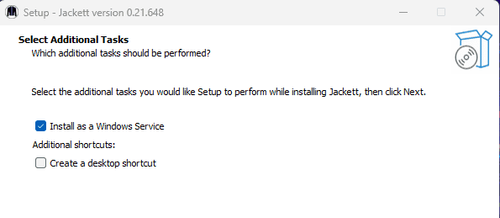
On Windows, you can do that by downloading the latest version of the installer from the releases page, launching it, and following on-screen instructions. Ensure you check the box for the Install as a Windows Service option.
On Linux, use the following command to install the latest Jackett version and run the package:
cd /opt && f=Jackett.Binaries.LinuxAMDx64.tar.gz && release=$(wget -q https://github.com/Jackett/Jackett/releases/latest -O - | grep "title>Release" | cut -d " " -f 4) && sudo wget -Nc https://github.com/Jackett/Jackett/releases/download/$release/"$f" && sudo tar -xzf "$f" && sudo rm -f "$f" && cd Jackett* && sudo ./install_service_systemd.sh && systemctl status jackett.service && cd - && echo -e "\nVisit http://127.0.0.1:9117"
Once installed, access the Jacket interface on your machine. It's often available at http://localhost:9117/UI/Dashboard.
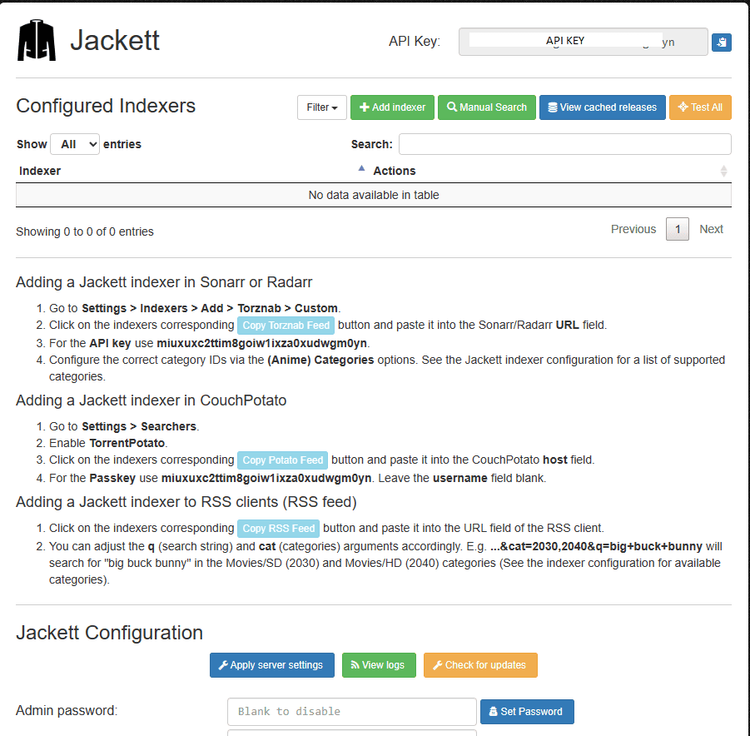
Next, click Add indexer to add your target websites. Then, download and install the FlareSolverr docker image with the following command:
docker pull flaresolverr/flaresolverr
Now, ensure you have your Docker engine running.
Lastly, configure the FlareSolverr API URL in Jackett. To do that, navigate to the FlareSolverr API URL option and enter the FlareSolverr API URL. This typically consists of the IP address of your machine and the port where the FlareSolverr service is listening on, typically http://172.17.0.2:8191.

Click on Apply server settings, and you've successfully configured FlareSolverr with Jackett!
Set up FlareSolverr with Prowlarr
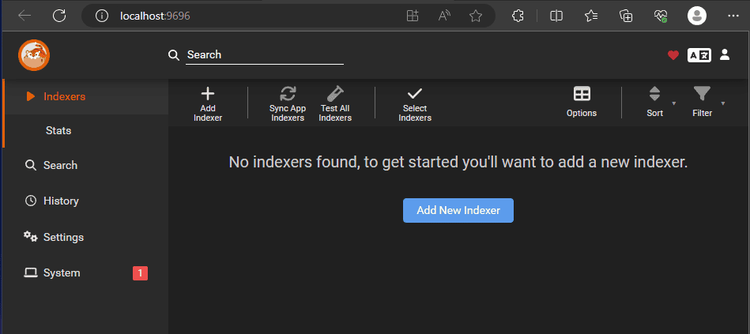
To configure FlareSolverr with Prowlarr, start by installing Prowlarr. To do that, download its .exe file and follow the Setup Wizard's instructions. Once installed, open the web UI by going to http://localhost:9696.
Next, download and install FlareSolverr's Docker image using the following command.
docker pull flaresolverr/flaresolverr
Ensure you have your Docker engine running.
In settings, navigate to Indexers > Add indexer proxy and select "FlareSolverr".
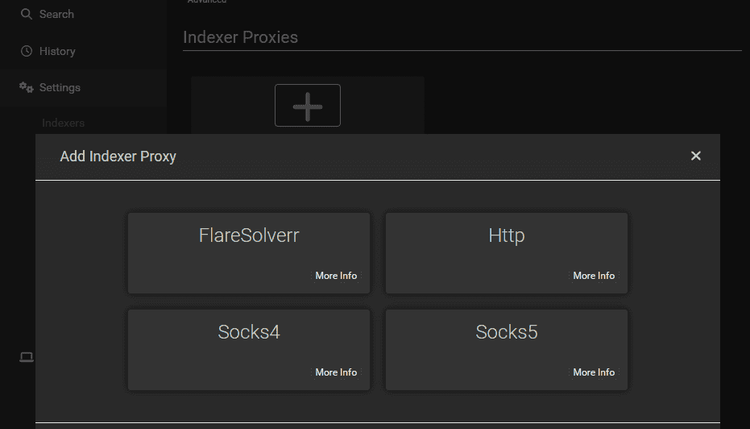
Lastly, add the following FlareSolverr details: Name: FlareSolverr, Tags: flaresolverr, Host: http://flaresolverr:8191.
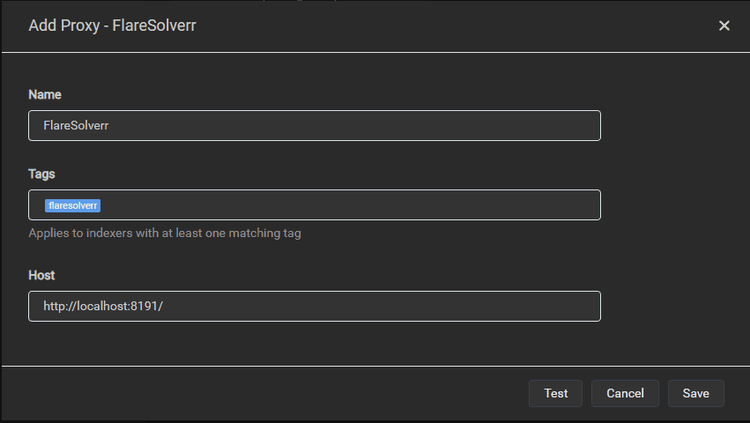
The host refers to the HTTP address and port of your FlareSolverr instance. So it could differ for you. For example, if your machine's address is 172.17.0.2, your host would be, http://172.17.0.2:8191. Generally, http://localhost:8191/ works.
Click "Save", and you're ready to use FlareSolverr with Prowlarr.
Other Languages: C#
FlareSolver offers a dedicated library called FlareSolverSharp, allowing you to integrate FlareSolverr's capabilities into your C# projects. Like its Python counterpart, FlareSolverrSharp solves Cloudflare's challenges using Selenium and Undetected ChromeDriver. It returns the target's HTML and Cloudflare cookies.
Conclusion
FlareSolverr is a great tool for solving Cloudflare challenges. However, the bot detection system frequently updates, while FlareSolverr still needs to. That's why it'll only work on some websites with less advanced protection.
In these cases, consider using always-evolving solutions like ZenRows, which succeeds where FlareSolverr failed. Are you starting a new project? Sign up to get your free API key today.
Frequent Questions
How Do I Set up Flaresolverr?
You can set up FlareSolverr using a Docker container. To do that, ensure you have Docker installed. Then, download FlareSolverr's Docker image and create a FlareSolverr container using the following command:
docker create \
--name=flaresolverr \
-p 8191:8191 \
-v /path/to/flaresolverr/config:/app/config \
flaresolverr/flaresolverr
Lastly, run FlareSolverr using docker start container_name in your terminal.
What Is the Default Port of FlareSolverr?
The default port of FlareSolverr is 8191. FlareSolverr maps your local machine to this port, allowing you to leverage its services outside of the container. You can access FlareSolverr on your local machine by visiting http://localhost:8191.
Did you find the content helpful? Spread the word and share it on Twitter, or LinkedIn.