Elixir web scraping is a great option thanks to the language's simplicity, scalability, and process distribution capabilities.
In this step-by-step tutorial, you'll learn how to perform data scraping in Elixir with Crawly. Let's dive in!
Can You Scrape Websites with Elixir?
Elixir is a viable choice for web scraping. Developers love it for its ease of use, efficiency, and scalability. That makes it a perfect tool for both beginners and experienced users. At the same time, Elixir isn't the most popular language for online data scraping.
Python web scraping is much more common for its extensive ecosystem. JavaScript with Node.js also enjoys popularity in this domain. Check out our article to discover the best programming languages for web scraping.
Elixir stands out for its exceptional process distribution capabilities and extreme scalability. It excels in handling parallel tasks, making it particularly suitable for large scraping projects.
Prerequisites
Set up your Elixir environment for web scraping.
Set Up an Elixir Project
Before getting started, make sure you have Elixir installed on your computer. Otherwise, visit the Elixir installation page and follow the instructions for your OS. On Windows, you'll first have to install Erlang.
Then, use the mix new command to initialize an Elixir project called elixir_scraper:
mix new elixir_scraper --sup
Great! Your elixir_scraper will now contain a blank web scraping Elixir project.
Install the Tools
To perform web scraping in Elixir, you'll need the following two libraries:
- Crawly: A Scrapy-like framework for crawling sites and exporting structured data from their pages. The library acts as a pipeline that executes tasks one at a time on the scraped items.
- Floky: A simple, yet complete, HTML parser to select nodes via CSS selectors and retrieve data from them.
Add them to your project's dependencies by making sure the mix.exs file contains:
defp deps do
    [
      {:crawly, "~> 0.16.0"},
      {:floki, "~> 0.33.0"}
    ]
end
After this operation, your mix.exs will look like as follows:
defmodule ElixirScraper.MixProject do
  use Mix.Project

  def project do
    [
      app: :elixir_scraper,
      version: "0.1.0",
      elixir: "~> 1.16",
      start_permanent: Mix.env() == :prod,
      deps: deps()
    ]
  end

  # Run "mix help compile.app" to learn about applications.
  def application do
    [
      extra_applications: [:logger],
      mod: {ElixirScraper.Application, []}
    ]
  end

  # Run "mix help deps" to learn about dependencies.
  defp deps do
    [
      {:crawly, "~> 0.16.0"},
      {:floki, "~> 0.33.0"}
    ]
  end
end
Install the libraries with this command:
mix deps.get
Well done! Your Elixir web scraping project is ready!
Tutorial: How to Do Web Scraping with Elixir
Doing web scraping using Elixir involves the four steps below:
- Create a Crawly spider for the target site.
- Set up Crawly to visit the desired webpage.
- Use Floky to parse the HTML content and populate some Crawly items.
- Configure Crawly to export the scraped items to CSV.
The target site will be ScrapeMe, an e-commerce platform with a paginated list of Pokémon products. The goal of the Elixir Crawly scraper you're about to create is to extract all product data from each page.
Time to write some code!
Step 1: Create Your Spider
In Crawly, a spider is an Elixir module specifying a specific site's scraping process. It defines how to extract structured data from pages and follow links for crawling. Specifically, it's Crawly.Spider behavior module that must contain the following functions:
-
base_url(): Returns the base URL of the target site. Crawly uses it to filter out requests not related to the given website. -
init(): Returns a list of URLs the crawler should start from. -
parse_item(): Defines the parsing logic to convert scraped data into Crawly items, which can be exported in different formats. It also specifies how to perform the next requests for crawling the site.
Launch the command below to set up a new Crawly spider:
mix crawly.gen.spider --filepath ./lib/scrapeme_spider.ex --spidername ScrapemeSpider
The first time you run this command, be patient as it'll take a while. The reason is that it'll initialize all the Crawly files needed to run the project.
This will create a scrapeme_spider.ex file in the /lib folder containing the ScrapemeSpider module below:
defmodule ScrapemeSpider do
  use Crawly.Spider

  @impl Crawly.Spider
  def base_url(), do: "https://books.toscrape.com/"

  @impl Crawly.Spider
  def init() do
    [start_urls: ["https://books.toscrape.com/index.html"]]
  end

  @impl Crawly.Spider
  @doc """
     Extract items and requests to follow from the given response
  """
  def parse_item(response) do
    # Extract item field from the response here. Usually it's done this way:
    # {:ok, document} = Floki.parse_document(response.body)
    # item = %{
    #   title: document |> Floki.find("title") |> Floki.text(),
    #   url: response.request_url
    # }
    extracted_items = []

    # Extract requests to follow from the response. Don't forget that you should
    # supply request objects here. Usually it's done via
    #
    # urls = document |> Floki.find(".pagination a") |> Floki.attribute("href")
    # Don't forget that you need absolute urls
    # requests = Crawly.Utils.requests_from_urls(urls)

    next_requests = []
    %Crawly.ParsedItem{items: extracted_items, requests: next_requests}
  end
end
Update base_url() so that it returns the base URL of the target site:
@impl Crawly.Spider
def base_url(), do: "https://scrapeme.live/"
Clean out the comments in parse_item() and empty the start_urls array returned by init(). This will be your starting Scrapeme spider module:
defmodule ScrapemeSpider do
  use Crawly.Spider

  @impl Crawly.Spider
  def base_url(), do: "https://scrapeme.live/"

  @impl Crawly.Spider
  def init() do
    [start_urls: []]
  end

  @impl Crawly.Spider
  @doc """
     Extract items and requests to follow from the given response
  """
  def parse_item(response) do
    extracted_items = []

    next_requests = []
    %Crawly.ParsedItem{items: extracted_items, requests: next_requests}
  end
end
To run it, launch the command below:
iex -S mix run -e "Crawly.Engine.start_spider(ScrapemeSpider)"
On Windows, iex must be iex.bat. So the command becomes:
iex.bat -S mix run -e "Crawly.Engine.start_spider(ScrapemeSpider)"
If it all went as planned, that will generate this output:
[debug] Opening/checking dynamic spiders storage
[debug] Using the following folder to load extra spiders: ./spiders
[debug] Could not load spiders: %MatchError{term: {:error, :enoent}}
[debug] Starting data storage
[debug] Starting the manager for ScrapemeSpider
[debug] Starting requests storage worker for ScrapemeSpider...
[debug] Started 4 workers for ScrapemeSpider
Perfect, get ready to start scraping some data!
Step 2: Connect to the Target Page
To instruct the Crawly spider to visit the target page, add it to the start_urls array returned by init():
@impl Crawly.Spider
def init() do
  [start_urls: ["https://scrapeme.live/shop/"]]
end
The Elixir web scraping script will now perform a request to the desired page. To verify that, retrieve the source HTML of the page and log it in parse_item():
# extract the HTML form the target page and log it
html = response.body
Logger.info("HTML of the target page:\n#{html}")
The complete scrapeme_spider.ex will be:
defmodule ScrapemeSpider do
  use Crawly.Spider

  @impl Crawly.Spider
  def base_url(), do: "https://scrapeme.live/"

  @impl Crawly.Spider
  def init() do
    [start_urls: ["https://scrapeme.live/shop/"]]
  end

  @impl Crawly.Spider
  @doc """
     Extract items and requests to follow from the given response
  """
  def parse_item(response) do
    # extract the HTML form the target page and log it
    html = response.body
    Logger.info("HTML of the target page:\n#{html}")

    extracted_items = []
    next_requests = []
    %Crawly.ParsedItem{items: extracted_items, requests: next_requests}
  end
end
Run it, and it'll now print:
[info] HTML of the target page:

<!doctype html>
<html lang="en-GB">
<head>
<meta charset="UTF-8">
<meta name="viewport" content="width=device-width, initial-scale=1, maximum-scale=2.0">
<link rel="profile" href="http://gmpg.org/xfn/11">
<link rel="pingback" href="https://scrapeme.live/xmlrpc.php">
<!-- omitted for brevity... -->
Wonderful! Your Elixir scraping script now connects to the target page. It's time to parse its HTML content and extract some data from it.
Step 3: Extract Specific Data from the Scraped Page
This step aims to define a CSS selector strategy to get the HTML product nodes and retrieve data from them.
Open the target page in your browser and inspect a product HTML element in the DevTools:
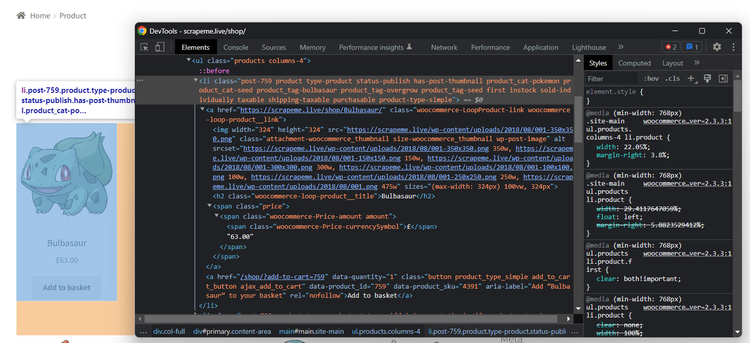
Take a look at the HTML code and note that you can select all products with this CSS selector:
li.product
li is the HTML tag, while product is the element's class attribute.
Given a product element, the useful information to extract is:
- The URL is in the
a.woocommerce-LoopProduct-link. - The image is in the
img.attachment-woocommerce_thumbnailnode. - The name is in the
h2.woocommerce-loop-product__titlenode. - The price is in the
span.pricenodes.
Put that knowledge into practice by implementing the following parsing logic in parse_item().
First, pass the response body to Floky to parse its HTML content.
# parse the response HTML body
{:ok, document} = Floki.parse_document(response.body)
Then, select all the HTML product elements on the page and iterate to convert them to Crawly items:
product_items =
  document
  |> Floki.find("li.product")
  |> Enum.map(fn x ->
    %{
      url: Floki.find(x, "a.woocommerce-LoopProduct-link")|> Floki.attribute("href") |> Floki.text(),
      name: Floki.find(x, "h2.woocommerce-loop-product__title") |> Floki.text(),
      image:  Floki.find(x, "img.attachment-woocommerce_thumbnail") |> Floki.attribute("src") |> Floki.text(),
      price: Floki.find(x, "span.price") |> Floki.text(),
    }
  end)
Crawly automatically passes the parsed items returned by the parse_item() function to the next task in the pipeline.
Thus, make sure to add them to the return object as below:
%Crawly.ParsedItem{items: product_items}
Put it all together, and you'll get this ScrapemeSpider module:
defmodule ScrapemeSpider do
  use Crawly.Spider

  @impl Crawly.Spider
  def base_url(), do: "https://scrapeme.live/"

  @impl Crawly.Spider
  def init() do
    [start_urls: ["https://scrapeme.live/shop/"]]
  end

  @impl Crawly.Spider
  def parse_item(response) do
    # parse the response HTML body
    {:ok, document} = Floki.parse_document(response.body)

    # select all product elements on the page
    # and convert them to scraped items
    product_items =
      document
      |> Floki.find("li.product")
      |> Enum.map(fn x ->
        %{
          url: Floki.find(x, "a.woocommerce-LoopProduct-link")|> Floki.attribute("href") |> Floki.text(),
          name: Floki.find(x, "h2.woocommerce-loop-product__title") |> Floki.text(),
          image:  Floki.find(x, "img.attachment-woocommerce_thumbnail") |> Floki.attribute("src") |> Floki.text(),
          price: Floki.find(x, "span.price") |> Floki.text(),
        }
      end)

    %Crawly.ParsedItem{items: product_items}
  end
end
Execute it, and it'll automatically log the scraped items as in these lines:
[debug] Stored item: %{name: "Bulbasaur", image: "https://scrapeme.live/wp-content/uploads/2018/08/001-350x350.png", url: "https://scrapeme.live/shop/Bulbasaur/", price: "£63.00"}
# omitted for brevity...
[debug] Stored item: %{name: "Pidgey", image: "https://scrapeme.live/wp-content/uploads/2018/08/016-350x350.png", url: "https://scrapeme.live/shop/Pidgey/", price: "£159.00"}
As you can see, the scraped items contain the desired data. Mission achieved!
Step 4: Convert Scraped Data Into a CSV File
Crawly supports the CSV and JSON export formats out of the box. To export the scraped items to CSV, you need to configure the task in the pipeline. Add a config folder to your project and then create the config.exs configuration file inside it:
import Config

 config :crawly,
   middlewares: [],
   pipelines: [
     {Crawly.Pipelines.CSVEncoder, fields: [:url, :name, :image, :price]},
     {Crawly.Pipelines.WriteToFile, extension: "csv", folder: "output"}
   ]
Crawly.Pipelines.CSVEncoder instructs Crawly to convert the scraped items to CSV format. Bear in mind that you must specify the item attributes you want to appear in the CSV file in the fields attribute. Use Crawly.Pipelines.WriteToFile to set the output folder and file extension.
Create a blank output folder in your project's root and run the web scraping Elixir spider:
iex -S mix run -e "Crawly.Engine.start_spider(ScrapemeSpider)"
Wait for the script to complete, and the CSV file below will appear in the output directory.
Open it, and you'll see:
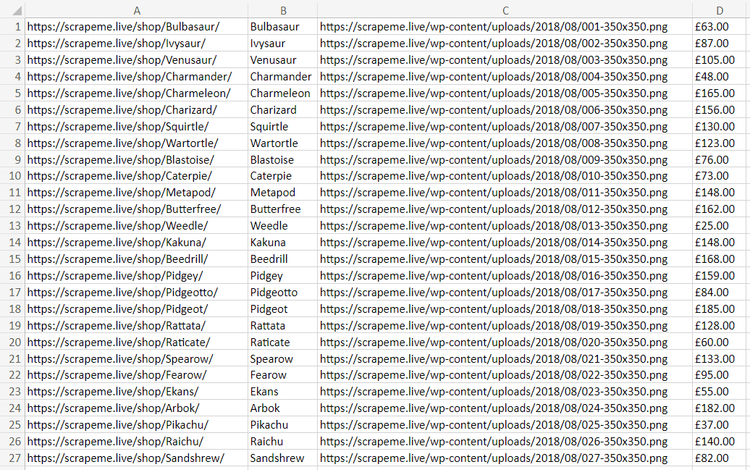
Et voilà! You just performed web scraping in Elixir with Crawly!
Advanced Web Scraping Techniques with Elixir
Now that you know the basics, it's time to explore advanced Elixir web scraping techniques.
Scrape and Get Data from Paginated Pages
The current output only involves the product data from the home page. However, the target site has many pages. You need to perform web crawling to scrape them all and retrieve all products. If you're unfamiliar with that, read our guide on web crawling vs web scraping.
Crawly makes it easy to implement web crawling. All you have to do is pass the requests to the page you want to visit next to the requests field of the objected returned by parse_item().
The web scraping Elixir tool will add each request to the queue and visit the page only if it hasn't visited it yet. In detail, it'll apply parse_item() function to each page, scraping new products as a result.
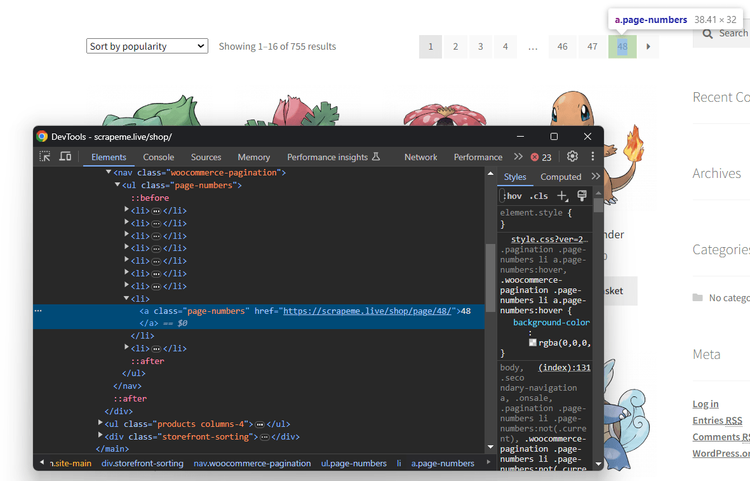
Thus, inspect the pagination element on the page to learn how to extract the URLs from it:

Note that you can select each link element with the CSS selector below:
a.page-numbers
Get their destination URLs from the href attribute and convert it to a Crawly request with the request_from_url() utility:
# find the URLs of the next pages to visit and
# convert them to Crawly requests
next_requests =
  document
  |> Floki.find("a.page-numbers")
  |> Floki.attribute("href")
  |> Enum.map(
    fn url -> Crawly.Utils.request_from_url(url)
  end)
Next, pass them to the return object:
%Crawly.ParsedItem{items: product_items, requests: next_requests}
Before launching the spider, update the global configurations in config.exs. Use the closespider_itemcount option to make it scrape only one page at a time, and closespider_itemcount to make it stop after scraping at least 50 items:
import Config

 config :crawly,
   concurrent_requests_per_domain: 1,
   closespider_itemcount: 50,

   middlewares: [],
   pipelines: [
     {Crawly.Pipelines.CSVEncoder, fields: [:url, :name, :image, :price]},
     {Crawly.Pipelines.WriteToFile, extension: "csv", folder: "output"}
   ]
Set concurrent_requests_per_domain to a value greater than 1 to perform parallel web scraping with Elixir. The default value is 4.
Perfect! Run the spider again:
iex -S mix run -e "Crawly.Engine.start_spider(ScrapemeSpider)"
This time, the script will go through many pagination pages and scrape them all. The final result will be a CSV file storing this data:

Amazing! You just learn how to perform Elixir web crawling!
Avoid Getting Blocked When Scraping with Elixir
The biggest challenge when doing web scraping with Elixir is getting blocked. Many sites know how valuable their data is, even if publicly available on their pages. So, they adopt anti-bot technologies to detect and block automated scripts. Those solutions can stop your spider.
Two tips to perform web scraping without getting blocked involve setting a real-world User-Agent and using a proxy to protect your IP. You can set custom User-Agents globally in Crawly with the Middlewares.UserAgent middleware in config.exs:
import Config

 config :crawly,
   # ...
   middlewares: [
    # other middlewares...
    {
      Crawly.Middlewares.UserAgent, user_agents: [
        "Mozilla/5.0 (Windows NT 10.0; Win64; x64) AppleWebKit/537.36 (KHTML, like Gecko) Chrome/120.0.0.0 Safari/537.36",
        "Mozilla/5.0 (Windows NT 10.0; Win64; x64; rv:109.0) Gecko/20100101 Firefox/121.0",
        "Mozilla/5.0 (Windows NT 10.0; Win64; x64) AppleWebKit/537.36 (KHTML, like Gecko) Chrome/120.0.0.0 Safari/537.36 Edg/120.0.2210.121"
      ]
    }
   ],
   pipelines: [
     #...
   ]
Crawly will now automatically rotate over the User-Agent strings in the user_agents array.
Configuring a proxy server depends instead on the Crawly.Middlewares.RequestOptions middleware. Get the URL of a free proxy from a site like Free Proxy List and then use it in the configuration file as follows:
import Config

 config :crawly,
   # ...
   middlewares: [
    # other middlewares...
    {Crawly.Middlewares.RequestOptions, [proxy: {"231.32.4.13", 3671}]}
   ],
   pipelines: [
     #...
   ]
By the time you follow the tutorial, the chosen proxy server will no longer work. The reason is that free proxies are short-lived and unreliable. Plus, they're data-greedy and only good for learning purposes!
Don't forget that these two tips are just baby steps to bypass anti-bot measures. Advanced solutions like Cloudflare will still be able to detect your Elixir web scraping script as a bot. For example, try to get the HTML of a G2 product review page:
defmodule G2Spider do
  use Crawly.Spider

  @impl Crawly.Spider
  def base_url(), do: "https://www.g2.com/"

  @impl Crawly.Spider
  def init() do
    [start_urls: ["https://www.g2.com/products/airtable/reviews"]]
  end

  @impl Crawly.Spider
  @doc """
     Extract items and requests to follow from the given response
  """
  def parse_item(response) do
    # extract the HTML form the target page and log it
    html = response.body
    Logger.info(html)

    %Crawly.ParsedItem{items: []}
  end
end
The Crawly spider will receive the following 403 error page:
<!DOCTYPE html>
<!--[if lt IE 7]> <html class="no-js ie6 oldie" lang="en-US"> <![endif]-->
<!--[if IE 7]>    <html class="no-js ie7 oldie" lang="en-US"> <![endif]-->
<!--[if IE 8]>    <html class="no-js ie8 oldie" lang="en-US"> <![endif]-->
<!--[if gt IE 8]><!--> <html class="no-js" lang="en-US"> <!--<![endif]-->
<head>
<title>Attention Required! | Cloudflare</title>
<meta charset="UTF-8" />
<meta http-equiv="Content-Type" content="text/html; charset=UTF-8" />
<!-- omitted for brevity -->
How to avoid that? With ZenRows! Not only does this service offer the best anti-bot toolkit, it can also rotate your User Agent, add IP rotation capabilities, and more.
Try the power of ZenRows with Crawly! Sign up for free to get your first 1,000 credits, and reach the Request Builder page below:
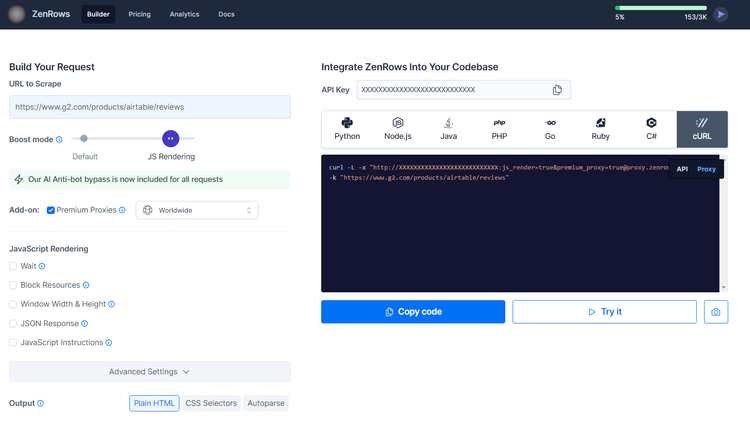
Assume you want to extract some data from the protected G2.com page seen earlier. Follow the instructions below:
- Paste the target URL (
https://www.g2.com/products/airtable/reviews) into the "URL to Scrape" input. - Check "Premium Proxy" to get rotating IPs
- Enable the "JS Rendering" feature (the User-Agent rotation and AI-powered anti-bot toolkit are always included for you).
- Select the “cURL” and then the “Proxy” mode to get the complete URL of the ZenRows proxy.
Extract the proxy info from the generated URL and pass it to the Crawly.Middlewares.RequestOptions middleware in config.exs:
import Config

 config :crawly,
  # ...
  middlewares: [
    # other middlewares...
    {Crawly.Middlewares.RequestOptions, [proxy: {"http://proxy.zenrows.com", 8001}, proxy_auth: {"<YOUR_ZENROWS_KEY>", "js_render=true&premium_proxy=true"}]}
  ],
   pipelines: [
     #...
   ]
Run your spider again, and this time it'll print the source HTML of the G2 page:
<!DOCTYPE html>
<head>
<meta charset="utf-8" />
<link href="https://www.g2.com/assets/favicon-fdacc4208a68e8ae57a80bf869d155829f2400fa7dd128b9c9e60f07795c4915.ico" rel="shortcut icon" type="image/x-icon" />
<title>Airtable Reviews 2024: Details, Pricing, & Features | G2</title>
<!-- omitted for brevity ... -->
Wow! You just integrated ZenRows into the Crawly Elixir library.
Scraping JavaScript-Rendered Pages with Elixir
Crawly comes with Splash integration through the fetcher configuration option. This allows the scraping of pages that require JavaScript for rendering or data retrieval. Follow the instructions below to use Crawly with Splash to scrape the Infinite Scrolling demo page:
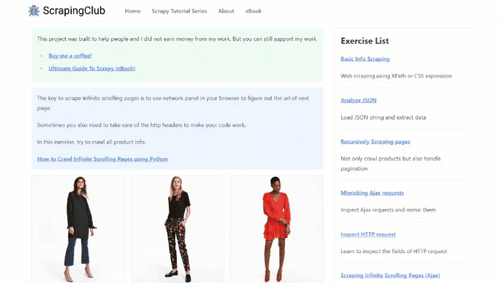
That loads new data via JavaScript as the user scrolls down. Thus, it’s a great example of a dynamic-content page that requires a headless browser.
Make sure you have Docker installed on your machine. Then, download the Splash image using this command and run it on port 8050 using the command below it:
docker pull scrapinghub/splash
docker run -it -p 8050:8050 --rm scrapinghub/splash
For a complete tutorial on how to set up Splash, follow our guide on Scrapy Splash.
Configure Crawly to use Splash for fetching and rendering data by setting the following fetcher option in config.exl:
import Config

 config :crawly,
   fetcher: {Crawly.Fetchers.Splash, [base_url: "http://localhost:8050/render.html", wait: 3]},

   middlewares: [
    #  ...
   ],
   pipelines: [
     # ...
   ]
Create an infinite_scrolling_spider.ex spider containing the InfiniteScrollingSpider module below:
defmodule InfiniteScrollingSpider do use Crawly.Spider
@impl Crawly.Spider def base_url(), do: "https://scrapingclub.com/"
@impl Crawly.Spider def init() do [start_urls: ["https://scrapingclub.com/exercise/list_infinite_scroll/"]] end
@impl Crawly.Spider @doc """ Extract items and requests to follow from the given response """ def parse_item(response) do {:ok, document} = Floki.parse_document(response.body)
product_items =
  document
  |> Floki.find(".post")
  |> Enum.map(fn x ->
    %{
      url: Floki.find(x, "h4 a")|> Floki.attribute("href") |> Floki.text(),
      name: Floki.find(x, "h4") |> Floki.text(),
      image:  Floki.find(x, "img") |> Floki.attribute("src") |> Floki.text(),
      price: Floki.find(x, "h5") |> Floki.text(),
    }
  end)

%Crawly.ParsedItem{items: product_items}
end end
Execute your new spider:
iex -S mix run -e "Crawly.Engine.start_spider(InfiniteScrollingSpider)"
That will log:
[debug] Stored item: %{name: "Short Dress", image: "/static/img/90008-E.jpg", url: "/exercise/list_basic_detail/90008-E/", price: "$24.99"}
# omitted for brevity...
[debug] Stored item: %{name: "Fitted Dress", image: "/static/img/94766-A.jpg", url: "/exercise/list_basic_detail/94766-A/", price: "$34.99"}
Wonderful! You're now an Elixir web scraping master!
Conclusion
This step-by-step tutorial walked you through how to build an Elixir script for web scraping. You started with the basics and then explored more complex topics. You have become a web scraping Elixir ninja!
Now, you know why Elixir is great for parallel scraping, the basics of web scraping and web crawling using Crawly, and how to integrate it with Splash to extract data from JavaScript-rendered sites.
The problem is that it doesn't matter how advanced your Elixir scraper is. Anti-scraping technologies can still detect and stop it! Avoid them all with ZenRows, a scraping tool with the best built-in anti-bot bypass features. Your data of interest is a single API call away!
Did you find the content helpful? Spread the word and share it on Twitter, or LinkedIn.