JavaScript web scraping libraries are very popular nowadays. While you can use any programming language for web scraping, JavaScript holds a significant place. Partly, the reason is that JavaScript is common among developers as they find it very easy to use.
Besides, web scraping involves the client side of a website, traversing the DOM elements. Since JavaScript is a client-side language, it's a better tool for web scraping than other languages. It's also user-friendly and compatible with any backend programming language.
This article will discuss the best JavaScript and Node.js libraries for web scraping. We'll present a demo for each so that you can compare the effort each one requires for the same scraping task.
We selected the dev.to website for our demo. You can find a list of tags we'll scrape in this URL.
If you view the page source, you can see the DOM elements of the web page as the following.

We have to scrape the innerHTML of a tag with the crayons-tag class inside the div elements with the tag-card class.
Let's see how to scrape this page with each library, along with its pros and cons.
1. jQuery
jQuery is one of the most popular JavaScript libraries for manipulating HTML content easily. Therefore, it also acts as a great JS web scraping library.
To get started with jQuery, all you have to do is add a reference to the jQuery library on the web page. However, unlike other libraries mentioned in this article, jQuery isn't a Node.js library. So it only works on the client side or, in other words, on the browser.
Let's scrape dev.to tags with jQuery. Your code should look like the following.
<DOCTYPE HTML>
<head></head>
<body>
	<!-- Scraped dev.to tags will be displayed here -->
	<div class="demo-container"></div>
	<!-- Specifying the jQuery library -->
	<script src="https://code.jquery.com/jquery-3.6.0.min.js"></script>
	<script>
		$(document).ready(function() {
			// Go to the dev.to tags page and get the HTML code
			$.get("https://dev.to/tags", (html) => {
				// Find elements with crayons-tag class inside the HTML page received
				[...$(html).find(".crayons-tag")].forEach((el) => {
					// Get the text(tag name) inside of each element with crayons-tag class
					const text = $(el).text();
					// Append each tag to a list
					$("div.demo-container").append("<li>"+text+"</li>");
				})
			})
		});
	</script>
</body>
</HTML>
Now open the HTML file to see your results. Congrats! You have successfully scraped the tag list.
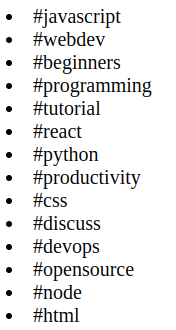
Working with jQuery as a JavaScript crawler library is easier than with any other library. You don't have to install anything.
Furthermore, many developers are already familiar with jQuery as it's broadly used for handling client-side JavaScript. Thus, there won't be anything new to learn when it comes to web scraping with jQuery.
However, the main con is that you can't scrape some sites with jQuery. The reason is that jQuery sends Ajax requests that are subject to a policy called the same origin policy. It means that you can't retrieve data from a different domain using jQuery requests.
Overall, jQuery is suitable for a quick demo but doesn't work in real-world cases.
2. ZenRows
ZenRows API is one of the best options for a web scraping framework using Node.js. The biggest problem most scrapers face while scraping large amounts of data is getting blocked by the website. Zenrows offers a vast rotating proxy pool to address this issue so that you can bypass any blocking that comes your way.
Furthermore, ZenRows provides residential proxies allowing you to browse as a real user. This API also helps to prevent geo-blocks as it offers many proxies. By using premium proxies, users can access websites from different geolocations.
Moreover, ZenRows help you to bypass anti-bots like Cloudflare in Node.js. Thus, you can scrape the HTML forms in web pages easily.
While ZenRows works great with almost all popular programming languages, utilizing Node.js is pretty simple. First, sign up and get your API key for free, and you'll see the following interface.
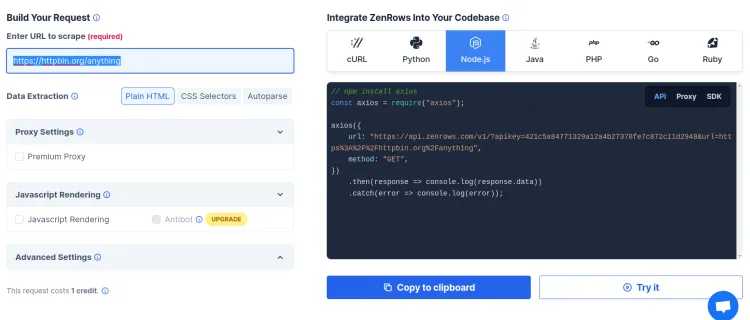
Working with this interface is much easier than working with other programming libraries. You just have to fill in data in the input fields, and ZenRows will write the necessary code for you.
Add the URL and the CSS selector in the relevant fields, as shown below.
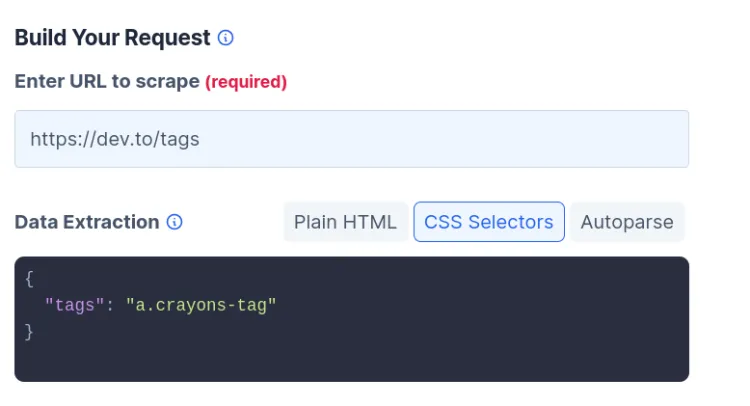
Then select any programming language from the right menu and choose SDK, as shown below.
The code will change according to your selection.
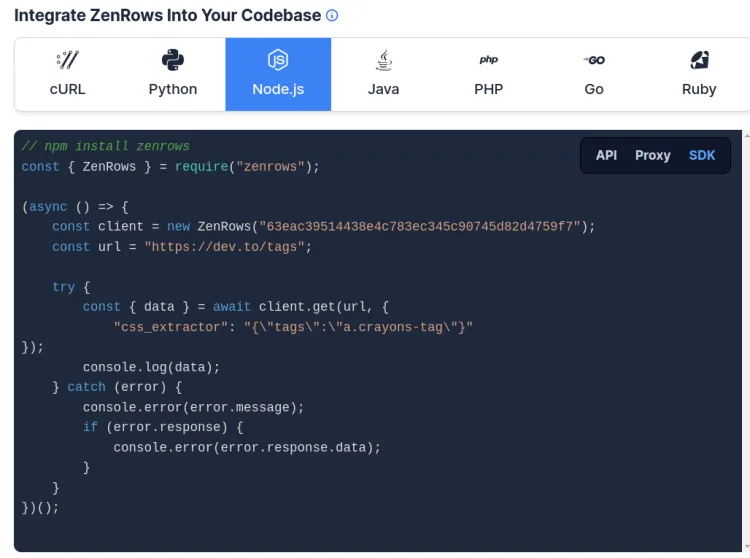
Click "Try it", and you'll get the results as shown in the following screenshot.
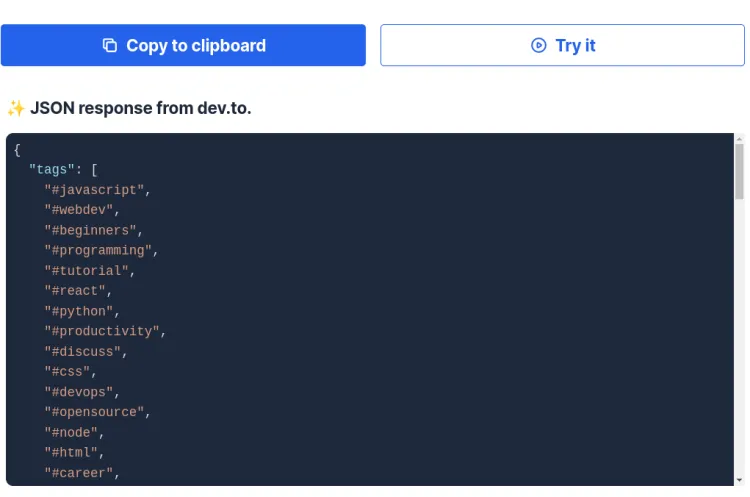
If you want, you can run this code on your local machine. All you have to do is copy it and run it on your favorite IDE or text editor like VS Code.
However, remember to install ZenRows before running the code with the following command.
npm install zenrows
That is a basic scraping scenario. If you want to try more complex ones, ZenRows also facilitates them by providing more advanced options.
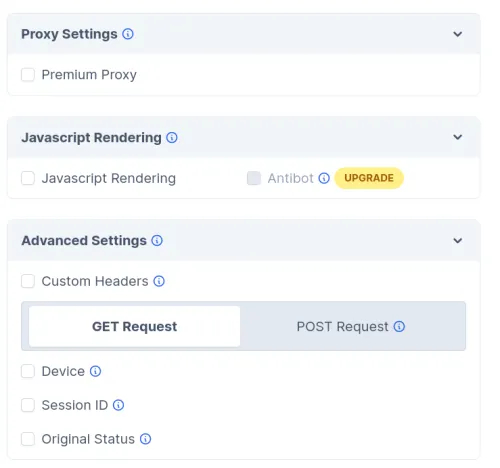
Now, let's compare ZenRows with the other best JavaScript libraries.
3. Axios and Cheerio
Axios is one of the most popular JavaScript web scraping libraries that makes HTTP requests. Sending HTTP requests is a part of the scraping process. Cheerio is a Node.js web crawler framework that works perfectly with Axios for sending HTTP requests.
Cheerio is a great tool for easily traversing a web page. Therefore, we have included the combination of Axios and Cheerio as the third solution in our article. Now, let's see how to scrape dev.to tags with these two libraries.
First, you have to install them using the following commands.
npm install axios cheerio
_Italic_The following code will scrape the list of tags from the dev.to/tags page.
const axios = require("axios");
const cheerio = require("cheerio");

const fetchTitles = async () => {
	try {
		// Go to the dev.to tags page
		const response = await axios.get("https://dev.to/tags");

		// Get the HTML code of the webpage
		const html = response.data;
		const $ = cheerio.load(html);

		// Create tags array to store tags
		const tags = [];

		// Find all elements with crayons-tag class, find their innerText and add them to the tags array
		$("a.crayons-tag").each((_idx, el) => tags.push($(el).text()));

		return tags;
	} catch (error) {
		throw error;
	}
};

// Print all tags in the console
fetchTitles().then(titles => console.log(titles));
You'll get an output as shown below.
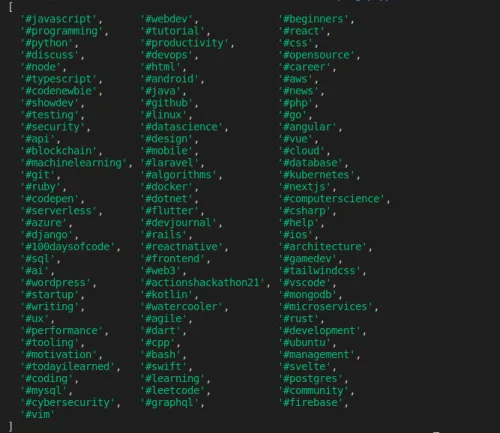
The next two solutions on our list are Puppeteer and Playwright, which use headless browsers. Headless browsers are heavy as they have to start up a real browser. Therefore, this combination of Axios and Cheerio is very fast in terms of performance. Additionally, you can use Axios to add proxies to your Cheerio web scraper.
The main con is that you can't scrape dynamic content. Additionally, you have to learn to work with two libraries.
Let's see what's next on our list!
4. Puppeteer
Puppeteer is one of the most popular Node.js libraries for test automation. It offers a high-level API to automate most Chrome browser tasks through the DevTools protocol. You can also use Puppeteer as a JavaScript web crawler framework since it can automate browser tasks.
Most importantly, Puppeteer works as a headless browser. Headless browsers are the best option if we want to scrape dynamic AJAX pages or the data nested in JS elements.
Let's see how to scrape tags in the dev.to site with Puppeteer.
First, install Puppeteer Node.js web scraping library with the following command.
npm install puppeteer
BoldThen you can scrape the list of tags with the following code.
const puppeteer = require("puppeteer");

async function tutorial() {
	try {
		// Specify the URL of the dev.to tags web page
		const URL = "https://dev.to/tags";

		// Launch the headless browser
		const browser = await puppeteer.launch();
		const page = await browser.newPage();
		// Go to the webpage
		await page.goto(URL);

		// Perform a function within the given webpage context
		const data = await page.evaluate(() => {
			const results = [];

			// Select all elements with crayons-tag class
			const items = document.querySelectorAll(".crayons-tag");
			items.forEach(item => {
				// Get innerText of each element selected and add it to the array
				results.push(item.innerText);
			});
			return results;
		});

		// Print the result and close the browser
		console.log(data);
		await browser.close();
	} catch (error) {
		console.error(error);
	}
}

tutorial();
Your output will look like the below screenshot.
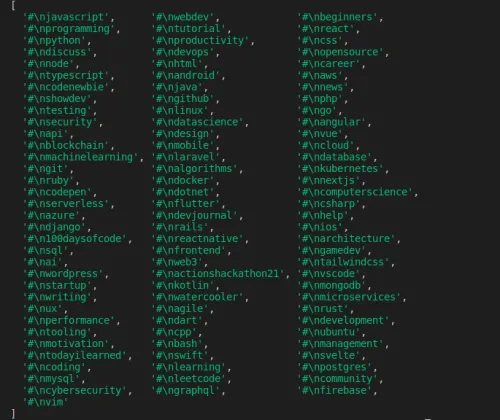
The steps of web scraping with Puppeteer JavaScript scraping framework are very simple and clear. However, as you can see, Puppeteer requires much longer code than jQuery and ZenRows.
The best thing about Puppeteer over other popular JS libraries is that it allows you to easily access any dynamic website's data. It also enables you to go through the pagination or any other special page constructs of a web page.
The main con of Puppeteer as a JavaScript scraping library is that it requires more technical knowledge than other libraries. Moreover, when you use Puppeteer, you need more expensive infrastructure since it needs to launch browsers, unlike ZenRows, which does it for you.
Finally, as you can see above, you also have to write many lines of code, even for a small task.
5. Playwright
Playwright is also a Node.js web scraping library. It's primarily built for testing. However, its capability to automate browser tasks also makes it an ideal choice for web scraping. Playwright Node.js scraping library also comes with headless browser support.
As you can see, Playwright is a Microsoft product introduced to compete with Puppeteer by Google. What makes Playwright better than Puppeteer is its cross-browser support.
It includes Chromium for Chrome and Edge, Gecko for Firefox, and Webkit for Safari. Puppeteer and Playwright are almost the same in terms of performance.
Run the following command to install Playwright.
npm install playwright
Then we can scrape the list of tags using the following code.
const playwright = require("playwright");

async function main() {
	// Launch the headless browser
	const browser = await playwright.chromium.launch({
		headless: true,
	});

	// Go to the dev.to/tags page
	const page = await browser.newPage();
	await page.goto("https://dev.to/tags");

	// Find all elements with crayons-tag class, get their innerText and add them to the data array
	const data = [];
	const tags = await page.$$("div.tag-card");
	for (let tag of tags) {
		const title = await tag.$eval(".crayons-tag", el => el.textContent);
		data.push(title);
	}

	// Print the result
	console.log(data);
	await browser.close();
}

main();
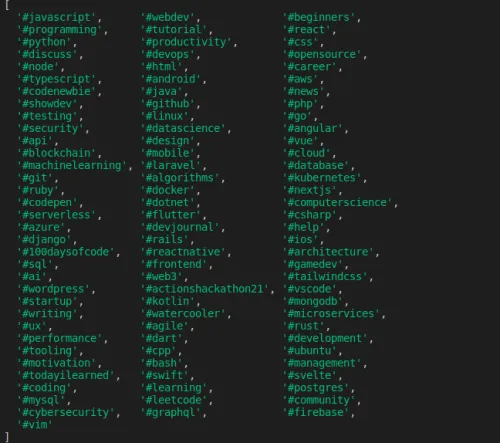
The code is very self-explanatory. The output will be displayed as shown below.
The downside of Playwright over other top JS libraries is that it's still a new library. Many developers aren't aware of it yet.
So the support can be minimal compared to other tools mentioned in this article. Moreover, you might have trouble using it for complex scenarios if you aren't a savvy developer.
Which JavaScript Web Scraping Library Is Best for You?
The answer to this question is a bit obvious at this moment. There are cool JavaScript libraries that you can use freely. However, you need to learn them first.
Additionally, you must put some effort into getting something done with them. The biggest problem is finding workarounds to prevent getting your IP address blocked and bypassing CAPTCHAs.
Overall the simplicity that ZenRows brings is undefeatable. Thus, it's always recommended to use such premium services.
Conclusion
As you can see, when it comes to web scraping with JavaScript and Node.js, you have several exceptional tools and libraries at your disposal. Each has its advantages over the others, so you'll have to consider what kind of projects you want to engage in and the level of your coding skills..
Once you've decided which is the best fit for you, you'll be able to successfully scrape any page you want.
Thanks for reading! We hope that you found this guide helpful. You can sign up for free, try ZenRows, and let us know any questions, comments, or suggestions.
Did you find the content helpful? Spread the word and share it on Twitter, or LinkedIn.