Building a PowerShell web scraping script is a great way to retrieve online data in Windows out of the box. This means saving time in setting up an environment for your favorite programming language.
In this tutorial, you'll see how to perform web scraping with PowerShell using the PSParseHTML module. Let's dive in!
Is PowerShell Good for Web Scraping?
Yes, you can perform web scraping with PowerShell!
As a scripting language, PowerShell offers ideal straightforwardness for simple scraping tasks. Also, it comes with built-in utilities and support for third-party libraries. These make parsing HTML content and exporting data to human-readable formats much more accessible.
For more complex projects, Python and JavaScript are more popular. That's due to their broad ecosystems and communities. No wonder they appear on the list of best languages for web scraping.
Tutorial: How to Do Web Scraping With PowerShell
This guided section teaches you how to create a PowerShell website scraping script.
The target site will be Scrapingcourse, a demo e-commerce website containing a paginated list of products. The PowerShell scraper you're about to build will retrieve all product data from this page:
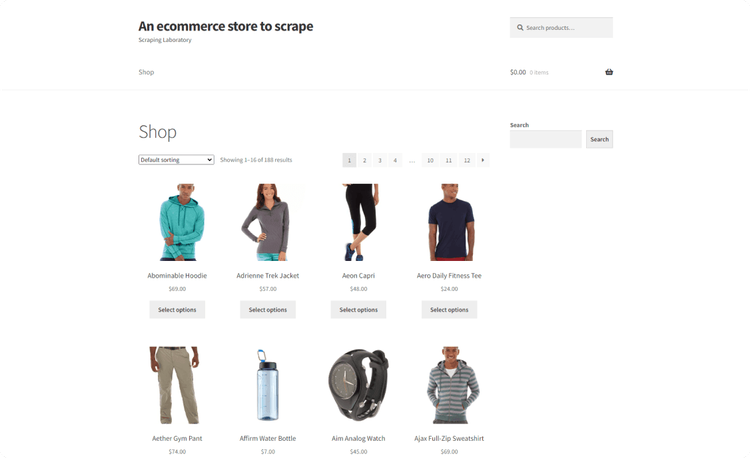
Get ready to build a web scraping PowerShell script!
Step 1: Set Up the Project
Windows already comes with a version of PowerShell preinstalled. Yet, that's Windows PowerShell and not PowerShell Core. Windows PowerShell isn't cross-platform and comes with some limitations. PowerShell Core is what you need to follow the tutorial.
Thus, make sure you have PowerShell Core 7 installed on your computer. Download the installer for your OS, launch it, and follow the instructions.
Next, open a PowerShell 7 terminal. Create a PowerShellScraper folder for your PowerShell web scraping project and enter it:
mkdir PowerShellScraper
cd PowerShellScraper
Add the following scraper.ps1 PowerShell script inside the directory:
Write-Host "Hello, World!"
Launch the script to verify that it works using the command below:
.\scraper.ps1
If all goes as expected, you'll see in the terminal:
Hello, World!
Load PowerShellScraper in your IDE, such as Visual Studio Code with the PowerShell extension.
Awesome! You're now ready to perform web scraping with PowerShell.
Step 2: Get the HTML of Your Target Page
Invoke-WebRequest from Windows PowerShell comes with a built-in HTML parser. That means it enables you to perform an HTTP request and parse the resulting HTML content. However, this feature isn't available in PowerShell Core for cross-platform compatibility reasons.
Thus, you need to install a third-party PowerShell HTML parser. The most popular is PSParseHTML, a module that wraps the HTML Agility Pack (HAP) and AngleSharp libraries. Learn more about those two libraries in our guide on the best C# HTML parser.
Install PSParseHTML with the command below:
Install-Module -Name PSParseHTML -AllowClobber -Force
You can now get the target page and parse its HTML content with the ConvertFrom-HTML function. By default, PSParseHTML will return an HTML Agility Pack object. As HAP doesn't support CSS selectors, use the -Engine AngleSharp option to get an AngleSharp object instead:
$ParsedHTMLResponse = ConvertFrom-HTML -URL "https://www.scrapingcourse.com/ecommerce/" -Engine AngleSharp
Under the hood, PSParseHTML will:
- Perform an HTTP
GETrequest to the specified URL in-URL. - Retrieve the HTML document associated with the page.
- Parse it and return an object that exposes the AngleSharp methods.
Then, use the OuterHtml attribute to get the raw HTML of the page. Print it in the terminal with:
$ParsedHTMLResponse.OuterHtml
Your scraper.ps1 file will now store the following code:
# download the target page and parse its HTML content
$ParsedHTMLResponse = ConvertFrom-HTML -URL "https://www.scrapingcourse.com/ecommerce/" -Engine AngleSharp
$ParsedHTMLResponse.OuterHtml
Run the script, and it'll produce the following output:
<!DOCTYPE html>
<html lang="en-US">
<head>
    <!--- ... --->

    <title>Ecommerce Test Site to Learn Web Scraping – ScrapingCourse.com</title>

  <!--- ... --->
</head>
<body class="home archive ...">
    <p class="woocommerce-result-count">Showing 1–16 of 188 results</p>
    <ul class="products columns-4">

        <!--- ... --->

    </ul>
</body>
</html>
Terrific! Your web scraping PowerShell script retrieves and parses the target page as desired. Time to extract data from it.
Step 3: Extract Specific Data From the Scraped Page
You need to define an effective node selection strategy to scrape data from a page. The idea is to select the HTML elements of interest and then collect data from them. To achieve the desired goal, you must first study the HTML source code of the web page.
For that reason, visit the target page in your browser and inspect a product HTML node with the DevTools:
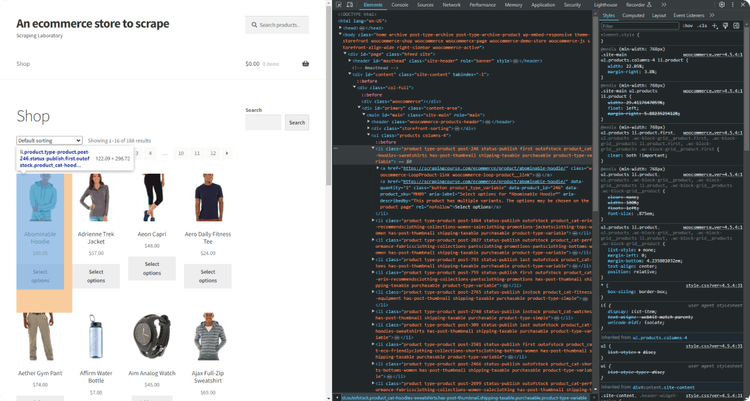
Expand the node and analyze its HTML code. You'll notice that li.product is an effective CSS selector to select each product node. If you're not familiar with that syntax, li is the tag of the HTML element, while product refers to its class.
Given an HTML product node, you can scrape:
- The URL from the
<a>node. - The image URL from the
<img>node. - The name from the
<h2>node. - The price from the
<span>node.
Keep in mind that $ParsedHTMLResponse exposes all methods supported by AngleSharp. These include:
-
QuerySelector(): Returns the first node that matches the CSS selector passed as an argument. -
QuerySelectorAll(): Returns all nodes matching the given CSS selector.
Implement the PowerShell web scraping logic on a single product element as below:
# select the first HTML product node on the page
$HTMLProduct = $ParsedHTMLResponse.QuerySelector("li.product")
# extract data from it
$Name = $HTMLProduct.QuerySelector("h2").TextContent
$URL = $HTMLProduct.QuerySelector("a").Attributes["href"].NodeValue
$Image = $HTMLProduct.QuerySelector("img").Attributes["src"].NodeValue
$Price = $HTMLProduct.QuerySelector("span").TextContent
QuerySelector() applies the specified CSS selector and retrieves the desired node. You can then access its text content with the TextContent attribute. Attributes returns the array of HTML attributes with their values stored in NodeValue.
You can then print the scraped data in the terminal with the following code:
$Name
$URL
$Image
$Price
The current scraper.ps1 will contain:
# download the target page and parse its HTML content
$ParsedHTMLResponse = ConvertFrom-HTML -URL "https://www.scrapingcourse.com/ecommerce/" -Engine AngleSharp

# get the first HTML product on the page
$HTMLProduct = $ParsedHTMLResponse.QuerySelector("li.product")
$Name = $HTMLProduct.QuerySelector("h2").TextContent
$URL = $HTMLProduct.QuerySelector("a").Attributes["href"].NodeValue
$Image = $HTMLProduct.QuerySelector("img").Attributes["src"].NodeValue
$Price = $HTMLProduct.QuerySelector("span").TextContent

# log the scraped data
$Name
$URL
$Image
$Price
Execute it, and it'll print:
Abominable Hoodie
https://www.scrapingcourse.com/ecommerce/product/abominable-hoodie/
https://www.scrapingcourse.com/ecommerce/wp-content/uploads/2024/03/mh09-blue_main-324x324.jpg
$69.00
Amazing! You just built your first PowerShell website scraping script. In the next section, learn how to scrape all elements on the page.
Step 4: Extract Multiple Products
Your new goal is to extract data from each product HTML element. Before jumping into the scraping logic, you need to define a data structure where to store that data. So, add a list of custom PowerShell objects:
$Products = New-Object Collections.Generic.List[PSCustomObject]
Next, select all product nodes with QuerySelectorAll() instead of QuerySelector(). Iterate over them, apply the scraping logic, instantiate a custom object, and add it to the list:
get all HTML products on the page
$HTMLProducts = $ParsedHTMLResponse.QuerySelectorAll("li.product")

# iterate over the list of HTML product elements
# and scrape data from them
foreach ($HTMLProduct in $HTMLProducts) {
  # scraping logic
  $Name = $HTMLProduct.QuerySelector("h2").TextContent
  $URL = $HTMLProduct.QuerySelector("a").Attributes["href"].NodeValue
  $Image = $HTMLProduct.QuerySelector("img").Attributes["src"].NodeValue
  $Price = $HTMLProduct.QuerySelector("span").TextContent

  # create an object containing the scraped
  # data and add it to the list
  $Product = [PSCustomObject] @{
    "Name" = $Name
    "URL"  = $URL
    "Image"= $Image
    "Price"= $Price
  }
  $Products.Add($Product)
}
Print the scraped data to verify that the PowerShell web scraping logic works as desired:
$Products
Your script will contain:
# download the target page and parse its HTML content
$ParsedHTMLResponse = ConvertFrom-HTML -URL "https://www.scrapingcourse.com/ecommerce/" -Engine AngleSharp

# initialize a list where to store the scraped data
$Products = New-Object Collections.Generic.List[PSCustomObject]

# get all HTML products on the page
$HTMLProducts = $ParsedHTMLResponse.QuerySelectorAll("li.product")

# iterate over the list of HTML product elements
# and scrape data from them
foreach ($HTMLProduct in $HTMLProducts) {
  # scraping logic
  $Name = $HTMLProduct.QuerySelector("h2").TextContent
  $URL = $HTMLProduct.QuerySelector("a").Attributes["href"].NodeValue
  $Image = $HTMLProduct.QuerySelector("img").Attributes["src"].NodeValue
  $Price = $HTMLProduct.QuerySelector("span").TextContent

  # create an object containing the scraped
  # data and add it to the list
  $Product = [PSCustomObject] @{
    "Name" = $Name
    "URL"  = $URL
    "Image"= $Image
    "Price"= $Price
  }
  $Products.Add($Product)
}

# log the scraped data
$Products
Run it, and it'll produce the output below:
Abominable Hoodie
https://www.scrapingcourse.com/ecommerce/product/abominable-hoodie/
https://www.scrapingcourse.com/ecommerce/wp-content/uploads/2024/03/mh09-blue_main-324x324.jpg
$69.00

// omitted for brevity...

Artemis Running Short
https://www.scrapingcourse.com/ecommerce/product/artemis-running-short/
https://www.scrapingcourse.com/ecommerce/wp-content/uploads/2024/03/wsh04-black_main-324x324.jpg
$45.00
Terrific! The list of scraped objects contains all the data of interest.
Step 5: Convert Scraped Data Into a CSV File
PowerShell comes with the Export-Csv utility to convert a list into CSV and export it to a file. Use it to create a products.csv CSV output file and populate it with the collected data:
$Products | Export-Csv -LiteralPath ".\products.csv"
Put it all together, and you'll get:
# download the target page and parse its HTML content
$ParsedHTMLResponse = ConvertFrom-HTML -URL "https://www.scrapingcourse.com/ecommerce/" -Engine AngleSharp

# initialize a list where to store the scraped data
$Products = New-Object Collections.Generic.List[PSCustomObject]

# get all HTML products on the page
$HTMLProducts = $ParsedHTMLResponse.QuerySelectorAll("li.product")

# iterate over the list of HTML product elements
# and scrape data from them
foreach ($HTMLProduct in $HTMLProducts) {
  # scraping logic
  $URL = $HTMLProduct.QuerySelector("a").Attributes["href"].NodeValue
  $Image = $HTMLProduct.QuerySelector("img").Attributes["src"].NodeValue
  $Name = $HTMLProduct.QuerySelector("h2").TextContent
  $Price = $HTMLProduct.QuerySelector("span").TextContent

  # create an object containing the scraped
  # data and add it to the list
  $Product = [PSCustomObject] @{
    "URL"  = $URL
    "Image"= $Image
    "Name" = $Name
    "Price"= $Price
  }
  $Products.Add($Product)
}

# export the scraped data to CSV
$Products | Export-Csv -LiteralPath ".\products.csv"
Launch the PowerShell web scraping script:
.\scraper.ps1
Wait for the script to complete, and a products.csv file will appear in your project's root folder. Open it, and you'll see:
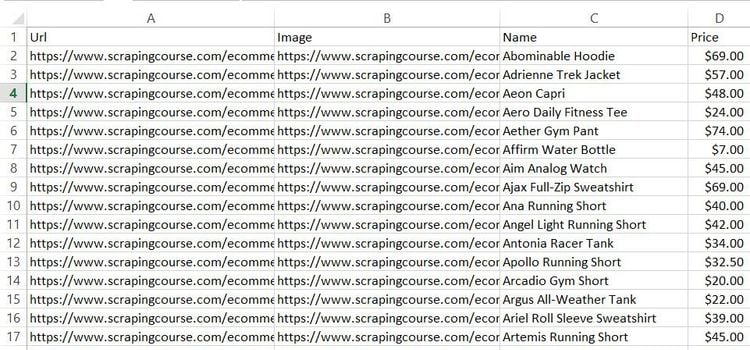
Et voilà! You just learned the basics of web scraping with PowerShell!
Advanced Web Scraping Techniques With PowerShell
Follow this section and explore more advanced PowerShell web scraping techniques.
Scrape and Get Data From Paginated Pages
The current script retrieves data only from one of the many pages the target site consists of. To scrape all items on the site, you must go through each product page. That's done via web crawling, the art of automatically discovering and visiting new pages.
Need some clarification about the difference between scraping and crawling? Please read our guide on web crawling vs web scraping!
There are several ways to implement web crawling logic. The smarter way is to inspect the URLs of the pages of interest to look for patterns. If you look at the URLs of the pagination pages, you'll notice they follow this format:
https://www.scrapingcourse.com/ecommerce/page/<page>/
As there are 12 product pages on the site, you can get all URLs to visit and scrape data from with:
$PaginationURLs = for ($Page = 1; $Page -le 12; $Page++) {
  "https://www.scrapingcourse.com/ecommerce/page/$($Page)/"
}
$PaginationURLs will now contain:
https://www.scrapingcourse.com/ecommerce/page/1/
https://www.scrapingcourse.com/ecommerce/page/2/
https://www.scrapingcourse.com/ecommerce/page/3/
# omitted for brevity ...
https://www.scrapingcourse.com/ecommerce/page/12/
Iterate over one page at a time and apply the scraping logic on each page to scrape all products. Bear in mind that this web scraping PowerShell script is just an example. Thus, limit the number of pages to 5 to avoid making too many requests to the target site:
$PaginationURLs = for ($Page = 1; $Page -le 5; $Page++) {
  "https://www.scrapingcourse.com/ecommerce/page/$($Page)/"
}

# initialize a list where to store the scraped data
$Products = New-Object Collections.Generic.List[PSCustomObject]

foreach ($PaginationURL in $PaginationURLs) {
  # download the target page and parse its HTML content
  $ParsedHTMLResponse = ConvertFrom-HTML -URL $PaginationURL -Engine AngleSharp

  # get all HTML products on the page
  $HTMLProducts = $ParsedHTMLResponse.QuerySelectorAll("li.product")

  # iterate over the list of HTML product elements
  # and scrape data from them
  foreach ($HTMLProduct in $HTMLProducts) {
    # scraping logic
  $URL = $HTMLProduct.QuerySelector("a").Attributes["href"].NodeValue
  $Image = $HTMLProduct.QuerySelector("img").Attributes["src"].NodeValue
  $Name = $HTMLProduct.QuerySelector("h2").TextContent
  $Price = $HTMLProduct.QuerySelector("span").TextContent

    # create an object containing the scraped
    # data and add it to the list
    $Product = [PSCustomObject] @{
      "URL"   = $URL
      "Image" = $Image
      "Name"  = $Name
      "Price" = $Price
    }
    $Products.Add($Product)
  }
}

# export the scraped data to CSV
$Products | Export-Csv -LiteralPath ".\products.csv"
Run the script again:
.\scraper.ps1
This time, the PowerShell website scraping script will go through 5 product pages. The new output CSV file will contain more records than before:
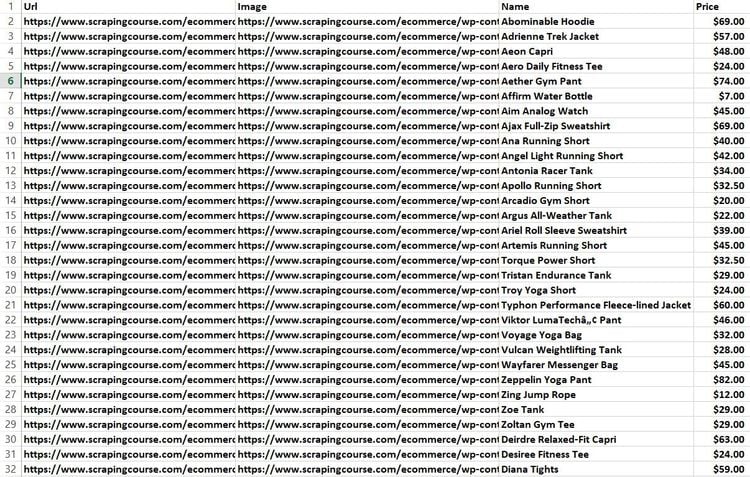
Congratulations! You now know how to perform web crawling with PowerShell.
Use of Proxy With PowerShell
When you make a request with PSParseHTML, the destination server will see your IP. Because of that, your IP will get blacklisted when you make too many requests. This will risk your privacy and damage your IP's reputation.
The easiest way to avoid these inconveniences is to use a proxy. A proxy server acts as an intermediary between your machine and the server, forwarding requests on both sides. This way, the server will see the requests as coming from the proxy's IP, not yours.
To use a proxy in your PowerShell web scraping script, you first need to retrieve the URL of a proxy server. Visit a site like Free Proxy List and get one. For example, suppose this is the connection information of the chosen proxy server:
PROTOCOL: HTTP
IP: 137.184.22.92
PORT: 8000
The proxy server URL will be:
http://137.184.22.92:8000
The main challenge is that the ConvertFrom-HTML function doesn't support proxies. As a solution, you can:
- Retrieve the HTML associated with the target page with
Invoke-Request. - Configure
Invoke-Requestto use a proxy. - Pass the resulting HTML to
ConvertFrom-HTMLthrough the-Contentoption.
This is how you can use a proxy in your web scraping PowerShell script:
$Proxy = "http://137.184.22.92:8000"
# download the target page via a proxy
$Response = Invoke-WebRequest -Uri "<PAGE_URL>" -Proxy $Proxy

# parse its HTML content
$ParsedHTMLResponse = ConvertFrom-HTML -Content $Response.Content -Engine AngleSharp
Notice that this snippet is likely to fail with the error below:
Unable to read data from the transport connection: An existing connection was forcibly closed by the remote host
Free proxies are unreliable, short-lived, and even data-greedy. While they're good for learning purposes, you can't use them in production!
Proxies protect your IPs but aren't generally enough to avoid advanced anti-bot detection. Learn how to overcome anti-scraping solutions in the section.
Avoid Getting Blocked When Scraping With PowerShell
Data is the most valuable asset on Earth. Companies know that and want to protect their data at all costs, even if it's publicly available on their sites. Here's why anti-bot technologies have become so popular.
Those solutions represent the biggest challenge to web scraping using PowerShell. That's because they can detect and block automated scripts. So, they can prevent your script from retrieving data from web pages.
Performing web scraping without getting blocked is possible but not easy. Systems like Cloudflare can mark your PowerShell website scraping script as a bot. No matter what precautions you take.
Verify that by targeting a Cloudflare-protected site like G2:
# download the target page and parse its HTML content
$ParsedHTMLResponse = ConvertFrom-HTML -URL "https://www.g2.com/products/notion/reviews" -Engine AngleSharp
$ParsedHTMLResponse.OuterHtml
That snippet will fail with the following 403 Forbidden error:
Invoke-WebRequest:                     Attention Required! | Cloudflare        body{margin:0;padding:0}       if (!navigator.cookieEnabled) {
window.addEventListener('DOMContentLoaded', function () {       var cookieEl = document.getElementById('cookie-alert');
cookieEl.style.display = 'block';     })   }              Please enable cookies.                     Sorry, you have been blocked
# omitted for brevity...
So, what's the next move? Use a complete scraping API like ZenRows! This next-generation technology supports User-Agent rotation and IP concealment, plus it provides the best anti-bot toolkit to avoid getting blocked. These are just some of the many features offered by the service.
Enhance your web scraping PowerShell script with ZenRows! Sign up for free to receive your first 1,000 credits and visit the Request Builder page:
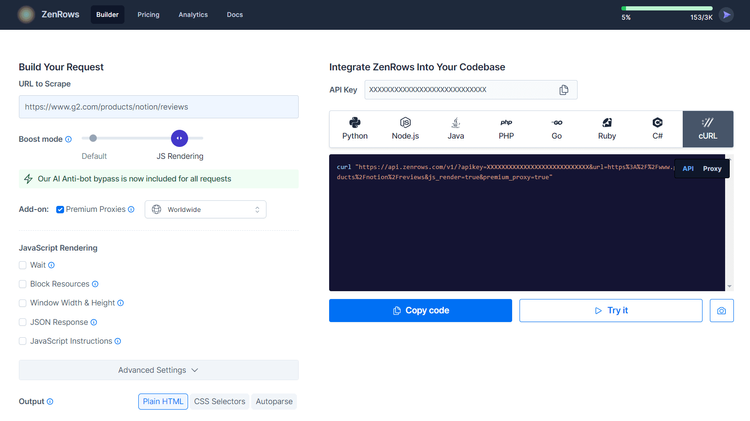
Now, assume you want to scrape the page protected with G2.com page presented earlier:
- Paste the target URL (
https://www.g2.com/products/notion/reviews) into the "URL to Scrape" input. - Enable the "JS Rendering" mode (the User-Agent rotation and AI-powered anti-bot toolkit are always included by default).
- Toggle the "Premium Proxy" check to get rotating IPs.
- Select “cURL” and then the “API” mode to get the URL of the ZenRows API to call in your script.
Pass the generated URL to the ConvertFrom-HTML function:
# download the target page and parse its HTML content
$ParsedHTMLResponse = ConvertFrom-HTML -URL "https://api.zenrows.com/v1/?apikey=<YOUR_ZENROWS_API_KEY>&url=https%3A%2F%2Fwww.g2.com%2Fproducts%2Fnotion%2Freviews&js_render=true&premium_proxy=true" -Engine AngleSharp
$ParsedHTMLResponse.OuterHtml
Execute the script, and this time it'll return the HTML associated with the target G2 page:
<!DOCTYPE html>
<head>
<meta charset="utf-8" />
<link href="https://www.g2.com/assets/favicon-fdacc4208a68e8ae57a80bf869d155829f2400fa7dd128b9c9e60f07795c4915.ico" rel="shortcut icon" type="image/x-icon" />
<title>Notion Reviews 2024: Details, Pricing, & Features | G2</title>
<!-- omitted for brevity ... -->
Here we go! Bye-bye anti-bot blocks. You just saw how easy it is to use ZenRows for web scraping using PowerShell.
Scraping JavaScript-Rendered Pages With PowerShell
PSParseHTML is a wrapper for two popular C# HTML parsing libraries. That means it's great for scraping sites with static HTML pages. On the other hand, it can't deal with pages that use JavaScript for other retrieval or rendering.
For those pages, you need a headless browser. That tool can render pages in a controllable browser and allows you to scrape dynamic-content sites. The most popular headless browser library for PowerShell is Selenium.
Install the PowerShell Selenium module with this command:
Install-Module Selenium
As of this writing, the package received the latest update in 2020. Because of that, it can't control modern versions of Chrome.
As a workaround, you must overwrite the ChromeDriver executable retrieved by the library at installation time. Download the version of ChromeDriver that matches your version of Chrome. Unzip the file and place the chromedriver executable file in the /assemblies folder of Selenium.
If you're wondering where Selenium has been installed, run the command below in PowerShell. This will return the path to the Selenium installation folder:
(Get-InstalledModule -Name Selenium).installedlocation
Now, follow the instructions below to learn how to use Selenium in PowerShell.
We need to change the target page of the scraping operation to better showcase Selenium. Find a page that relies on JavaScript, such as the Infinite Scrolling demo. That dynamically loads new products as the user scrolls down:
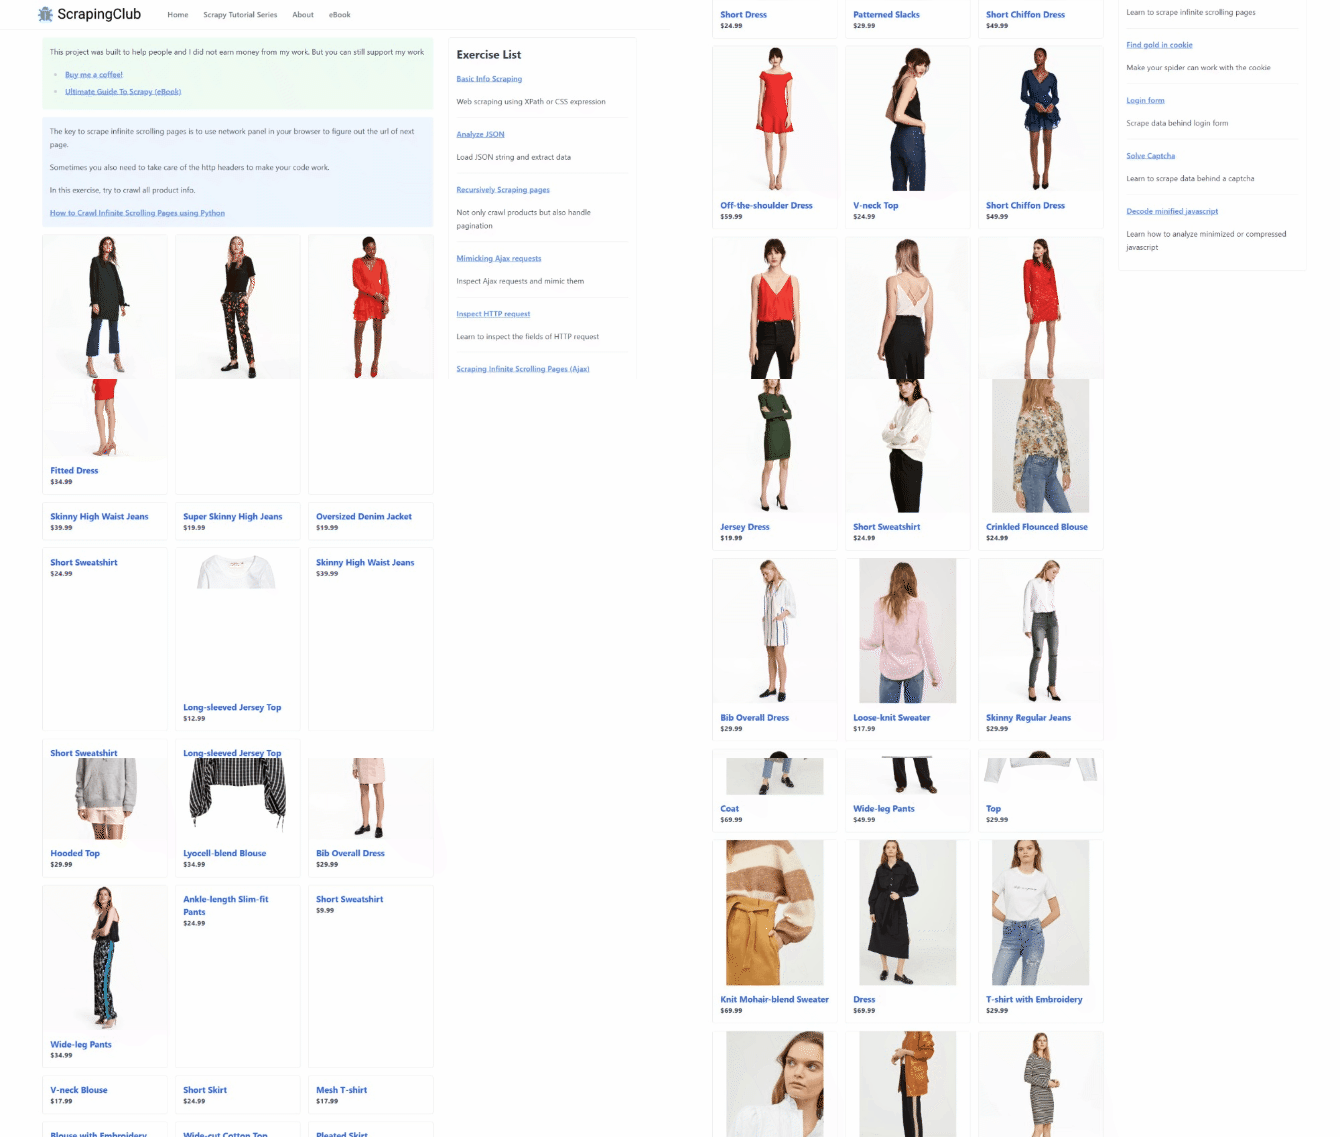
Use the PowerShell Selenium module to scrape data from a dynamic content page as follows:
# import Selenium and its types
$FullPath = (Get-InstalledModule -Name Selenium).installedlocation
Import-Module "${FullPath}\Selenium.psd1"

# start a driver in headless mode and visit
# the target page
$Driver = Start-SeChrome -Headless
Enter-SeUrl "https://scrapingclub.com/exercise/list_infinite_scroll/" -Driver $Driver

# where to store the scraped data
$Products = New-Object Collections.Generic.List[PSCustomObject]

# get all HTML products on the page
$HTMLProducts = Find-SeElement -Driver $Driver -CssSelector ".post"

# iterate over the list of HTML product elements
# and scrape data from them
foreach ($HTMLProduct in $HTMLProducts) {
  $NameElement = $HTMLProduct.FindElement([OpenQA.Selenium.By]::CssSelector("h4"))
  $PriceElement = $HTMLProduct.FindElement([OpenQA.Selenium.By]::CssSelector("h5"))
  $Name = $NameElement.Text
  $Price = $PriceElement.Text

  # create an object containing the scraped
  # data and add it to the list
  $Product = [PSCustomObject] @{
    "Name"  = $Name
    "Price" = $Price
  }
  $Products.Add($Product)
}

# log the scraped data
$Products

# close the browser and release its resources
Stop-SeDriver -Driver $Driver
Run this PowerShell web scraping JavaScript page script:
.\scraper.ps1
That will produce this output:
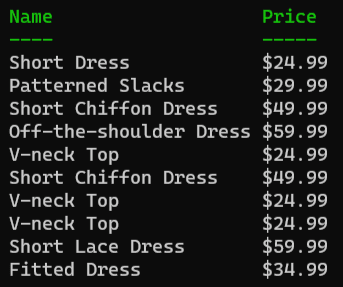
Yes! You're now a PowerShell web scraping master!
Conclusion
This step-by-step tutorial guided you through the process of doing web scraping using PowerShell. During this journey, you saw the fundamentals and added more complex aspects.
PSParseHTML allows you to parse HTML in PowerShell Core and extract data from web pages. This module wraps HTML Agility Pack and AngleSharp to enable web scraping and crawling in PowerShell. With Selenium, you can then deal with sites that require JavaScript.
The challenge? No matter how complex your PowerShell scraper is, anti-bot measures can stop it. Avoid them all with ZenRows, a scraping API with the most effective anti-bot bypass features. Building scraping scripts that work on any web page has never been easier!