Ever thought of hosting your Scrapy project on a server? Scrapyd makes it seamless, allowing you to easily schedule, monitor, and deploy spiders.
In this tutorial, you'll learn how to manage your Scrapy spiders remotely using Scrapyd. Let's get started!
What Is Scrapyd?
Scrapyd is a tool for deploying your Scrapy spiders on a server, allowing you to manage them remotely via easy API calls.
The Scrapyd server is a demon service, meaning it listens to crawl requests from your spiders and executes them autonomously.
Being a management server tool, Scrapyd brings the following extra benefits to your Scrapy project:
- Quickly deploy and manage your Python Scrapy project remotely.
- Manage all scraping jobs efficiently using a unified JSON API platform.
- Track and oversee scraping processes with a user-friendly web interface.
- Scale up and enhance data collection by executing spiders across multiple servers.
- Optimize server performance by adjusting the number of concurrent spiders.
- Automate and simplify task scheduling by integrating with tools like Celery and Gerapy.
- Expand web application capabilities by integrating Scrapy with Python frameworks like Django.
Next, let’s see how to deploy Scrapy spiders with Scrapyd.
How to Run Scrapyd Spiders for Web Scraping
Running spiders via Scrapyd involves a few steps, from running the server to spider deployment and management. Let's see how it works.
Prerequisites
You’ll need Python version 3+ to run Scrapy and Scrapyd. So, ensure you download and install the latest Python version from the Python’s website if you’ve not already done so.
The first step is to install Scrapy, Scrapyd, and Scrapy-Client using pip:
pip install scrapyd scrapy scrapyd-client
Next, create a Scrapy project by running scrapy startproject <YOUR_PROJECT_NAME> via the command line.
Now, open the spiders folder in your Scrapy project and create a scraper.py file.
We'll create a simple Scrapy spider to retrieve the product information from a product page on ScrapeMe.

Paste the following code inside your spiders/scraper.py directory.
# import the required modules
from scrapy.spiders import Spider

class MySpider(Spider):
    # specify the spider name
    name = 'product_scraper'
    start_urls = ['https://scrapeme.live/product-category/pokemon/']

    # parse HTML page as response
    def parse(self, response):
        # extract text content from the ul element
        products = response.css('ul.products li.product')

        data = []

        for product in products:
            # parent = product.css('li.product')
            product_name = product.css('h2.woocommerce-loop-product__title::text').get()
            price = product.css('span.woocommerce-Price-amount::text').get()

            # append the scraped data into the empty data array
            data.append(
                {
                'product_name': product_name,
                'price': price,
            }
            )

        # log extracted text
        self.log(data)
To be sure everything works up to this point, you can test the code by running scrapy crawl product_scraper.
Here's a log of the scraped items:
[{'product_name': 'Bulbasaur', 'price': '63.00'}, {'product_name': 'Ivysaur', 'price': '87.00'}, {'product_name': 'Venusaur', 'price': '105.00'}, {'product_name': 'Charmander', 'price': '48.00'}, {'product_name': 'Charmeleon', 'price': '165.00'}, {'product_name': 'Charizard', 'price': '156.00'}, ...]
The scraper works, and you're good to go! Now, let's deploy it.
Deploy Spiders to Scrapyd
You'll need to start a Scrapyd server before deploying your spider. To do so, open the command line to your project root folder and run:
scrapyd
If a port number to your server appears in your console, as shown below, you've successfully started your Scrapyd server. Kudos! You're almost there.
Site starting on 6800
Next, open the scrapy.cfg file in your Scrapy project root folder and uncomment the url variable. Then, set the deploy option to local to deploy on your local machine.
default.settings points Scrapyd to your Scrapy settings file, while the scraper is your project name.
Your scrapy.cfg should look like this:
[settings]
default = scraper.settings

[deploy:local]
url = http://localhost:6800/
project = scraper
Next is the deployment of your spider. This allows the Scrapyd API to track changes in your spiders and sync them to the web interface for monitoring.
See the basic command for spider deployment below. target_name is the deployment environment (local in this case), and our_project_name is your project name (scraper in our case).
scrapyd-deploy <target_name> -p <your_project_name>
Let's turn that into a meaningful command by applying it to your Scrapy project through another terminal, as shown:
scrapyd-deploy local -p scraper
This should return a JSON response, including your node name and response status, among others:
{"node_name": "User", "status": "ok", "project": "scraper", "version": "1701728434", "spiders": 1}
To verify further, you can visit the built-in web interface at Scrapyd's port by going to http://localhost:6800 in your browser. You'll see your project listed under "Available projects" ("scraper").
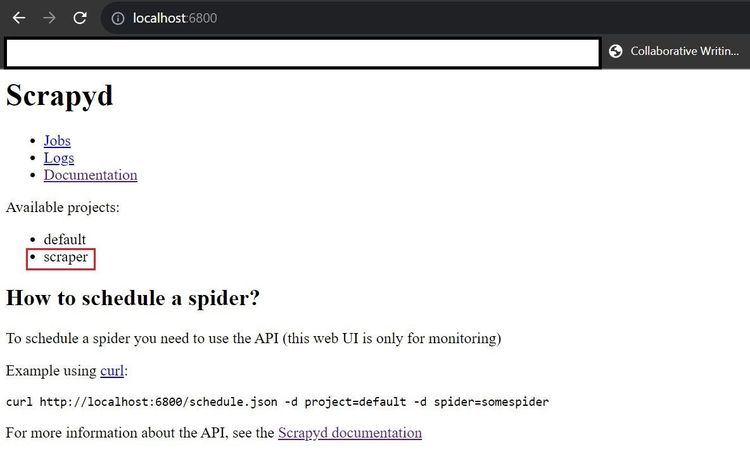
"default" is a default deployment initiated automatically by Scrapyd. Don't bother about it.
What a way to deploy your Scrapy Spider!
But there's more. Let's see how to manage your spiders with Scrapyd, including scraper scheduling, monitoring, and more.
Managing Spiders with Scrapyd
Scrapyd's JSON API endpoints are the best ways to manage spiders. While there's also a web interface, it's only suitable for monitoring tasks and viewing logs. Let's see how to manage your spiders, including running cron jobs.
Endpoints for Crawling and Monitoring
Scrapyd has different endpoints for scheduling, monitoring, and cancelling tasks. Here's how each works.
The task scheduling endpoint is http://localhost:6800/schedule.json. Here's the basic CURL syntax for scheduling a task using the JSON API:
curl http://localhost:6800/schedule.json -d project=<YOUR_PROJECT_NAME> -d spider=<YOUR_SPIDER_NAME>
To continuously apply and run this request, create a new Python file called schedule.py in your project root folder and modify the CURL to use Python's POST request, as shown below.
scraper and product_scraper are the project and spider names.
# import the required library
import requests

# speficy schedule endpoint
url = 'http://localhost:6800/schedule.json'

# specify project and spider names
data = {'project': 'scraper', 'spider': 'product_scraper'}

# make Python request
response = requests.post(url, data=data)

# resolve and print the JSON response
if response.status_code == 200:
    print(response.json())
else:
    print(response.json())
Running the Python script above outputs the JSON response, showing the node name, status, and job ID:
{'node_name': 'User', 'status': 'ok', 'jobid': '3971374a92fc11eeb09b00dbdfd2847f'}
Congratulations! You've successfully scheduled your first Scrapy task with Scrapyd.
Now, let's monitor this schedule.
The monitoring endpoint looks like this: http://localhost:6800/listjobs.json.
This endpoint lists information about all available tasks. You can add an optional project parameter to view a specific project instead.
Here's the CURL format for viewing all the tasks under the scraper project:
curl http://localhost:6800/listjobs.json?project=<YOUR_PROJECT_NAME>
To monitor your spider tasks iteratively, create a new monitor.py file inside your Scrapy root folder and use the following GET request to list task information on Scrapyd:
# import the required library
import requests

# speficy schedule endpoint
url = 'http://localhost:6800/listjobs.json'

# specify request parameters
params = {'project': 'scraper'}

# make Python request
response = requests.get(url, params=params)

# resolve and print the JSON response
if response.status_code == 200:
    print(response.json())
else:
    print(response.json())
Executing monitor.py outputs the node name, request status, schedule information (this includes pending, running, and finished), ID, start and end times, log, and items directories, as shown.
The pending and running arrays are empty because there are no pending or running tasks.
{'node_name': 'User', 'status': 'ok', 'pending': [], 'running': [], 'finished': [{'project': 'scraper', 'spider': 'product_scraper', 'id': '3971374a92fc11eeb09b00dbdfd2847f', 'start_time': '2023-12-05 00:24:08.854899', 'end_time': '2023-12-05 00:24:15.445038', 'log_url': '/logs/scraper/product_scraper/3971374a92fc11eeb09b00dbdfd2847f.log', 'items_url': '/items/scraper/product_scraper/3971374a92fc11eeb09b00dbdfd2847f.jl'}]}
You're doing just great if you've made it here!
There's one more endpoint to explore before we move on to the graphic interface part.
The cancelation endpoint is handy for terminating a running process and requires the task ID.
Scrapyd's endpoint for canceling tasks is http://localhost:6800/cancel.json.
This endpoint accepts a POST request with the project name and job ID in the request body, as shown in the following code.
Create a cancel.py file in your Scrapy root folder and paste the following code:
# import the required library
import requests

# speficy the schedule endpoint
url = 'http://localhost:6800/cancel.json'

# replace with the target job ID
job_id = '<TARGET_JOB_ID>'

# specify request parameters
data = {'project': 'scraper', 'job': job_id}

# make Python request
response = requests.post(url, data=data)

# resolve and print the JSON response
if response.status_code == 200:
    print(response.json())
else:
    print(response.json())
The ok status proves that the cancelation request was successful. However, prevstate assumes None since the specified job wasn't active.
{'node_name': 'User', 'status': 'ok', 'prevstate': None}
While these three endpoints are a solid way to start with the Scrapyd API, the tool features many other valuable endpoints. We'll summarize them all in the table below.
| Endpoint | Description | Basic CURL usage |
|---|---|---|
| schedule.json | Schedule a spider execution. | curl http://localhost:6800/schedule.json -d project=<PROJECT_NAME> -d spider=<SPIDER_NAME> |
| listjobs.json | List all pending, running, and finished tasks. | curl http://localhost:6800/listprojects.json |
| listjobs.json?project=<PROJECT_NAME> | List the job information in a particular project | curl http://localhost:6800/listprojects.json?<PROJECT_NAME> |
| cancel.json | Cancel a specific running job. Removes pending and running jobs and accepts the target job ID. |
curl http://localhost:6800/cancel.json -d project=<PROJECT_NAME> -d job=<TARGET_JOB_ID> |
| daemonstatus.json | Check the execution status of a server. | curl http://localhost:6800/daemonstatus.json |
| addversion.json | Add a version to a project and create the project if it doesn't exist. | curl http://localhost:6800/addversion.json -F project=<PROJECT_NAME> -F version=r<VERSION_NUMBER> -F egg=@<PROJECT_NAME>.egg |
| listversions.json | Get an ordered list of all the versions available for a project. The last version is the current version |
curl http://localhost:6800/listversions.json?project=PROJECT_NAME |
| listspiders.json | Get a list of all the spiders in a recent project version. | curl http://localhost:6800/listspiders.json?project=PROJECT_NAME |
| delversion.json | Delete a project version. Deletes the project if there are no more versions. | curl http://localhost:6800/delversion.json -d project=<PROJECT_NAME> -d version=r<VERSION_NUMBER> |
| delproject.json | Delete a project | curl http://localhost:6800/delproject.json -d project=<PROJECT_NAME> |
Using these endpoints is pretty straightforward. As shown previously, you can create a separate Python file for each in your project root folder.
ScrapydWeb: Graphic Interface for Spider Monitoring
ScrapydWeb is a cluster manager for running Scrapyd's JSON API endpoints through a user interface. It's also daemon-based and listens to changes within the Scrapyd cluster, allowing you to deploy spiders, schedule scraping jobs, monitor spider tasks, and view logs.
The only caveat with ScrapydWeb is that it's limited to Python versions less than 3.9 at the time of writing. Hence, you might need to downgrade to as low as Python 2.7 to use it.
Besides the version compatibility limitations, Scrapyd is the best tool for managing spiders from a user interface.
A helpful tip is to install and isolate scrapydweb into a dedicated Python 2.7 virtual environment. Then, use a more recent Python version environment for other dependencies like Scrapy and Scrapyd.
To get started, install the package using pip:
pip install scrapydweb
Once installed, open the command line to your Scrapy project root folder and run the scrapydweb command. It will create a new scrapydweb_settings_v10.py file in your project folder.
The SCRAPYD_SERVERS section in the scrapydweb_settings_v10.py file lists the local Scrapyd server port as 6800. It means that ScrapyWeb will automatically deploy any Scrapyd cluster on that port.
Run the scrapydweb command again to start the ScrapydWeb server. This will start the ScrapyWeb daemon and display the server URL like so:
http://127.0.0.1:5000
Visit that URL in your browser. You should see the ScrapydWeb user interface, as shown.
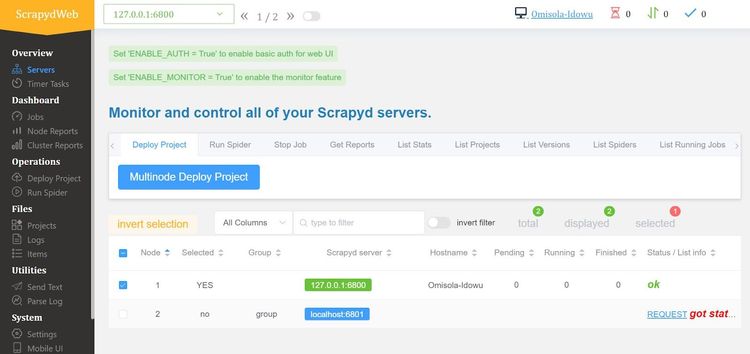
To schedule the spiders within the running cluster, put a checkmark on 127.0.0.1.6800 and click the "Run Spider" tab. Then click "Multinode Run Spider".

Next, select your cluster server, project, and spider name from the provided fields.
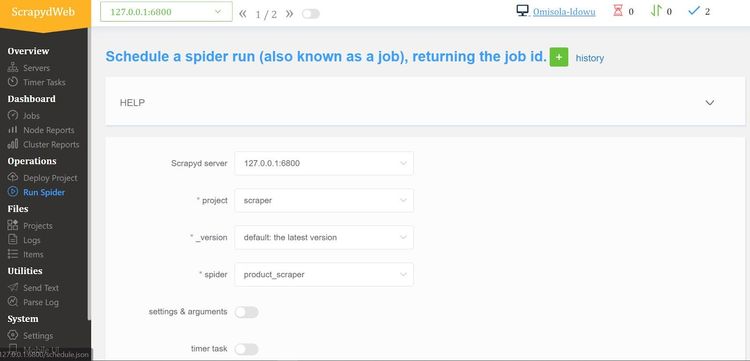
You can click "settings & arguments" to specify user agents or enable cookies for the task. The "timer task" toggle also allows you to schedule cron jobs.
Finally, click "Check CMD" and click "Run Spider".
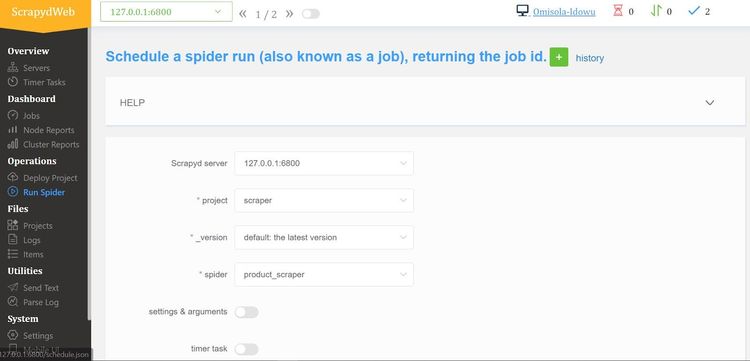
To confirm that it works, let's monitor the tasks.
Go to "Jobs" on the sidebar, and you should see a list of all the tasks you've scheduled previously. Move the scrollbar to the right and log against any task.

That works! Feel free to play around with the features of ScrapydWeb to see its spider-managing power.
Gerapy: Pretty Code Editor And Other Utilities
Based on Django and Scrapy, Gerapy is another cluster management tool for monitoring Scrapy spiders.
It features cron jobs, interval, and date-based scheduling, logging, a visual code editor for modifying project code, and more.
Let's quickly see how to sync Gerapy with Scrapyd, upload your Scrapy project, and use its code editor.
To begin, install the package using pip:
pip install gerapy
Initialize gerapy by running gerapy init. This creates a gerapy workspace within the current working folder.
Since it's Django-based, run gerapy migrate to update Gerapy's database schema.
Next, create a super user with the gerapy createsuperuser command. Then, enter your authentication credentials to sign up.
You should get a success message that says:
Superuser created successfully.
Next, run the following command in your terminal to start a Gerapy server:
gerapy runserver
This will start a development server at http://127.0.0.1:8000/. Launch that URL in your browser to load the Gerapy user interface.
If prompted, enter the username and password you set earlier.

Congratulations! You've successfully launched the Gerapy user interface.
The next step is to point Gerapy to the local Scrapyd server. This is useful for scheduling and monitoring your spiders.
Go to "Clients" and click "Create" at the top-right.
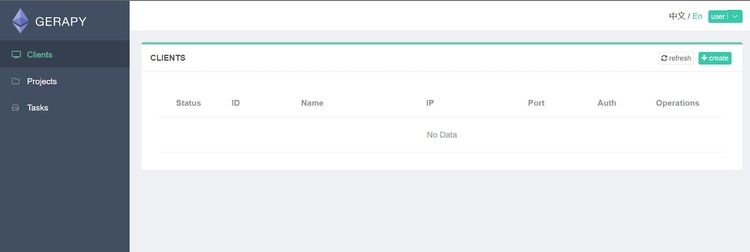
Type "local" in the "Name" field and enter your local server IP address in the "IP" field.
Enter your Scrapyd port number in the "Port" field. Finally, click "Create" to sync Gerapy with your Scrapyd server.
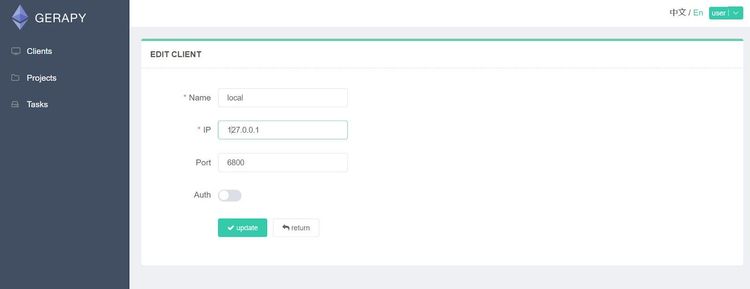
If you've hosted your Spider on a remote service like Azure or AWS, specify the provider's IP address in the "IP" field. You can also set the name as your provider's name. Then, toggle the "Auth" button to apply relevant authentication credentials.
You're now one step closer to scheduling a spider with Gerapy.
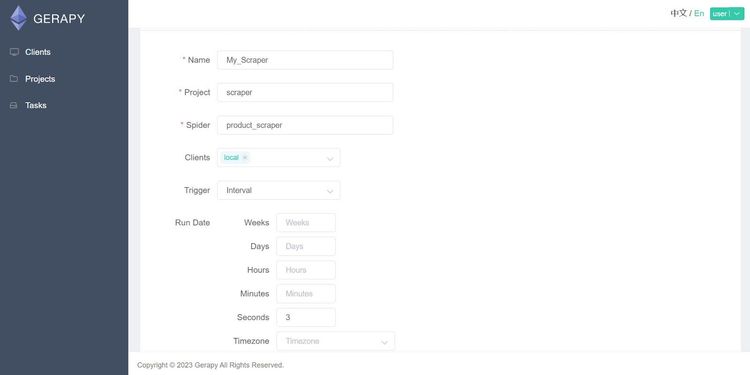
Click "Tasks" on the sidebar and input a name for your task. Fill in the "Project" field with your Scrapy project name and the "Spider" field with your Spider name.
Click "local" from the "Clients" dropdown. From the "Trigger" dropdown, select Interval, Date, or Crontab (for cron jobs) and configure your time trigger.
The trigger will prompt your scraper to run based on your selected time frame. For instance, the task below will run every three seconds. Click "Create" once done.
Look at the terminals running the Scrapyd and Gerapy servers. You should now see the requests running at the chosen interval.
What an achievement!
But we want to visualize the stats for this task.
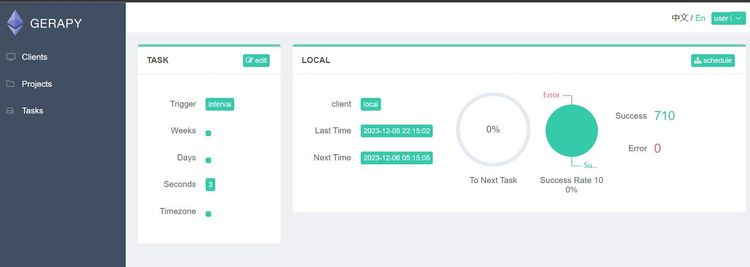
To do that, click the "Tasks" tab and go to "Status", and you'll see the stats loading in real time.
For example, the visualization below shows a 100% success rate for all 710 tasks.
Congratulations! That works.
Gerapy also lets you upload your Scrapy project and edit it on the fly using a built-in code editor.
It involves uploading your project directly to Gerapy via the user interface or manually moving it into Gerapy's project folder.
Let's take the user interface route for this example.
Before you begin, ensure that you zip your Scrapy project folder.
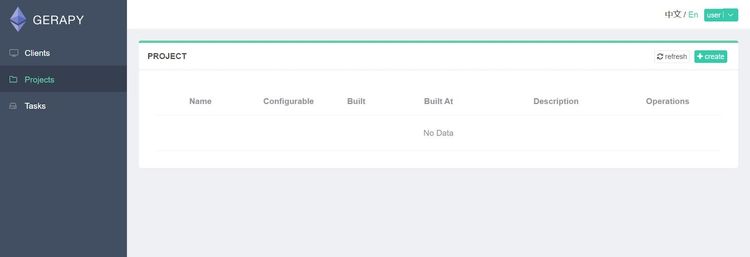
Go to "Projects" and click "Create" at the top-right of the Gerapy page.
Select "Upload" and upload the zipped version of your project. Then click "Finish" when done.
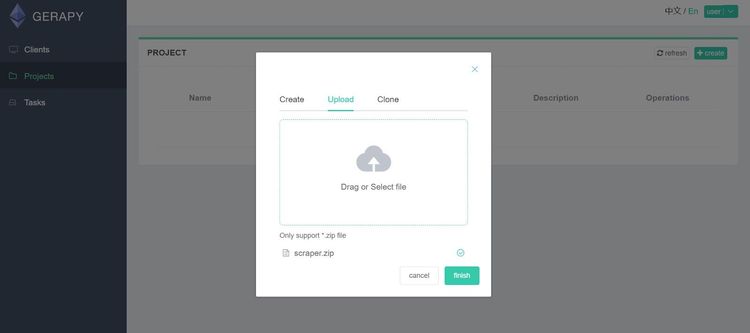
You can select the "Clone" option if your Scrapy project is on a version control like GitHub.
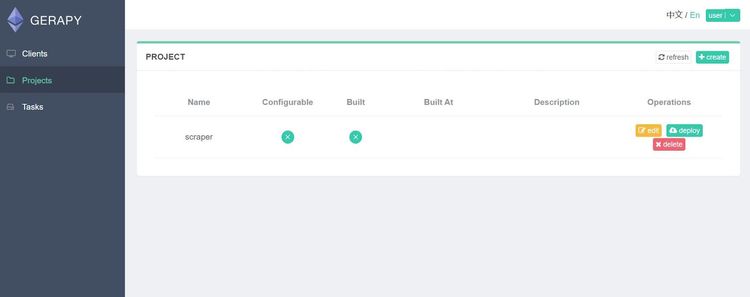
You should now see the uploaded project on the "PROJECT" page. Click "deploy" to commence launching.
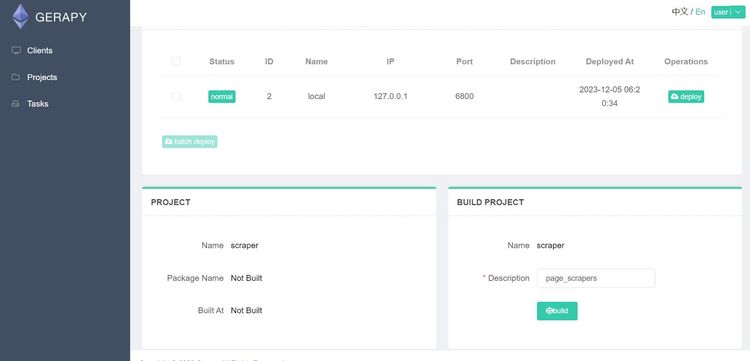
Next, enter a description in the "BUILD PROJECT" section and click "build". A success message shows that your build was successful.
To use the code editor, go to "Projects", and you'll see the previous build.
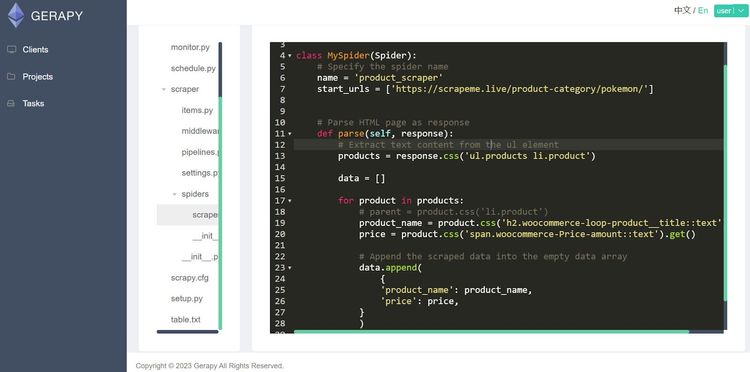
Click "Edit" to open Gerapy's real-time code editor, where you can start editing your project code.

Here’s what the code editor looks like:
Maximize Efficiency in Spider Task Management
Scrapyd takes spider scheduling further with features like concurrency, prioritized queue management, and dynamic resource allocation.
A selling point is that it also allows you to control the level of concurrency based on your machine's capability.
For example, max_proc is a built-in method of defining the maximum number of concurrent spider executions at a time.
Considering Scrapyd's centralized architecture, you can distribute your spiders across multiple machines and control what happens within each machine.
Another built-in functionality that can enhance spider performance in that case is max_proc_per_cpu, which lets you control the number of concurrent tasks per machine.
Additionally, you can leverage Scrapyd's task prioritization to control how spiders run concurrently in an asynchronous job queue. For instance, you can prioritize some spider versions over others.
While time-based scheduling isn't built-in, you can set up time or event-driven conditions for triggering the schedule.json endpoint.
These functionalities make Scrapyd effective at managing spider schedules and system resources regardless of how complex the scraping job is.
Integration with Other Tools
Scrapyd's ability to integrate with several tools adds scalability to your Scrapy spiders.
As you've seen, Scrapyd effectively supports task management tools like ScrapydWeb and Gerapy. Scrapyd is also effective for sending notifications across several channels. For example, ScrapydWeb supports monitoring notifications via Slack, Telegram, and email.
Since spiders typically require consistent storage solutions, Scrapyd makes this easy by supporting databases like MongoDB, MySQL, PostgreSQL, and others.
Although you've seen how Scrapyd enables local hosting, it fully supports cloud services like Azure, Google Cloud, and AWS for data storage and spider deployment.
With that said, irrespective of Scrapyd's functionalities, it doesn't save your scraper block getting blocked. Fortunately, you can integrate Scrapyd with scraping APIs like ZenRows to allow JavaScript rendering and bypass anti-bot technologies.
Conclusion
In this Scrapyd tutorial, you've learned how to host your Scrapy project with Scrapyd.
You now know:
- How to schedule spiders using Scrapyd’s JSON endpoints.
- How Scrapyd works.
- Ways to deploy your spiders with Scrapyd.
- Scrapyd integration with third-party spider management tools.
- How to manage your spiders with Scrapyd’s JSON API.
- How to integrate Scrapyd with Scrapy.
To complement these functionalities, implement ZenRows with Scrapy to avoid getting blocked. Try ZenRows today as your all-in-one scraping solution.
Frequent Questions
Why Use Scrapyd Instead Of Just Scrapy?
You want to use Scrapyd instead of Scrapy because it simplifies remote spider deployment and control with JSON API endpoints. It also allows you to schedule spiders based on specific triggers.
What Are The Alternatives To Scrapyd?
Scrapyd alternatives include Celery, Scrapy Cluster, and SpiderKeeper. Another alternative is to deploy your spiders in Docker containers.
How Can You Host Scrapy?
You can host your Scrapy project by deploying it via a web server or a cloud service. You can make the process easier by using a server provider like Scrapyd. Then, use it to launch your spiders to a chosen hosting platform.
Did you find the content helpful? Spread the word and share it on Twitter, or LinkedIn.