Are you scraping with Selenium and want to bypass anti-bot detection with its Driverless plugin?
In this article, you'll learn how to scrape with Selenium Driverless, including how its basic features work.
What Is Selenium Driverless?
Selenium Driverless is an optimized version of Selenium that runs the Chrome browser without the ChromeDriver. Unlike the standard Selenium, this Driverless version doesn't automate Chrome but makes it look like you're running the mainstream browser.
It means you won't get the typical "Chrome is being controlled by automated software" message when using the library in non-headless mode. Selenium Driverless also patches the user agent in headless mode by removing the HeadlessChrome flag. These improvements reduce the chances of anti-bot detection.
The library packs many extra features, including support for asynchronous execution, multiple Chrome tabs, straightforward wait mechanisms, and more. Similar to alternatives like the Undetected ChromeDriver and Selenium Stealth, its goal is to bypass anti-bot detection during web scraping.
Next, let's see how to use it.
Tutorial: How to Scrape With Selenium Driverless
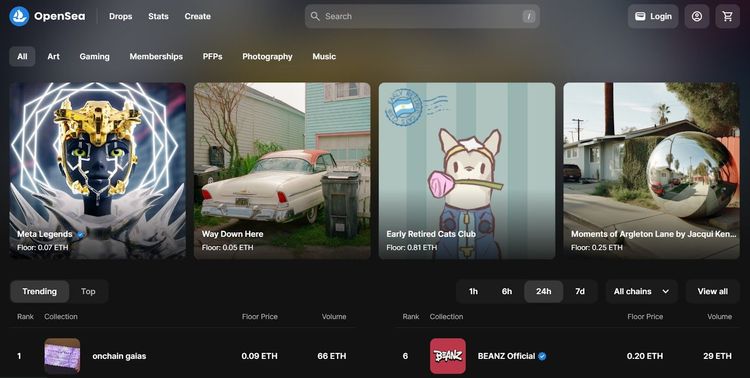
Selenium Driverless inherits the standard Selenium methods. Using OpenSea as a demo, you'll scrape full HTML to see how the library works.
Here's the website you want to scrape:

Let's start with the prerequisites.
Prerequisites
This tutorial uses Python version 3.12.1. So, ensure you download and install the latest version from Python's download page. Then, install the Selenium Driverless package using pip:
pip install selenium-driverless
The above command installs all associated packages, including the standard Selenium library. In the next section, we will see how the library works.
Get the Target Page Full HTML
Selenium Driverless works better in asynchronous mode. So, you'll use that feature in this example.
First, import the Selenium Driverless package and Python's built-in asyncio library for asynchronous support. Then, define an asynchronous function that starts a Chrome instance, visits the target web page, and implicitly waits for the page to load:
# import the required libraries
from selenium_driverless import webdriver
import asyncio

async def scraper():

    async with webdriver.Chrome() as browser:
        # open the target website
        await browser.get("https://opensea.io/")

        # implicitly wait for the page to load
        await browser.sleep(1.0)
Expand that function by printing the page source to extract its HTML. Finally, quit the browser and run the scraper function with asyncio:
async def scraper():

    async with webdriver.Chrome() as browser:

        # ...

        # extract the page's full HTML
        print(await browser.page_source)

        # quit the driver
        await browser.quit()

# run the function
asyncio.run(scraper())
Your final code should look like this after combining the snippets:
# import the required libraries
from selenium_driverless import webdriver
import asyncio

async def scraper():

    async with webdriver.Chrome() as browser:

        # open the target website
        await browser.get("https://opensea.io/")

        # implicitly wait for the page to load
        await browser.sleep(1.0)

        # extract the page's full HTML
        print(await browser.page_source)

        # quit the driver
        await browser.quit()

# run the function
asyncio.run(scraper())
The code extracts the target website's HTML as expected:
<!DOCTYPE html>
<html lang="en-US" class="light" style="color-scheme: light;">
<head>

    <!-- ... -->

    <title>OpenSea, the largest NFT marketplace</title>
    <meta content="OpenSea, the largest NFT marketplace" property="og:title">
    <meta content="OpenSea is the world's first and largest web3 marketplace for NFTs and ..." name="description">
</head>
<body>

    <!-- ... Other content omitted for brevity -->

</body>
</html>
You just extracted content from OpenSea using Selenium Driverless. Nice job! You can also boost its bypass capability with a proxy. In the next section, you'll see how to do that.
Add a Proxy to Selenium Driverless
Modern websites often limit the requests an IP address can send within a particular period. So, you'll need to add a proxy to your scraper if you want to scrape more pages.
You'll use a free proxy from the Free Proxy List and send a request to https://httpbin.io/ip, a demo website that returns your current IP address.
Free proxies have a short lifespan and are only good for learning the basics. They may not work at the time of reading. So, feel free to grab a new one from that website.
To begin, define the scraper function in asynchronous mode. Start a Chrome instance and add your proxy address. Then, open the target website. Ensure you run Chrome in non-headless mode Selenium Driverless doesn’t support proxy in headless mode:
from selenium_driverless import webdriver
import asyncio

async def scraper():

    async with webdriver.Chrome() as browser:

        # set a proxy for all contexts
        await browser.set_single_proxy("http://134.209.105.209:3128/")

        # open the target website
        await browser.get("https://httpbin.io/ip")
Next, wait for the page to load and print the page source. Clear the proxy settings before quitting the browser. Finally, run the function with asyncio:
async def scraper():

    async with webdriver.Chrome() as browser:

        # ...

        # implicitly wait for the page to load
        await browser.sleep(1.0)

        # extract the page's full HTML
        print(await browser.page_source)

        # clear the proxy
        await browser.clear_proxy()

        # quit the driver
        await browser.quit()

# run the function
asyncio.run(scraper())
Here's the full code:
# import the required libraries
from selenium_driverless import webdriver
import asyncio

async def scraper():

    async with webdriver.Chrome() as browser:

        # set a proxy for all contexts
        await browser.set_single_proxy("http://134.209.105.209:3128/")

        # open the target website
        await browser.get("https://httpbin.io/ip")

        # implicitly wait for the page to load
        await browser.sleep(1.0)

        # extract the page's full HTML
        print(await browser.page_source)

        # clear the proxy
        await browser.clear_proxy()

        # quit the driver
        await browser.quit()

# run the function
asyncio.run(scraper())
Running the code twice outputs the following IP addresses from the proxy server:
{
  "origin": "134.209.105.209:48346"
}

{
  "origin": "134.209.105.209:49488"
}
Your web scraper now uses the specified proxy. Bravo!
However, as earlier mentioned, free proxies are unreliable. You'll need premium web scraping proxies for real projects. But keep in mind that they require authentication.
Another advantage that Selenium Driverless has over the Standard WebDriver is that it supports proxy authentication by default.
All you need to do is replace the previous proxy address with the premium one containing your authentication credentials like so:
# import the required libraries
from selenium_driverless import webdriver
import asyncio

async def scraper():

    async with webdriver.Chrome() as browser:

        # set a proxy for all contexts
        await browser.set_single_proxy("http://<username>:<password>@example.proxy.com:5001/")

        # open the target website
        await browser.get("https://httpbin.io/ip")

        # implicitly wait for the page to load
        await browser.sleep(1.0)

        # extract the page's full HTML
        print(await browser.page_source)

        # clear the proxy
        await browser.clear_proxy()

        # quit the driver
        await browser.quit()

# run the function
asyncio.run(scraper())
Let's now see the other features of Selenium Driverless.
Other Features of Selenium Driverless
The Selenium Driverless library has other features that make it suitable for web scraping. You'll learn about them in this section.
Asyncio and Sync Support
Selenium Driverless is asynchronous by default. However, it also supports synchronous content extraction, giving you two options for executing your scraping tasks.
The asynchronous mode is the best option for scraping multiple pages because it allows concurrent content extraction, reducing execution time and improving overall efficiency.
Here's an example code demonstrating asynchronous execution using the asyncio library:
# import the required libraries
from selenium_driverless import webdriver
import asyncio

async def scraper():

    async with webdriver.Chrome() as browser:

        # open the target website
        await browser.get("https://httpbin.io/")

        # implicitly wait for the page to load
        await browser.sleep(1.0)

        # extract the page's full HTML
        print(await browser.page_source)

        # quit the driver
        await browser.quit()

# run the function
asyncio.run(scraper())
The synchronous mode doesn't support loading multiple pages, making it slower. However, it's simpler to implement and sufficient for scraping fewer pages. Using Selenium Driverless in synchronous mode requires the library's sync module.
See an example synchronous code below:
# import the required library (sync module)
from selenium_driverless.sync import webdriver

def scraper():

    with webdriver.Chrome() as browser:

        # open the target website
        browser.get("https://httpbin.io/")

        # implicitly wait for the page to load
        browser.sleep(1.0)

        # extract the page's full HTML
        print(browser.page_source)

        # quit the driver
        browser.quit()

# run the function
scraper()
You now know how to run Selenium Driverless in asynchronous and synchronous modes. Keep reading to see more features.
Unique Execution Contexts
The unique execution context in Selenium Driverless lets you isolate a browser environment for specific scraping tasks like proxy or cookie modification. It's useful if you don't want the actions on a particular web page to interfere with other scraping activities during concurrent execution.
For instance, the code below modifies the selected element text within a unique context by setting the unique_context argument to True inside the script execution method:
# import the required libraries
from selenium_driverless import webdriver
import asyncio

async def main():
    async with webdriver.Chrome() as browser:

        # open the target web page
        await browser.get("https://httpbin.io/ip")

        # script to modify HTML content within a unique context
        unique_context_script = """
            var element = document.getElementsByTagName("pre")[0];
            if (element) {
                element.outerHTML = "This is the new text content!";
            }
            """

        # execute the script to modify HTML content within a unique context
        await browser.execute_script(unique_context_script, unique_context=True)

        # retrieve the modified HTML content within the unique context
        modified_html = await browser.execute_script(
            "return document.documentElement.outerHTML",
            unique_context=True
            )

        print("Modified HTML content within unique context:\n", modified_html)

# run the function
asyncio.run(main())
You can scale the code by spinning another context without modifying the page's HTML.
Multiple Contexts
Multiple contexts let you open many tabs or windows with a single browser instance. This feature allows concurrent web scraping, as you can handle different pages in separate windows.
You can also use the multiple contexts feature to set a different proxy address and cookie for each website you want to scrape. The only setback is that it doesn't support setting proxy per context on Windows.
Let's see an example by visiting https://httpbin.io/ip, a web page that returns your IP address. The sample code below uses two browser contexts to handle the target URL and sets a proxy for the second context. It then prints the page source to view your IP address:
# import the required libraries
from selenium_driverless import webdriver
import asyncio

async def main():

    async with webdriver.Chrome() as browser:

        # set the first context
        context_1 = browser.current_context

        # set the second context with a proxy
        context_2 = await browser.new_context(
            proxy_bypass_list=["localhost"],
            proxy_server="http://38.242.230.228:8118"
            )

        # visit the target page within each context
        await context_1.current_target.get("https://httpbin.io/ip")
        await context_2.get("https://httpbin.io/ip")

        # print the page source to view ip
        print(await context_1.page_source)
        print(await context_2.page_source)

asyncio.run(main())
The code will output your local IP address for the first context and the proxy's IP address for the second one.
That’s it for multiple contexts. Let's see one more feature that's useful for web scraping.
Pointer Interaction
The pointer interaction feature allows you to control the cursor on a web page. It's handy for moving the pointer to a specific element or coordinate and performing a click action.
For example, the following code uses pointer interaction to move to an element's coordinate and click it to navigate to another page. It then prints the new page title:
# import the required libraries
from selenium_driverless import webdriver
from selenium_driverless.types.by import By
import asyncio

async def scraper():

    async with webdriver.Chrome() as browser:

        # open the target website
        await browser.get("https://opensea.io/", wait_load=True)

        # get the element by XPATH
        element = await browser.find_element(By.XPATH, "//*[text()='Drops']")

        # get element's location
        element_location = await element.location

        # separate the target element's x and y cordinates
        x_cord = element_location["x"]
        y_cord = element_location["y"]

        # define a pointer instance and movement parameters
        pointer = await browser.current_pointer
        move_kwargs = {"total_time": 0.7, "accel": 2, "smooth_soft": 20}

        # move to the target element and click it
        await pointer.move_to(x_cord, y_cord)
        await pointer.click(x_cord, y_cord, move_kwargs=move_kwargs, move_to=True)

        # implicitly wait for the page to load
        await browser.sleep(5.0)

        # extract the page's title
        print(await browser.title)

        # quit the driver
        await browser.quit()

# run the function
asyncio.run(scraper())
You just navigated a web page using the Selenium Driverless pointer interaction feature.
Limitations of Selenium Driverless
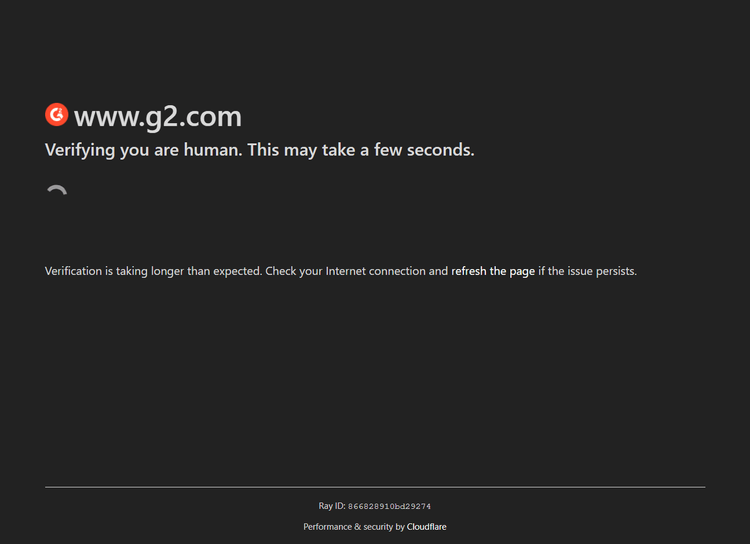
Selenium Driverless is a feature-rich web scraping tool. However, despite its ability to set proxies and spin up Chrome without a WebDriver, advanced anti-bot measures can still block you while using it to scrape multiple pages concurrently.
For example, a protected website like the G2 Reviews page blocks Selenium Driverless despite setting a proxy. You can try it out with the following code:
# import the required libraries
from selenium_driverless import webdriver
import asyncio

async def scraper():

    async with webdriver.Chrome() as browser:

        # set a proxy for all contexts
        await browser.set_single_proxy("http://38.242.230.228:8118")

        # open the arget website
        await browser.get("https://www.g2.com/products/asana/reviews")

        # implicitly wait for the page to load
        await browser.sleep(1.0)

        # take a screenshot of the page
        print(await browser.save_screenshot("g2-review-page-access.png"))

        # clear the proxy
        await browser.clear_proxy()

        # quite the driver
        await browser.quit()

# run the function
asyncio.run(scraper())
The code outputs the following screenshot, showing that Selenium Driverless couldn't bypass Cloudflare Turnstile:

The best way to avoid getting blocked is to use a web scraping API like ZenRows. It helps you fix your request headers, auto-rotate premium proxies, and bypass any anti-bot system at scale.
ZenRows also offers JavaScript instructions for headless browser support. It means you can replace Selenium with ZenRows and eliminate the resource overuse associated with Selenium.
Let's use ZenRows to access the G2 page that got you blocked earlier.
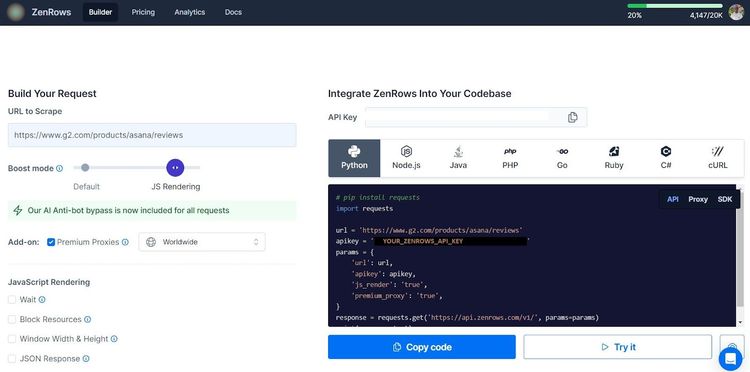
Sign up to launch the Request Builder. Paste the target URL in the link box, toggle the Boost mode to JS Rendering, and activate Premium Proxies. Select Python as your programming language and choose the API request option. Then, copy and paste the generated code into your script.

The generated code uses the Request library as the HTTP client. Ensure you install it with pip if you've already not done so:
pip install requests
Now, format the generated code like so:
# pip install requests
import requests

params = {
    "url": "https://www.g2.com/products/asana/reviews",
    "apikey": "<YOUR_ZENROWS_API_KEY>",
	"js_render": "true",
	"premium_proxy": "true",
}
response = requests.get("https://api.zenrows.com/v1/", params=params)
print(response.text)
The code visits the website and scrapes its full HTML, as shown:
<!DOCTYPE html>
<html>
<head>
    <meta charset="utf-8" />
    <link href="https://www.g2.com/images/favicon.ico" rel="shortcut icon" type="image/x-icon" />
    <title>Asana Reviews 2024</title>
</head>
<body>
    <!-- other content omitted for brevity -->
</body>
You just scraped a protected website with ZenRows. Congratulations!
Conclusion
In this article, you've seen how the Selenium Driverless library works in Python. Here's a summary of what you've learned:
- Performing basic web scraping with the Selenium Driverless library in Python.
- Adding a proxy to your Selenium Driverless web scraper.
- How to use the asynchronous, synchronous, pointer interaction, and unique and multiple contexts features in Selenium Driverless.
Remember that advanced anti-bot mechanisms can still block you even if you use Selenium Driverless. Use ZenRows to bypass any form of CAPTCHA and other anti-bot detection systems and scrape any website without limitations. Try ZenRows for free!
Did you find the content helpful? Spread the word and share it on Twitter, or LinkedIn.