Selenium web scraping involves making many requests in a short period of time, but that triggers bot detection mechanisms and gets you blocked. Fortunately, proxies act as an intermediary between your scraper and target web servers, enabling your requests to look like they are coming from different users.
So, you'll learn how to set up a Selenium proxy in Java step-by-step in this tutorial.
Let's dive in!
Prerequisites
Before getting started, follow the steps below to create your Java project.
Firstly, ensure you have the latest version of JDK for your operating system. If you don't, visit Oracle's download page and follow the installation instructions specific to your OS.
Once installed, set the JAVA_HOME environment variable to the directory of your Java configuration files. To do that, navigate to the Environment Variables window. Under the user variable section, click on New.
After that, set the variable name as JAVA_HOME and set the variable value as your JDK installation directory path.
Also, add JDK's bin directory to the system's PATH environment variable. You can do that by selecting Path under the System variable section, then navigating through Edit > New to enter the JDK's bin directory.
Lastly, create a Java project and install the necessary dependencies: Selenium and WebDriver.
To better manage your Java project, it is recommended to use a Java Build tool (for example, Maven or Gradle). For this tutorial, we'll use Maven to manage the necessary dependencies. So, to follow along, open your preferred IDE (VScode, Eclipse, or IntelliJ) and create your Java project using Maven build integration.
For VScode, install the Extension Pack for Java extension. It'll install other necessary extensions for your Java project.
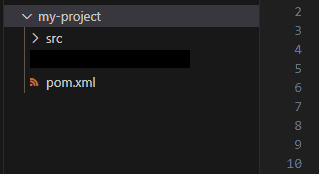
If done correctly, you'll have a project tree similar to this:

Open the pom.xml file and the installed Selenium and WebDriver Manager packages as dependencies. Make sure you use the latest non-alpha versions.
  	<!-- Selenium -->
    <dependency>
      <groupId>org.seleniumhq.selenium</groupId>
      <artifactId>selenium-java</artifactId>
      <version>4.10.0</version>
    </dependency>

    <!-- WebDriver Manager -->
    <dependency>
      <groupId>io.github.bonigarcia</groupId>
      <artifactId>webdrivermanager</artifactId>
      <version>5.4.0</version>
    </dependency>
Lastly, add the following properties to update the Java Build Path to match your Java version. In the below code, replace {java_version} with your actual version number (e.g., 20.0.1).
<properties>
    <maven.compiler.source>{Java_version}</maven.compiler.source>
    <maven.compiler.target>{Java_version}</maven.compiler.target>
</properties>
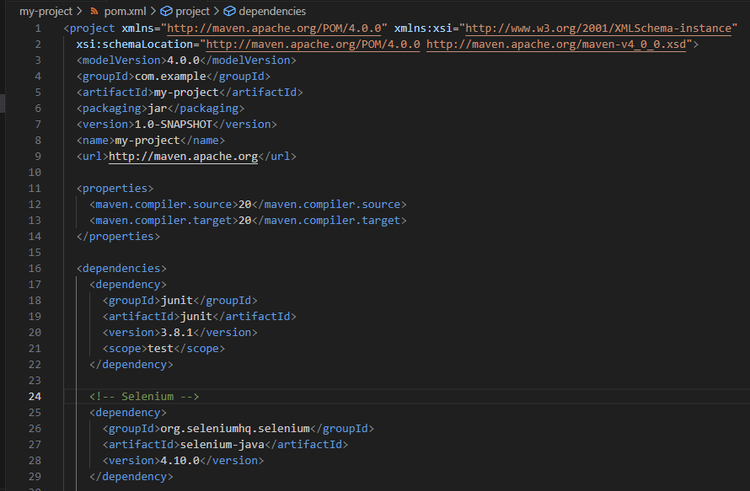
Your pom.xml file should look like this now:

Save your pom.xml file. Then in your terminal, navigate to the root directory of your project (where pom.xml is located) and run the maven build command below to fetch the added libraries.
mvn clean install
And you're ready to configure your first Selenium proxy using Java.
How to Set a Proxy in Selenium Java
To set up a proxy in Selenium Java, start by creating a new Java file (source files are typically located in the src/main/java directory). Then, import the following requirements:
package com.example;

import org.openqa.selenium.By;
import org.openqa.selenium.WebDriver;
import org.openqa.selenium.chrome.ChromeDriver;
import org.openqa.selenium.Proxy;
import org.openqa.selenium.chrome.ChromeOptions;
import io.github.bonigarcia.wdm.WebDriverManager;
After that, set up WebDriver Manager to automatically download the required driver binaries.
public class App {
    public static void main(String[] args) throws InterruptedException {
		// Download the required driver binaries
		WebDriverManager.chromedriver().setup();

	}
}
Then, define your proxy details (you can pick a free one from FreeProxyList), create an object using the Proxy module, and set the HTTP and SSL proxies.
// Set the proxy configuration
String proxyAddress = "47.88.3.19";
int proxyPort = 8080;

// Create a Proxy object and set the HTTP and SSL proxies
Proxy proxy = new Proxy();
proxy.setHttpProxy(proxyAddress + ":" + proxyPort);
proxy.setSslProxy(proxyAddress + ":" + proxyPort);
Next, create a ChromeOptions instance, set the proxy option, and add the headless argument to run your script in headless mode.
// Create ChromeOptions and set the proxy and additional options
ChromeOptions options = new ChromeOptions();
options.setProxy(proxy);
options.addArguments("--headless"); // Run in headless mode
Now, create a driver instance using ChromeOptions, navigate to your target URL (we'll use ident.me, a website that displays the IP address of the client accessing it), and wait for the content to load.
// Create driver instance with the ChromeOptions
WebDriver driver = new ChromeDriver(options);

// Navigate to target URL
driver.get("http://ident.me/");

// Wait for 5 seconds using Thread.sleep
Thread.sleep(5000); // Wait for 5 seconds
Lastly, retrieve the HTML content and print it on the console to verify that your script works and close the browser.
//retrieve text content
String ipAddress = driver.findElement(By.tagName("body")).getText();
System.out.println("Your IP address: " + ipAddress); //print on console

// Close the browser
driver.quit();
Putting everything together, here's the complete code:
package com.example;

import org.openqa.selenium.By;
import org.openqa.selenium.WebDriver;
import org.openqa.selenium.chrome.ChromeDriver;
import org.openqa.selenium.Proxy;
import org.openqa.selenium.chrome.ChromeOptions;
import io.github.bonigarcia.wdm.WebDriverManager;

public class App {
    public static void main(String[] args) throws InterruptedException {
		// Download the required driver binaries
        WebDriverManager.chromedriver().setup();

        // Set the proxy details
        String proxyAddress = "47.88.3.19";
        int proxyPort = 8080;

        // Create a Proxy object and set the HTTP and SSL proxies
        Proxy proxy = new Proxy();
        proxy.setHttpProxy(proxyAddress + ":" + proxyPort);
        proxy.setSslProxy(proxyAddress + ":" + proxyPort);

        // Create ChromeOptions instance and set the proxy options
        ChromeOptions options = new ChromeOptions();
        options.setProxy(proxy);
        options.addArguments("--headless"); // Run in headless mode

        // Create driver instance with the ChromeOptions
        WebDriver driver = new ChromeDriver(options);

        // Navigate to target URL
        driver.get("http://ident.me/");

        // Wait for a 5 seconds using Thread.sleep
        Thread.sleep(5000); // Wait for 5 seconds

		// Retrieve text content
        String ipAddress = driver.findElement(By.tagName("body")).getText();
        System.out.println("Your IP address: " + ipAddress);

		// Close the browser
        driver.quit();
    }
}
Right-click on your Java file and select Run Java to execute your code.
This is our result, displaying the same IP we set up as a proxy:
Your IP address: 47.88.3.19
Congrats! You've configured your first proxy using Selenium Java.
Proxy Authentication with Selenium Java: Credentials
Some proxy services require authentication to access their network. That's typically common with premium proxies.
To include proxy credentials in your Selenium Java scraper, set your authentication details (username and password) using the org.openqa.selenium.Proxy class.
// Set the proxy details
String proxyAddress = "47.88.3.19";
int proxyPort = 8080;
String proxyUsername = "your-username";
String proxyPassword = "your-password";
After that, create a Proxy object and set HTTP and SSL proxies, like with a free proxy. Then, proceed to set proxy authentication.
// Create a Proxy object and set the HTTP and SSL proxies
Proxy proxy = new Proxy();
proxy.setHttpProxy(proxyAddress + ":" + proxyPort);
proxy.setSslProxy(proxyAddress + ":" + proxyPort);

// Set proxy authentication
String proxyAuth = proxyUsername + ":" + proxyPassword;
proxy.setProxyType(Proxy.ProxyType.MANUAL);
proxy.setHttpProxy(proxyAuth + "@" + proxyAddress + ":" + proxyPort);
proxy.setSslProxy(proxyAuth + "@" + proxyAddress + ":" + proxyPort);
You should have the following full code now:
package com.example;

import org.openqa.selenium.By;
import org.openqa.selenium.WebDriver;
import org.openqa.selenium.chrome.ChromeDriver;
import org.openqa.selenium.Proxy;
import org.openqa.selenium.chrome.ChromeOptions;
import io.github.bonigarcia.wdm.WebDriverManager;

public class App {
    public static void main(String[] args) throws InterruptedException {
        // Download the required driver binaries
        WebDriverManager.chromedriver().setup();

        // Set the proxy details
        String proxyAddress = "47.88.3.19";
        int proxyPort = 8080;
        String proxyUsername = "your-username";
        String proxyPassword = "your-password";

        // Create a Proxy object and set the HTTP and SSL proxies
        Proxy proxy = new Proxy();
        proxy.setHttpProxy(proxyAddress + ":" + proxyPort);
        proxy.setSslProxy(proxyAddress + ":" + proxyPort);

        // Set proxy authentication
        String proxyAuth = proxyUsername + ":" + proxyPassword;
        proxy.setProxyType(Proxy.ProxyType.MANUAL);
        proxy.setHttpProxy(proxyAuth + "@" + proxyAddress + ":" + proxyPort);
        proxy.setSslProxy(proxyAuth + "@" + proxyAddress + ":" + proxyPort);

        // Create ChromeOptions instance and set the proxy options
        ChromeOptions options = new ChromeOptions();
        options.setProxy(proxy);
        options.addArguments("--headless"); // Run in headless mode

        // Create driver instance with the ChromeOptions
        WebDriver driver = new ChromeDriver(options);

        // Navigate to target URL
        driver.get("http://ident.me/");

        // Wait for 5 seconds using Thread.sleep
        Thread.sleep(5000);

        // Retrieve text content
        String ipAddress = driver.findElement(By.tagName("body")).getText();
        System.out.println("Your IP address: " + ipAddress);

        // Close the browser
        driver.quit();
    }
}
Implement a Rotating Proxy in Selenium Java
While using a proxy can help you avoid getting blocked, measures like rate limiting and IP banning can stop your bot. So, to make it increasingly difficult for websites to detect your scraping activities, you need to dynamically change your IP address per request.
To implement a rotating proxy in Selenium Java, the first step is to create a proxy pool to randomly select from for each request. For that, get more proxies from FreeProxyList.
Then, in your Java file, import the required classes for List and ArrayList. After that, set up WebDriver Manager to automatically download the required driver binaries and define your proxy list.
//..
import java.util.ArrayList;
import java.util.List;

public class rotator {
    public static void main(String[] args) throws InterruptedException {
        // Download the required driver binaries
        WebDriverManager.chromedriver().setup();

        // Define a list of proxy addresses and ports
        List<String> proxyList = new ArrayList<>();
        proxyList.add("190.61.88.147:8080");
        proxyList.add("13.231.166.96:80");
        proxyList.add("35.213.91.45:80");


	}
}
Next, iterate over each proxy in your Proxy pool using a for loop and create a new ChromeOptions instance. Also, create Proxy objects to set your proxies.
for (String proxyAddress : proxyList) {
	// Create ChromeOptions instance
	ChromeOptions options = new ChromeOptions();
	options.addArguments("--headless"); // Run in headless mode

	// Create a Proxy object and set the HTTP and SSL proxies
	Proxy proxy = new Proxy();
	proxy.setHttpProxy(proxyAddress);
	proxy.setSslProxy(proxyAddress);

	// Set the proxy options in ChromeOptions
	options.setProxy(proxy);

}
Within the same for loop, create a new driver instance using ChromeOptions, navigate to your target URL, wait a few seconds so the page loads, and retrieve your desired data.
// Create driver instance with the ChromeOptions
WebDriver driver = new ChromeDriver(options);

// Navigate to target URL
driver.get("http://ident.me/");

// Wait for 5 seconds using Thread.sleep
Thread.sleep(5000);

// Retrieve text content
String ipAddress = driver.findElement(By.tagName("body")).getText();
//System.out.println("Proxy: " + proxyAddress);
System.out.println("Your IP address: " + ipAddress);
System.out.println();

// Close the browser
driver.quit();
Your complete code should look like this:
package com.example;

import org.openqa.selenium.By;
import org.openqa.selenium.WebDriver;
import org.openqa.selenium.chrome.ChromeDriver;
import org.openqa.selenium.Proxy;
import org.openqa.selenium.chrome.ChromeOptions;
import io.github.bonigarcia.wdm.WebDriverManager;

import java.util.ArrayList;
import java.util.List;

public class rotator {
    public static void main(String[] args) throws InterruptedException {
        // Download the required driver binaries
        WebDriverManager.chromedriver().setup();

        // Define a list of proxy addresses and ports
        List<String> proxyList = new ArrayList<>();
        proxyList.add("190.61.88.147:8080");
        proxyList.add("13.231.166.96:80");
        proxyList.add("35.213.91.45:80");

        for (String proxyAddress : proxyList) {
            // Create ChromeOptions instance
            ChromeOptions options = new ChromeOptions();
            options.addArguments("--headless"); // Run in headless mode

            // Create a Proxy object and set the HTTP and SSL proxies
            Proxy proxy = new Proxy();
            proxy.setHttpProxy(proxyAddress);
            proxy.setSslProxy(proxyAddress);

            // Set the proxy options in ChromeOptions
            options.setProxy(proxy);

            // Create driver instance with the ChromeOptions
            WebDriver driver = new ChromeDriver(options);

            // Navigate to target URL
            driver.get("http://ident.me/");

            // Wait for 5 seconds using Thread.sleep
            Thread.sleep(5000);

            // Retrieve text content
            String ipAddress = driver.findElement(By.tagName("body")).getText();
            //System.out.println("Proxy: " + proxyAddress);
            System.out.println("Your IP address: " + ipAddress);
            System.out.println();

            // Close the browser
            driver.quit();
        }
    }
}
Run it, and it'll make three requests:
Your IP address: 190.61.88.147
Your IP address: 13.231.166.96
Your IP address: 35.243.118.158
Bingo! You've successfully increased your anonymity by using a different IP for each request.
However, free proxies are for learning but bad practice in a real-world scenario because they're prone to failure and easily spotted by anti-bot systems. For example, if you replace the target URL in our Selenium proxy rotator with a protected website, like G2, you'll be denied access.
Your IP address: Access denied
Error code 1020
You do not have access to www.g2.com.
The site owner may have set restrictions that prevent you from accessing the site.
Error details
Was this page helpful? Yes No
Performance & security by Cloudflare
The solution? Premium proxies.
Which Proxy Is Best for Selenium Java?
The best proxies to avoid getting blocked with Selenium Java are residential proxies. Check out our in-depth guide on the best web scraping proxies that integrate seamlessly with your headless browser.
Beyond that, bear in mind that even with high-level customizations and the best proxies you can find, web pages protected by higher-security layers will still flag you easily. Luckily, you can use ZenRows as a better alternative to Selenium. This API provides you with an all-in-one toolkit that deals with all anti-bot measures automatically, using rotating residential proxies, anti-CAPTCHA technologies, header rotation and much more.
Like Selenium, it enables you to mimic user behavior and render JavaScript, but without the need for additional infrastructure, maintenance, multiple paid tools and getting constantly blocked by systems that even use machine learning to identify your scraper.
Therefore, ZenRows is the easiest and quickest way to get the data you want, is more reliable, and scaling up is a piece of cake.
Let's try ZenRows against the protected website that denied us access earlier: G2.

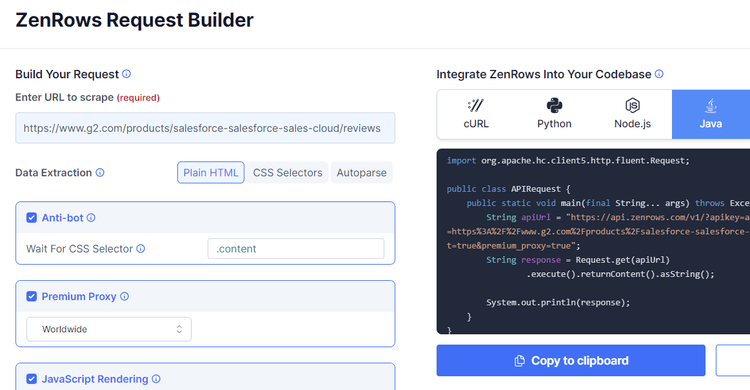
Sign up for your free API key, and you'll get to the Request Builder. Input the target URL (https://www.g2.com/products/salesforce-salesforce-sales-cloud/reviews) in the Request, then enable premium proxies, JavaScript rendering and the advanced anti-bot bypass for the best result, and select Java as a language on the right.

That'll generate your scraper's code. Copy it to your IDE.
import org.apache.hc.client5.http.fluent.Request;

public class APIRequest {
    public static void main(final String... args) throws Exception {
        String apiUrl = "https://api.zenrows.com/v1/?apikey=Your_API_Key&url=https%3A%2F%2Fwww.g2.com%2Fproducts%2Fsalesforce-salesforce-sales-cloud%2Freviews&js_render=true&antibot=true&premium_proxy=true";
        String response = Request.get(apiUrl)
                .execute().returnContent().asString();

        System.out.println(response);
    }
}
To send HTTP requests, you can use the Apache HttpClient library (or any other library). For that, add the dependency to your pom.xml file:
<!-- https://mvnrepository.com/artifact/org.apache.httpcomponents.client5/httpclient5 -->
<dependency>
    <groupId>org.apache.httpcomponents.client5</groupId>
    <artifactId>httpclient5</artifactId>
    <version>5.2.1</version>
</dependency>
Run it, and this should be your output:
<!DOCTYPE html>
//..
<title>Salesforce Reviews & Product Details - G2</title>
//..
🎉 Awesome, you've accessed a heavily protected web page using ZenRows to scrape with premium proxies and advanced anti-bot bypass mechanisms.
Conclusion
Using a proxy with Selenium Java is critical to get the data you want. However, you need premium proxies to get reasonable results, and you'll still need to spend countless hours dealing with different types of anti-bot measures. ZenRows makes that easy. Sign up now to get your free API key.
Frequent Questions
How to Use a Proxy with Selenium Java?
To use a proxy with Selenium Java, create an object and add the provider using the Proxy module. Then, configure the desired browser options (e.g., with ChromeOptions) and set the proxy options.
Can I Handle a Proxy Using Selenium in Java?
Yes, you can handle a proxy using Selenium in Java because this headless browser provides features that enable proxy configuration in WebDriver instances.
How to Create a Web Proxy in Java?
To create a web proxy in Java, configure a server that intercepts requests between clients and the requested web servers.
Did you find the content helpful? Spread the word and share it on Twitter, or LinkedIn.