Interested in using Puppeteer in Python? Luckily, there's an unofficial Python wrapper over the original Node.js library: Pyppeteer!
In this article, you'll learn how to use Pyppeteer for web scraping, including:
- Browse with it and extract data.
- Interact with dynamic content.
- Take screenshots.
- Integrate proxies.
- Automate logins.
- Solve common errors.
Let's get started! 👍
What Is Pyppeteer in Python
Pyppeteer is a tool to automate a Chromium browser with code, allowing Python developers to gain JavaScript-rendering capabilities to interact with modern websites and simulate human behavior better.
It comes with a headless browser mode, which gives you the full functionality of a browser but without a graphical user interface, increasing speed and saving memory.
Now, let's begin with the Pyppeteer tutorial.
How to Use Pyppeteer
Let's go over the fundamentals of using Puppeteer in Python, for which you need the installation procedure to move further.
1. How to Install Pyppeteer in Python
You must have Python 3.6+ installed on your system as a prerequisite. If you are new to it, check out an installation guide.
Note: Feel free to refresh your Python web scraping foundation with our tutorial if you need to.
Then, use the command below to install Pyppeteer:
pip install pyppeteer
When you launch Pyppeteer for the first time, it'll download the most recent version of Chromium (150MB) if it isn't already installed, taking longer to execute as a result.
2. How to Use Pyppeteer
To use Pyppeteer, start by importing the required packages.
#pip install asyncio
import asyncio
from pyppeteer import launch
Now, create a function to get an object going to the ScrapeMe website.
async def main():
   browserObj =await launch({"headless": False})
   url = await browserObj.newPage()
   await url.goto('https://scrapeme.live/shop/')


   await browserObj.close()
Note: Setting the headless option to False launches a Chrome instance with GUI. We didn't use True because we're testing.
Then, an asynchronous call to the main() function puts the script into action.
asyncio.get_event_loop().run_until_complete(main())
Here's what the complete code looks like:
import asyncio
from pyppeteer import launch


async def main():
   browserObj =await launch({"headless": False})
   url = await browserObj.newPage()
   await url.goto('https://scrapeme.live/shop/')


   ## Get HTML
    await browserObj.close()

asyncio.get_event_loop().run_until_complete(main())
And it works:
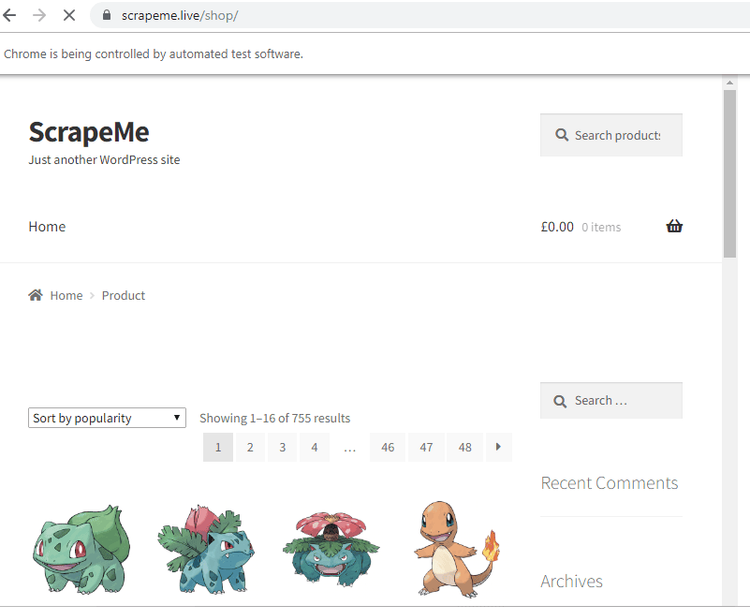
Notice the prompt "Chrome is being controlled by automated test software".
3. Scrape Pages with Pyppeteer
Add a few lines of code to wait until the page loads, return its HTML and close the browser instance.
htmlContent = await url.content()
await browserObj.close()
return htmlContent
Add them to your script and print the HTML.
import asyncio
from pyppeteer import launch


async def main():
   browserObj =await launch({"headless": False})
   url = await browserObj.newPage()
   await url.goto('https://scrapeme.live/shop/')


   ## Get HTML
   htmlContent = await url.content()
   await browserObj.close()
   return htmlContent


response = asyncio.get_event_loop().run_until_complete(main())
print(response)
Here you have:

Congratulations! 🎉 You scraped your first web page using Pyppeteer.
4. Parse HTML Contents for Data Extraction
Pyppeteer is quite a powerful tool that also allows parsing the raw HTML of a page to extract the desired information. In our case, the products' titles and prices from the ScrapeMe store.
Let's take a look at the source code to identify the elements we're interested in. For that, go to the website, right-click anywhere and select "Inspect". The HTML will be shown in the Developer Tools window.
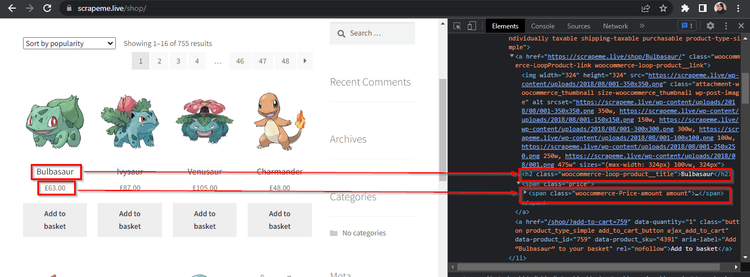
Look closely at the screenshot above. The product titles are in the <h2> tags. Similarly, the prices are inside the <span> tags, having the amount class.
Back to your code, use querySelectorAll() to extract all the <h2> and <span> elements, with the amount class in the second case, thanks to CSS Selectors. Then, add a loop to store the information in a JSON file.
import asyncio
from pyppeteer import launch


async def main():
    browserObj =await launch({"headless": False})
    url = await browserObj.newPage()
    await url.goto('https://scrapeme.live/shop/')
    titles = await url.querySelectorAll("h2")
    prices = await url.querySelectorAll("span .amount")
    for t,p in zip(titles,prices):
        title = await t.getProperty("textContent")
        price = await p.getProperty("textContent")
        # printing the article titles
        print(await title.jsonValue())
        print(await price.jsonValue())


response = asyncio.get_event_loop().run_until_complete(main())
Run the script, and see the result:
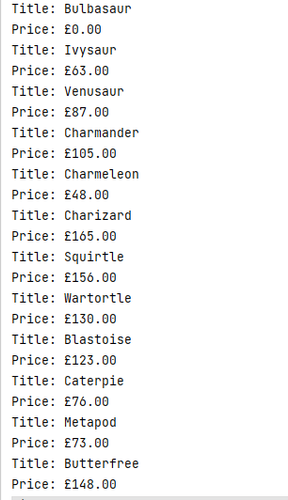
Nice job! 👏
5. Interact with Dynamic Pages
Many websites nowadays, like ScrapingClub, are dynamic, meaning that JavaScript determines how often its contents change. For example, social media websites usually use infinite scrolling for their post timeline.
Scraping such websites is a challenging task with Requests and BeautifulSoap libraries. However, Pyppeteer comes in handy for the job, and we'll use it to wait for events, click on buttons and scroll down.
Wait for the Page to Load
You must wait for the contents of the current page to load before proceeding to the next activity when using programmatically controlled browsers, and the two most popular approaches to achieve this are waitFor() and waitForSelector().
waitFor()
The waitFor() function waits for a time specified in milliseconds.
The following example opens the page in Chromium and waits for 4000 milliseconds before closing it.
import asyncio
from pyppeteer import launch


async def main():
   browserObj =await launch({"headless": False})
   url = await browserObj.newPage()


   await url.goto('https://scrapingclub.com/exercise/list_infinite_scroll/')
   await url.waitFor(4000)
   await browserObj.close()


asyncio.get_event_loop().run_until_complete(main())
waitForSelector()
waitForSelector() waits for a particular element to appear on the page before continuing.
For example, the following script waits for some <div> to appear before moving on to the next step.
import asyncio
from pyppeteer import launch

async def main():
   browserObj =await launch({"headless": False})
   url = await browserObj.newPage()
   await url.goto('https://scrapingclub.com/exercise/list_infinite_scroll/')
   await url.waitForSelector('div .alert', {'visible': True})
   await browserObj.close()

asyncio.get_event_loop().run_until_complete(main())
The waitForSelector() method accepts two arguments: a CSS Selector pointing to the desired element and an optional options dictionary. In our case above, options is {visible: True} to wait until the <div> element becomes visible.
Click on a Button
You can use Pyppeteer Python to click buttons or other elements on a web page. All you need to do is find that particular element using the selectors and call the click() method.
The example you see next clicks on a link at the page's footer by following the body > div > div > div > a path.
import asyncio
from pyppeteer import launch

async def main():
   browserObj =await launch({"headless": False})
   url = await browserObj.newPage()
   await url.goto('https://scrapingclub.com/exercise/list_infinite_scroll/')
   await url.click('body > div > div > div > a')
   await browserObj.close()

asyncio.get_event_loop().run_until_complete(main())
As mentioned earlier, web scraping developers wait for the page to load before interacting further, for example with the click() method. In the image below, you see we clicked on a link at the bottom of the initial target. Then, we waited for the title to load on the secondary target to scrape the heading title.
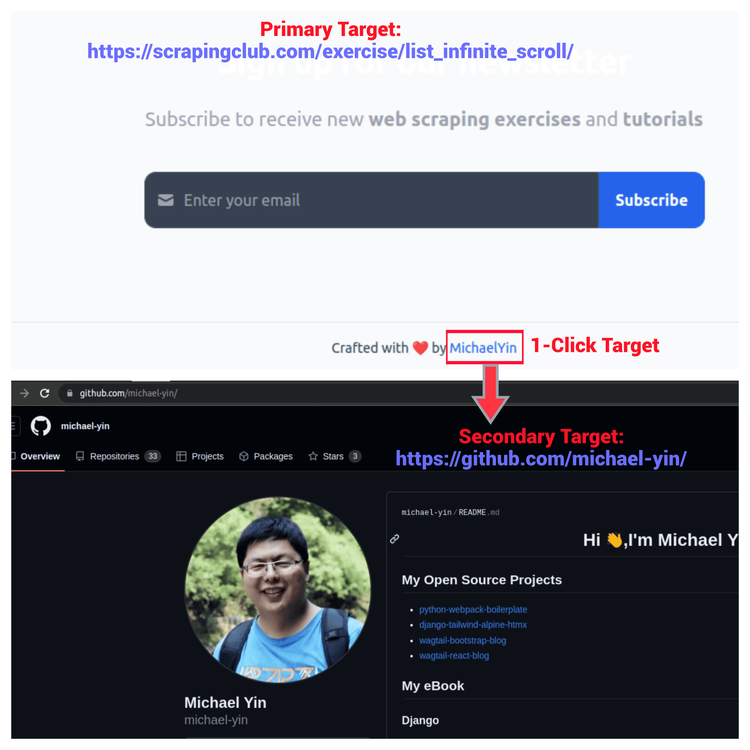
Let's see how to do this with Pyppeteer:
import asyncio
from pyppeteer import launch


async def main():


    browserObj=await launch({"headless": True})
    url = await browserObj.newPage()
    await url.goto('https://scrapingclub.com/exercise/list_infinite_scroll/')


    await url.waitForSelector('body > div > div > div > a')
    await url.click('body > div > div > div > a')


    await url.waitForSelector('a[href="https://github.com/michael-yin/"]')


    success_message = await    url.querySelector('a[href="https://github.com/michael-yin/"]')

    text = await success_message.getProperty("textContent")
    print (await text.jsonValue())
    await browserObj.close()


asyncio.get_event_loop().run_until_complete(main())
The output is the following:
MichaelYin
Notice we incorporated the waitForSelector() method to add robustness to the code.
Scroll the Page
Pyppeteer is useful for modern websites that use infinite scrolls to load the content, and the evaluate() function helps in such cases. Look at this code below to see how.
import asyncio
from pyppeteer import launch

async def main():
    browserObj =await launch({"headless": False})
    url = await browserObj.newPage()
    await url.setViewport({'width': 1280, 'height': 720})
    await url.goto('https://scrapingclub.com/exercise/list_infinite_scroll/')
    await url.evaluate("""{window.scrollBy(0, document.body.scrollHeight);}""")
    await url.waitFor(5000)
    await browserObj.close()

asyncio.get_event_loop().run_until_complete(main())
We created a browser object (with a url tab) and set the viewport size of the browser window (it's the visible area of the web page and affects how it's rendered on the screen). The script will scroll the browser window by one screen.
You can employ this scrolling to load all the data and scrape it. For example, assume you want to get all the product names from the infinite scroll page:
import asyncio
from pyppeteer import launch

async def main():

    browserObj =await launch({"headless": False})
    url = await browserObj.newPage()
    await url.setViewport({'width': 1280, 'height': 720})
    await url.goto('https://scrapingclub.com/exercise/list_infinite_scroll/')

    # Get the height of the current page
    current_height = await url.evaluate('document.body.scrollHeight')

    while True:
        # Scroll to the bottom of the page
        await url.evaluate('window.scrollBy(0, document.body.scrollHeight)')

        # Wait for the page to load new content
        await url.waitFor(2000)

        # Update the height of the current page
        new_height = await url.evaluate('document.body.scrollHeight')

        # Break the loop if we have reached the end of the page
        if new_height == current_height:
            break

        current_height = new_height

    #Scraping in Action
    all_product_tags = await url.querySelectorAll("div > h4 > a")
    for a in all_product_tags:
        product_name = await a.getProperty("textContent")
        print(await product_name.jsonValue())

    await browserObj.close()

asyncio.get_event_loop().run_until_complete(main())
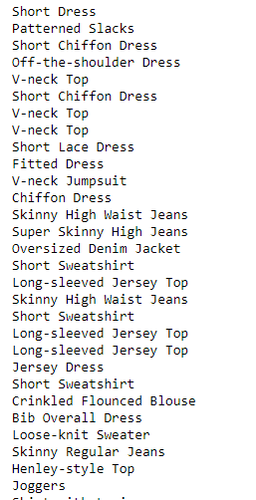
The Pyppeteer script above navigates to the page and gets the current scroll height, then iteratively scrolls the page vertically until no more scrolling happens. The waitFor() method waits for two seconds in each scroll to ensure the page loads content properly.
In the end, names for all the loaded products are printed as shown in this partial output snippet.
Great job so far! 👏
6. Take a Screenshot with Pyppeteer
It would be convenient to observe what the scraper is doing, right? But you don't see any GUI in real-time in production.
Fortunately, Pyppeteer's screenshot feature can help with debugging. The following code opens a webpage, takes a screenshot of the full page and saves it in the current directory with the "web_screenshot.png" name.
import asyncio
from pyppeteer import launch
async def main():
   browserObj =await launch({"headless": True})
   url = await browserObj.newPage()
   await url.goto('https://scrapingclub.com/exercise/list_infinite_scroll/')
   await url.screenshot({'path': 'web_screenshot.png'})
   await browserObj.close()
asyncio.get_event_loop().run_until_complete(main())
7. Use a Proxy with Pyppeteer
While doing web scraping, you need to use proxies to avoid being blocked by the target website. But why is that?
If you access a website with hundreds or thousands of daily requests, the site can blacklist your IP, and you won't be able to scrape the content anymore.
Proxies act as an intermediary between you and the target website, giving you new IPs. And some web scraping proxy providers, like ZenRows, have default IP rotation mechanisms to prevent getting the address banned so that you save money.
Take a look at the following code snippet to learn to integrate a proxy with Pyppeteer in the launch method.
import asyncio
from pyppeteer import launch

async def main():
   browserObj =await launch({'args': ['--proxy-server=address:port'], "headless": False})
   url = await browserObj.newPage()
   await url.authenticate({'username': 'user', 'password': 'passw'})
   await url.goto('https://scrapeme.live/shop/')
   await browserObj.close()

asyncio.get_event_loop().run_until_complete(main()
Note: If the proxy requires a username and password, you can set the credentials using the authenticate() method.
8. Login with Pyppeteer
You might want to scrape content behind a login sometimes, and Pyppeteer can help in this regard.
Go to the Quotes website, where you can realize about a Login on the top-right of the screen.
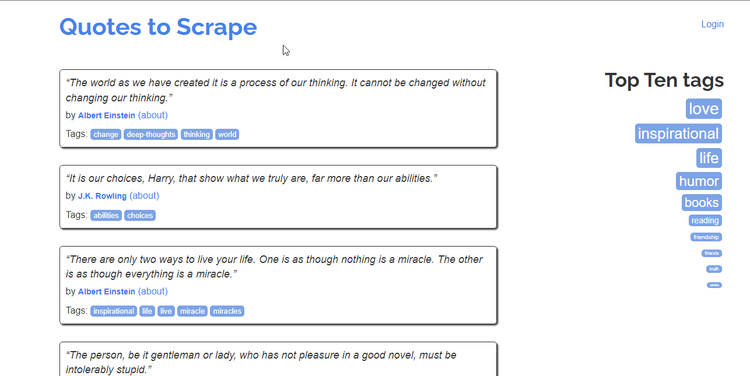
Clicking on the login link will redirect you to the login page, which contains input fields for the username and password, as well as a submit button.
Note: Since this website is intended for testing, you can use "admin" as a username and "12345" as a password.
Let's look at the HTML of those elements.
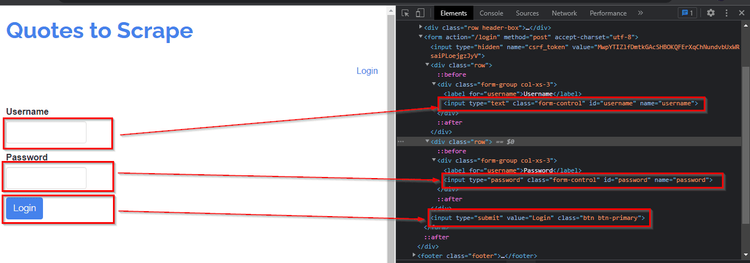
The script below enters the user credentials and then clicks on the login button with Pyppeteer. After that, it waits five seconds to let the next page load completely. Finally, it takes a screenshot of the page to test whether the login was successful.
import asyncio
from pyppeteer import launch

async def main():
   browserObj =await launch()
   url = await browserObj.newPage()
   await url.goto('http://quotes.toscrape.com/login')
   await url.type('#username', 'admin');
   await url.type('#password', '12345');
   await url.click('body > div > form > input.btn.btn-primary')
   await url.waitFor(5000);
   await url.screenshot({'path': 'quotes.png'})
   ## Get HTML
   await browserObj.close()

asyncio.get_event_loop().run_until_complete(main())
Congratulations! 😄 You successfully logged in.
Note: This website was simple and required only a username and password, but some websites implement more advanced security measures. Read our guide on how to scrape behind a login with Python to learn more.
Solve Common Errors
You may face some errors when setting up Pyppeteer, so find here how to solve them if appearing.
Error: Pyppeteer Is Not Installed
While installing Pyppeteer, you may encounter the "Unable to install Pyppeteer" error.
The Python version on your system is the root cause, as Pyppeteer supports only Python 3.6+ versions. So, if you have an older version, you may encounter such installation errors. The solution is upgrading Python and reinstalling Pyppeteer.
Error: Pyppeteer Browser Closed Unexpectedly
Let's assume you execute your Pyppeteer Python script for the first time after installation but encounter this error: pyppeteer.errors.BrowserError: Browser closed unexpectedly.
That means not all Chromium dependencies were completely installed. The solution is manually installing the Chrome driver using the following command:
pyppeteer-install
Conclusion
Pyppeteer is an unofficial Python port for the classic Node.js Puppeteer library. It's a setup-friendly, lightweight, and fast package suitable for web automation and dynamic website scraping.
This tutorial has taught you how to perform basic headless web scraping with Python's Puppeteer and deal with web logins and advanced dynamic interactions. Additionally, you know now how to integrate proxies with Pyppeteer.
If you need more features, check out the official manual, for example to set a custom user agent in Pyppeteer.
Need to scrape at a large scale without worrying about infrastructure? Let ZenRows help you with its massively scalable web scraping API.
Frequent Questions
What Is the Difference Between Pyppeteer and Puppeteer?
The difference is that Puppeteer is an official Node.js NPM package, while Pyppeteer is an unofficial Python cover over the original Puppeteer.
The primary distinction between them is the baseline programming language and the developer APIs they offer. For the rest, they have almost the same capabilities for automating web browsers.
What Is the Python Wrapper for Puppeteer?
Pyppeteer is Puppeteer's Python wrapper. Using the Chromium DevTools Protocol, the Python package of Pyppeteer offers an API for controlling the headless version of Google Chrome or Chromium, which enables you to carry out web automation activities like website scraping, web application testing, and automating repetitive processes.
What Is the Equivalent of Puppeteer in Python?
The equivalent of Puppeteer in Python is Pyppeteer, a library that allows you to control headless Chromium and allows you to render JavaScript and automate user interactions with web pages.
Can I Use Puppeteer with Python?
Yes, you can use Puppeteer with Python. However, you must first create a bridge to connect Python and JavaScript. Pyppeteer is exactly that.
What Is the Python Version of Puppeteer?
The Python version of Puppeteer is Pyppeteer. Similar to Puppeteer in functionality, Pyppeteer offers a high-level API for managing the browser.
Did you find the content helpful? Spread the word and share it on Twitter, or LinkedIn.