Selenium is the most used browser automation tool for web scraping and testing. While a Rust Selenium official library isn't available, the community created the thirtyfour port.
Here, you'll see the basics and then study more complex interactions. At the end of this guide, you'll know:
- How to use Selenium in Rust.
- Interact with web pages in a browser.
- Avoid getting blocked.
Why Use Selenium in Rust
Selenium is a favorite tool for controlling a browser instance for browser automation. This is due to its consistent API, which opens the door to cross-platform and cross-language automated scripts. No wonder Selenium is an excellent tool for both testing and headless browser scraping.
The project doesn't involve a Rust library but the community has come to the rescue with thirtyfour. This open-source and community-driven library receives weekly updates and is always up-to-date.
How to Implement Selenium in Rust
Get the basics of Selenium for Rust by learning how to scrape this infinite scrolling demo page:
This page uses JavaScript to load new products as the user scrolls down. Thus, you couldn't scrape it without a tool like the Rust Selenium library that can simulate user interaction. That demo page is a great example of a dynamic page that needs browser automation for data retrieval.
It's time to extract some data!
Step 1: Install Selenium in Rust
Before getting started, you need Rust installed on your computer. Follow the link to download the installer and follow the wizard to set it up.
You have everything required to get started. Create a Rust project in the rust_selenium folder with the cargo new command below:
cargo new rust_selenium
Great! rust_selenium will now contain a new Rust Cargo project. Open it in your favorite Rust IDE. For a more detailed procedure on how to set up Rust, follow our Rust web scraping guide.
Time to install thirtyfour, the Selenium WebDriver client for Rust. Open Cargo.toml and add the following lines in the [dependencies] section:
thirtyfour = "0.32.0-rc.9"
tokio = { version = "1", features = ["full"] }
That will add thirtyfour and tokio to your project's dependencies. Tokio is a Rust library recommended by thirtyfour to write asynchronous web code.
Your new Cargo.toml file will contain:
[package]
name = "rust_selenium"
version = "0.1.0"
edition = "2021"

# See more keys and their definitions at https://doc.rust-lang.org/cargo/reference/manifest.html

[dependencies]
thirtyfour = "0.32.0-rc.9"
tokio = { version = "1", features = ["full"] }
Install the two libraries with this Cargo command:
cargo update
Open main.rs in the src folder and initialize a basic Tokio script that imports thirtyfour:
use std::error::Error;
use thirtyfour::prelude::*;

#[tokio::main]
async fn main() -> Result<(), Box<dyn Error + Send + Sync>> {
    // scraping logic...

    Ok(())
}
To work properly, thirtyfour requires chromedriver running on your system. Visit the ChromeDriver download page to get the driver matching your Chrome version. Unzip the file and place the chromedriver executable in your project directory.
Launch the command below to run the ChromeDriver service on port 9515:
.\chromedriver
If everything goes as expected, that will print something like:
Starting ChromeDriver 120.0.6099.109 (3419140ab665596f21b385ce136419fde0924272-refs/branch-heads/6099@{#1483}) on port 9515
Only local connections are allowed.
Please see https://chromedriver.chromium.org/security-considerations for suggestions on keeping ChromeDriver safe.
ChromeDriver was started successfully.
For the rest of the tutorial, we will assume that chromedriver is running.
You can compile the Selenium Rust script with this command:
cargo build
And then run it with:
cargo run
Awesome, you're now fully set up!
Step 2: Build a Scraper with Selenium in Rust
Use the following lines to create a WebDriver instance to control a local Chrome window:
// define the browser options
let mut caps = DesiredCapabilities::chrome();
// to run Chrome in headless mode
caps.add_arg("--headless")?; // comment out in development
// initialize a driver to control a Chrome instance
// with the specified options
let driver = WebDriver::new("http://localhost:9515", caps).await?;
The --headless flag ensures that the Rust Selenium package starts Chrome in headless mode. Comment that line out if you want to follow the actions made by your scraping script in real-time.
Release the resources associated with the web driver by adding this line before the end of the script:
// close the browser and release its resources
driver.quit().await?;
Then, use the goto() method of driver to visit the target page in the controlled browser:
driver.goto("https://scrapingclub.com/exercise/list_infinite_scroll/").await?;
Next, get the raw HTML from the page and print it in the terminal with println!(). Call the source() method of the WebDriver object to get the current page's source:
let html = driver.source().await?;
println!("{html}");
That's what main.rs contains so far:
use std::error::Error;
use thirtyfour::prelude::*;

#[tokio::main]
async fn main() -> Result<(), Box<dyn Error + Send + Sync>> {
    // define the browser options
    let mut caps = DesiredCapabilities::chrome();
    // to run Chrome in headless mode
    caps.add_arg("--headless=new")?; // comment out in development
    // initialize a driver to control a Chrome instance
    // with the specified options
    let driver = WebDriver::new("http://localhost:9515", caps).await?;

    // visit the target page
    driver.goto("https://scrapingclub.com/exercise/list_infinite_scroll/").await?;
    // retrieve the source HTML of the target page
    // and print it
    let html = driver.source().await?;
    println!("{html}");

    // close the browser and release its resources
    driver.quit().await?;

    Ok(())
}
Launch the Selenium Rust script in headed mode. The thirtyfour package will launch Chrome and automatically open the Infinite Scrolling demo page:
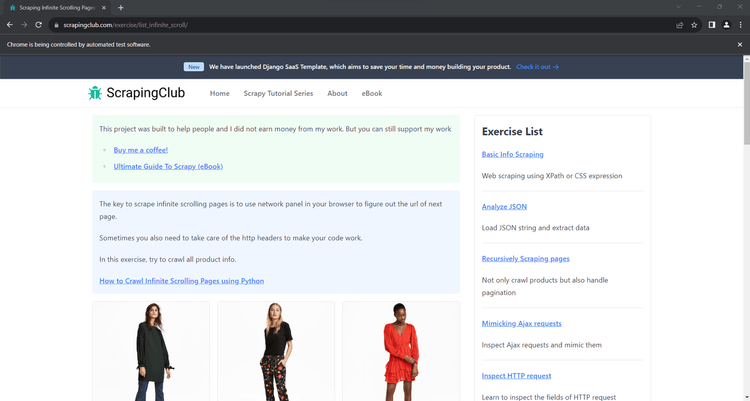
The message "Chrome is being controlled by automated test software" means that Selenium is working as desired.
The Rust script will also print the raw HTML of the page in the terminal:
<html class="h-full"><head>
  <meta charset="utf-8">
  <meta name="viewport" content="width=device-width, initial-scale=1">
  <meta name="description" content="Learn to scrape infinite scrolling pages"><title>Scraping Infinite Scrolling Pages (Ajax) | ScrapingClub</title>
  <link rel="icon" href="/static/img/icon.611132651e39.png" type="image/png">
  <!-- Omitted for brevity... -->
Perfect! That's exactly the HTML code of the page to scrape!
Step 3: Parse the Data You Want
Selenium provides you with everything you need to parse the HTML content of a page and extract data from it. Now, suppose the Rust scraper's goal is to collect each product's name and price on the page. To achieve that, you have to:
- Select the product cards on the page with an effective HTML selection strategy.
- Retrieve the desired information from each of them.
- Store the scraped data in a Rust vector.
An HTML selection strategy typically relies on XPath expressions or CSS Selectors. thirtyfour supports both, so you're free to go for the best suited for your specific case. In general, CSS selectors tend to be more intuitive than XPath expressions. For more details, read our guide on CSS Selector vs XPath.
Let's keep it simple and stick with CSS selectors. To figure out how to conceive the right ones for the scraping goal, you need to analyze the HTML node of a product card. Open the target page in the browser, right-click on a product node, and inspect it with DevTools:
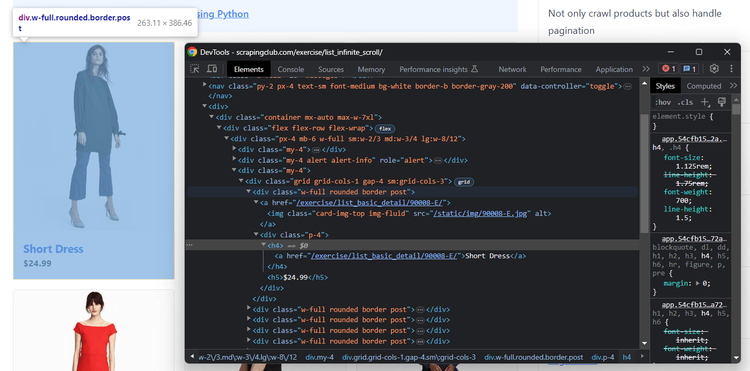
Here, you can note that:
- Each product is a
<div>with a"post"class. - The name info is in an
<h4>node. - The price data in an
<h5>element.
Follow the instructions and learn how to extract the name and price from the product cards on the page.
First, you need a custom struct to represent the product items on the page:
struct Product {
    name: String,
    price:String,
}
Then, you have to define a vector where to keep track of the scraped data:
let mut products: Vec<Product> = Vec::new();
Use the find_all() method in conjunction with By::Css() to select all HTML product nodes with a CSS selector:
let product_html_elements = driver.find_all(By::Css(".post")).await?;
Iterate over them, get the price and name, create a new Product instance, and add it to the products vector:
for product_html_element in product_html_elements {
    let name = product_html_element
        .find(By::Css("h4"))
        .await?
        .text()
        .await?;
    let price = product_html_element
        .find(By::Css("h5"))
        .await?
        .text()
        .await?;

    // create a new Product object and
    // add it to the vector
    let product = Product { name, price };
    products.push(product);
}
Note using the text() method to extract the price and name values. The Rust Selenium library also has methods for accessing HTML attributes and more.
You can then print the scraped data in the terminal with:
for product in products {
    println!("Price: {}\nName: {}\n", product.price, product.name)
}
That's what main.rs will look like:
use std::{error::Error};
use thirtyfour::prelude::*;

// custom struct to represent the product item
// to scrape
struct Product {
    name: String,
    price: String,
}

#[tokio::main]
async fn main() -> Result<(), Box<dyn Error + Send + Sync>> {
    // define the browser options
    let mut caps = DesiredCapabilities::chrome();
    // to run Chrome in headless mode
    caps.add_arg("--headless=new")?; // comment out in development

    // initialize a driver to control a Chrome instance
    // with the specified options
    let driver = WebDriver::new("http://localhost:9515", caps).await?;

    // visit the target page
    driver
        .goto("https://scrapingclub.com/exercise/list_infinite_scroll/")
        .await?;

    // where to store the scraping data
    let mut products: Vec<Product> = Vec::new();

    // select all product cards on the page
    let product_html_elements = driver.find_all(By::Css(".post")).await?;

    // iterate over them and apply the scraping logic
    for product_html_element in product_html_elements {
        let name = product_html_element
            .find(By::Css("h4"))
            .await?
            .text()
            .await?;
        let price = product_html_element
            .find(By::Css("h5"))
            .await?
            .text()
            .await?;

        // create a new Product object and
        // add it to the vector
        let product = Product { name, price };
        products.push(product);
    }

    // log the scraped products
    for product in products {
        println!("Price: {}\nName: {}\n", product.price, product.name)
    }

    // close the browser and release its resources
    driver.quit().await?;

    Ok(())
}
Execute it, and it'll produce:
Price: $24.99
Name: Short Dress

# omitted for brevity...

Price: $34.99
Name: Fitted Dress
Here we go! The Rust browser automation parsing logic works like a charm.
Step 4: Export Data as CSV
All that remains is to export the collected data in a format that is not accessible to humans, such as CAV. This will make using and sharing the scraped data much easier.
You could achieve the goal with the Rust Standard library, but it's simpler with a library. Add csv to your project's dependencies with this Cargo command:
cargo add csv
The [dependencies] section of your Cargo.toml file will now contain a line for the csv library.
Create the output CSV file and initialize it with a header row. Then, iterate over each element in products and add it to the file with write_record():
// create the CSV output file
let path = std::path::Path::new("products.csv");
let mut writer = csv::Writer::from_path(path)?;

// add the header row to the CSV file
writer.write_record(&["name", "price"])?;

// populate the output file
for product in products {
    writer.write_record(&[product.name, product.price])?;
}

// free up the writer resources
writer.flush().unwrap();
This is the final code for your Rust Selenium web scraping script:
use std::error::Error;
use thirtyfour::prelude::*;

// custom struct to represent the product item
// to scrape
struct Product {
    name: String,
    price: String,
}

#[tokio::main]
async fn main() -> Result<(), Box<dyn Error + Send + Sync>> {
    // define the browser options
    let mut caps = DesiredCapabilities::chrome();
    // to run Chrome in headless mode
    caps.add_arg("--headless=new")?; // comment out in development

    // initialize a driver to control a Chrome instance
    // with the specified options
    let driver = WebDriver::new("http://localhost:9515", caps).await?;

    // visit the target page
    driver
        .goto("https://scrapingclub.com/exercise/list_infinite_scroll/")
        .await?;

    // where to store the scraping data
    let mut products: Vec<Product> = Vec::new();

    // select all product cards on the page
    let product_html_elements = driver.find_all(By::Css(".post")).await?;

    // iterate over them and apply the scraping logic
    for product_html_element in product_html_elements {
        let name = product_html_element
            .find(By::Css("h4"))
            .await?
            .text()
            .await?;
        let price = product_html_element
            .find(By::Css("h5"))
            .await?
            .text()
            .await?;

        // create a new Product object and
        // add it to the vector
        let product = Product { name, price };
        products.push(product);
    }

    // close the browser and release its resources
    driver.quit().await?;

    // create the CSV output file
    let path = std::path::Path::new("products.csv");
    let mut writer = csv::Writer::from_path(path)?;

    // add the header row to the CSV file
    writer.write_record(&["name", "price"])?;

    // populate the output file
    for product in products {
        writer.write_record(&[product.name, product.price])?;
    }

    // free up the writer resources
    writer.flush().unwrap();

    Ok(())
}
Compile it:
cargo build
And run it:
cargo run
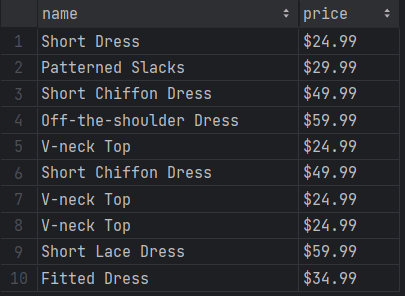
After the script execution is over, a products.csv file will show up in the root project folder. Open it, and you will see the following data:
Wonderful! You now know the basics of Selenium for Rust!
At the same time, recognize that the current output involves only ten rows. The reason is that the target page only has ten products and loads more dynamically via infinite scrolling. Dive into the next section to gain the skills required to scrape data from all products!
Interactions with Web Pages via Browser Automation
thirtyfour can simulate many web interactions, including scrolls, waits, mouse movements, and others. That's critical for interacting with dynamic content pages as a human being would. Another benefit is that browser automation helps your script not trigger anti-bot systems.
Interactions that the Rust Selenium WebDriver library can mimic include:
- Click elements and perform other mouse actions.
- Wait for elements on the page to be present, visible, clickable, etc.
- Scroll up and down the page.
- Fill out input fields and submit forms.
- Drag and drop elements.
- Take screenshots.
You can perform most of those actions with built-in methods. Use execute() to run a custom JavaScript script directly on the page for complex scenarios. With either approach, any user interaction in the browser becomes possible.
Let's see how to scrape all products from the infinite scroll demo page and then explore other popular Selenium Rust interactions!
Scrolling
On first load, the target page contains only ten products. In detail, it uses the infinite scrolling user interaction to retrieve new ones. If you want to load all products, you need to replicate the scroll down action.
However, Selenium for Rust doesn't provide a built-in method for scrolling. So, you need a custom JavaScript script to achieve that!
This JavaScript snippet tells the browser to scroll down the page 10 times at an interval of 0.5 seconds each:
// scroll down the page 10 times
const scrolls = 10
let scrollCount = 0

// scroll down and then wait for 0.5s
const scrollInterval = setInterval(() => {
  window.scrollTo(0, document.body.scrollHeight)
  scrollCount++

  if (scrollCount === numScrolls) {
    clearInterval(scrollInterval)
  }
}, 500)
To run it on the page, store the above script in a string variable and pass it to execute(). This method also requires a Vector with a list of arguments to pass to the script. Since you don't need arguments, you can use an empty vector as follows:
let scrolling_script = r#"
    // scroll down the page 10 times
    const scrolls = 10
    let scrollCount = 0

    // scroll down and then wait for 0.5s
    const scrollInterval = setInterval(() => {
    window.scrollTo(0, document.body.scrollHeight)
    scrollCount++

    if (scrollCount === numScrolls) {
        clearInterval(scrollInterval)
    }
    }, 500)
"#;
driver.execute(scrolling_script, Vec::new()).await?;
Place the execute() instruction before applying the HTML node selection logic.
thirtyfour will now scroll down the page as desired, but that's not enough. You also have to wait for the scrolling operation and data-loading process to be over. Because of that, use thread::sleep() to stop the script execution for 10 seconds:
thread::sleep(Duration::from_secs(10));
Add the following import to make that line work:
use std::{thread, time::Duration};
Put it all together, and you'll get:
use std::error::Error;
use thirtyfour::prelude::*;
use std::{thread, time::Duration};

// custom struct to represent the product item
// to scrape
struct Product {
    name: String,
    price: String,
}

#[tokio::main]
async fn main() -> Result<(), Box<dyn Error + Send + Sync>> {
    // define the browser options
    let mut caps = DesiredCapabilities::chrome();
    // to run Chrome in headless mode
    caps.add_arg("--headless=new")?; // comment out in development

    // initialize a driver to control a Chrome instance
    // with the specified options
    let driver = WebDriver::new("http://localhost:9515", caps).await?;

    // visit the target page
    driver
        .goto("https://scrapingclub.com/exercise/list_infinite_scroll/")
        .await?;

    // simulate the scroll down interaction
    let scrolling_script = r#"
        // scroll down the page 10 times
        const scrolls = 10
        let scrollCount = 0

        // scroll down and then wait for 0.5s
        const scrollInterval = setInterval(() => {
        window.scrollTo(0, document.body.scrollHeight)
        scrollCount++

        if (scrollCount === numScrolls) {
            clearInterval(scrollInterval)
        }
        }, 500)
    "#;
    driver.execute(scrolling_script, Vec::new()).await?;

    // wait for the scrolling operation to end
    // and for new products to be on the page
    thread::sleep(Duration::from_millis(10000));

    // where to store the scraping data
    let mut products: Vec<Product> = Vec::new();

    // select all product cards on the page
    let product_html_elements = driver.find_all(By::Css(".post")).await?;

    // iterate over them and apply the scraping logic
    for product_html_element in product_html_elements {
        let name = product_html_element
            .find(By::Css("h4"))
            .await?
            .text()
            .await?;
        let price = product_html_element
            .find(By::Css("h5"))
            .await?
            .text()
            .await?;

        // create a new Product object and
        // add it to the vector
        let product = Product { name, price };
        products.push(product);
    }

    // close the browser and release its resources
    driver.quit().await?;

    // create the CSV output file
    let path = std::path::Path::new("products.csv");
    let mut writer = csv::Writer::from_path(path)?;

    // add the header row to the CSV file
    writer.write_record(&["name", "price"])?;

    // populate the output file
    for product in products {
        writer.write_record(&[product.name, product.price])?;
    }

    // free up the writer resources
    writer.flush().unwrap();

    Ok(())
}
Compile the script, then run it to verify that the output now involves all 60 products:
cargo build
cargo run
Open the products.csv file. This time, it'll contain more than the first ten items:
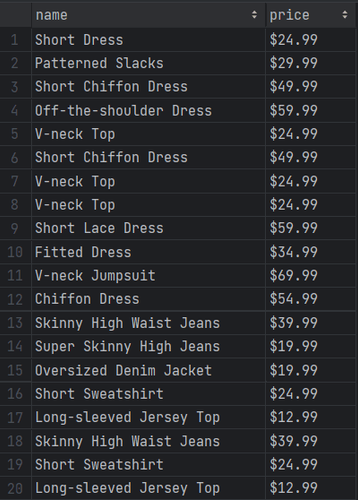
Mission complete! You just scraped all the products. 🎊
Wait for Element
The current Selenium Rust script reaches the scraping goal but relies on an implicit wait. Using this type of wait is discouraged. Why? Because it introduces unreliability into the scraping logic! A common network or computer slowdown may make your scraper fail, which you don't want.
Using a generic time-based wait isn't an approach you should trust. Instead, you should opt for explicit waits that wait for the presence of a particular node on the page. That's a best practice as it makes your script more consistent, robust, and reliable.
To wait for the 60th product to be on the page, you need to use query() along with wail_until() as below:
let last_product = driver.query(By::Css(".post:nth-child(60)")).first().await?;
last_product.wait_until().displayed().await?;
Replace the sleep() instruction with the two lines above. The scraper will now wait by default up to 30 seconds for the 60th product to render after the AJAX calls triggered by the scrolls.
The definitive Rust Selenium script is:
use std::error::Error;
use std::{thread, time::Duration};
use thirtyfour::prelude::*;

// custom struct to represent the product item
// to scrape
struct Product {
    name: String,
    price: String,
}

#[tokio::main]
async fn main() -> Result<(), Box<dyn Error + Send + Sync>> {
    // define the browser options
    let mut caps = DesiredCapabilities::chrome();
    // to run Chrome in headless mode
    caps.add_arg("--headless=new")?; // comment out in development

    // initialize a driver to control a Chrome instance
    // with the specified options
    let driver = WebDriver::new("http://localhost:9515", caps).await?;

    // visit the target page
    driver
        .goto("https://scrapingclub.com/exercise/list_infinite_scroll/")
        .await?;

    // simulate the scroll down interaction
    let scrolling_script = r#"
        // scroll down the page 10 times
        const scrolls = 10
        let scrollCount = 0

        // scroll down and then wait for 0.5s
        const scrollInterval = setInterval(() => {
        window.scrollTo(0, document.body.scrollHeight)
        scrollCount++

        if (scrollCount === numScrolls) {
            clearInterval(scrollInterval)
        }
        }, 500)
    "#;
    driver.execute(scrolling_script, Vec::new()).await?;

    // wait until the 60th product is visible on the page
    let last_product = driver.query(By::Css(".post:nth-child(60)")).first().await?;
    last_product.wait_until().displayed().await?;

    // where to store the scraping data
    let mut products: Vec<Product> = Vec::new();

    // select all product cards on the page
    let product_html_elements = driver.find_all(By::Css(".post")).await?;

    // iterate over them and apply the scraping logic
    for product_html_element in product_html_elements {
        let name = product_html_element
            .find(By::Css("h4"))
            .await?
            .text()
            .await?;
        let price = product_html_element
            .find(By::Css("h5"))
            .await?
            .text()
            .await?;

        // create a new Product object and
        // add it to the vector
        let product = Product { name, price };
        products.push(product);
    }

    // close the browser and release its resources
    driver.quit().await?;

    // create the CSV output file
    let path = std::path::Path::new("products.csv");
    let mut writer = csv::Writer::from_path(path)?;

    // add the header row to the CSV file
    writer.write_record(&["name", "price"])?;

    // populate the output file
    for product in products {
        writer.write_record(&[product.name, product.price])?;
    }

    // free up the writer resources
    writer.flush().unwrap();

    Ok(())
}
Execute the scraper again, and you'll get the same results as before. You'll get better performance this time as the script now waits for the right amount of seconds only.
Fantastic! You can now dig into other useful interactions.
Wait for Page to Load
driver.goto() waits for the browser to trigger the load event on the page. In other words, the Selenium Rust library already waits for pages to load.
When searching elements on a page, thirtyfour waits up to 30 seconds for you. That should be enough in most cases, but you may need more control. To handle more complex scenarios, use the following conditions:
-
stale(). -
not_stale(). -
displayed(). -
not_displayed(). -
enabled(). -
not_enabled(). -
clickable(). -
not_clickable(). -
has_class(). -
has_attribute().
For more information, check out the documentation.
Click Elements
To simulate clicks, the WebElement class exposes the click() method. Call it as below:
element.click().await?;
This function instructs the browser to send a mouse click event to the specified node. That will trigger the node's HTML onclick() callback.
If click() leads to a page change (as in the snippet below), you'll have to adapt the parsing logic to the new DOM structure:
let product_html_element = driver.find(By::Css(".post"));
product_element.click().await?;
// you are now on the detail product page...

// new scraping logic...

// driver.find(...)
Take a Screenshot
Page data isn't the only information that you can retrieve from a site. Screenshots of web pages or specific elements are also useful too. For example, to study what competitors are doing from a visual point of view.
Use the screenshot() method to take a screenshot of the current window and write it to the given filename:
driver.screenshot(std::path::Path::new("screenshot.png")).await?;
That'll produce a screenshot.png file with the browser viewport in your project's root directory.
Amazing! You're now the king of Rust Selenium WebDriver interactions!
Strategies to Prevent Being Blocked in Web Scraping with Rust
The biggest challenge to web scraping is getting blocked by anti-bot solutions. In this section, you'll learn how to avoid them by using real-world HTTP headers and rotating your exit IP with a proxy.
That isn't usually enough, though. So, you'll also explore a more effective solution!
Use a Proxy with Selenium Rust
Most anti-bot solutions track incoming requests. When too many requests in a short period of time come from the same IP or look suspicious, those systems will ban the IP. If this happens to you and you don't have other available IPs, your script will become useless.
The solution is to use a proxy server to conceal your IP. To set a proxy in thirtyfour:
- Get the URL of a free proxy from a site like Free Proxy List.
- Store it in a variable.
- Pass it to Chrome's
--proxy-serverflag via aChromeCapabilitiesargument.
Suppose the URL of your proxy server is 214.23.4.13:4912. Set it in the Selenium Rust script as below:
let mut caps = DesiredCapabilities::chrome();

// set the proxy
let proxy_url = "214.23.4.13:4912";
caps.add_arg(&format!("--proxy_flag={}", proxy_url))?;
Free proxies are data greedy, short-lived, and unreliable. Use them only for learning purposes! For more reliable providers, take a look at our article on web scraping proxies.
Customize the User Agent in Rust
Another aspect of getting around anti-bots is to set an actual User-Agent. This header describes the software from which the request is coming. If the server receives a request that appears to be from a bot, it'll probably block it.
Avoid that by setting a custom User-Agent with the --user-agent flag:
let mut caps = DesiredCapabilities::chrome();

// set the User-Agent header
let user_agent = "Mozilla/5.0 (Windows NT 10.0; Win64; x64) AppleWebKit/537.36 (KHTML, like Gecko) Chrome/120.0.0.0 Safari/537.36";
caps.add_arg(&format!("--user-agent={}", user_agent))?;
To learn more, follow our guide on Selenium user agent.
The All-in-One Solution to Avoid Getting Blocked while Web Scraping Don't forget that the two approaches seen earlier are just baby steps to perform web scraping without getting blocked. Sophisticated solutions like Cloudflare will still be able to detect and stop you:
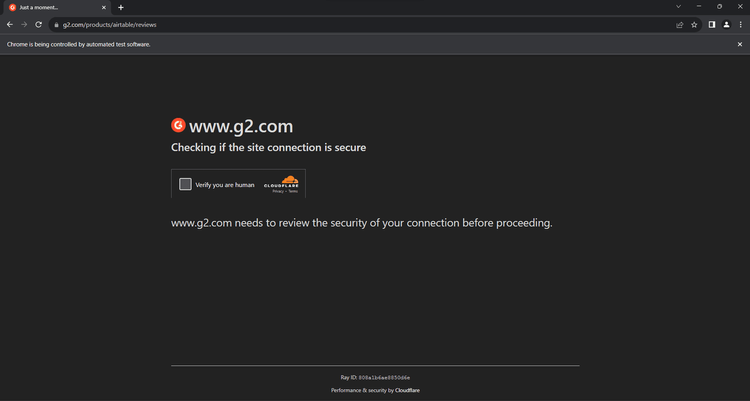
So, should you give up? Not at all! There is a solution and its name is ZenRows! As a scraping API, it seamlessly integrates with thrirtyfour to extend it with an anti-bot bypass system, IP and User-Agent rotation capabilities, and more.
Thanks to its headless browser capabilities, you could also replace the Rust Selenium library with just ZenRows.
Get a test of what ZenRows can do by signing up for free. You'll receive 1,000 credits for free and get to the following Request Builder page:
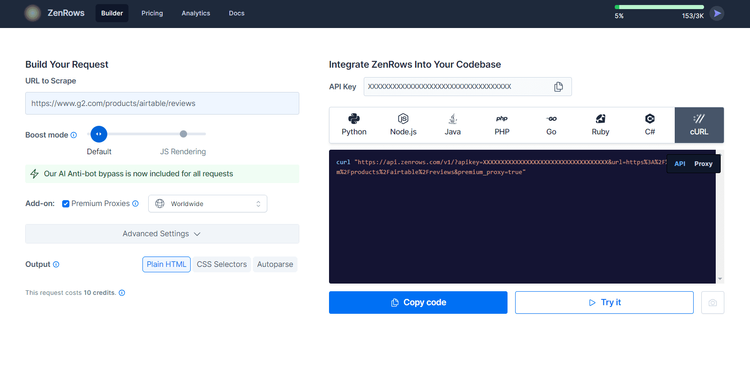
Suppose that your goal is to scrape the G2.com page seen earlier protected with Cloudflare.
Paste your target URL (https://www.g2.com/products/airtable/reviews) into the "URL to Scrape" field. Enable "Premium Proxy" to get rotating IPs and make sure the "JS Rendering" feature isn't turned on to avoid double rendering.
The advanced anti-bot bypass tools are included by default.
On the right, select the “cURL” option to get the raw scraping API URL. Copy the generated URL and use it to the Selenium's goto() method:
use std::error::Error;
use thirtyfour::prelude::*;

#[tokio::main]
async fn main() -> Result<(), Box<dyn Error + Send + Sync>> {
    // define the browser options
    let mut caps = DesiredCapabilities::chrome();
    // to run Chrome in headless mode
    caps.add_arg("--headless=new")?; // comment out in development
    // initialize a driver to control a Chrome instance
    // with the specified options
    let driver = WebDriver::new("http://localhost:9515", caps).await?;

    // visit the target page
    driver.goto("https://api.zenrows.com/v1/?apikey=<YOUR_ZENROWS_API_KEY>&url=https%3A%2F%2Fwww.g2.com%2Fproducts%2Fairtable%2Freviews&premium_proxy=true").await?;
    // retrieve the source HTML of the target page
    // and print it
    let html = driver.source().await?;
    println!("{html}");

    // close the browser and release its resources
    driver.quit().await?;

    Ok(())
}
Execute the script, and it'll print the source HTML of the G2.com page:
<!DOCTYPE html>
<head>
<meta charset="utf-8" />
<link href="https://www.g2.com/assets/favicon-fdacc4208a68e8ae57a80bf869d155829f2400fa7dd128b9c9e60f07795c4915.ico" rel="shortcut icon" type="image/x-icon" />
<title>Airtable Reviews 2024: Details, Pricing, & Features | G2</title>
<!-- omitted for brevity ... -->
Wow! You just integrated ZenRows into your Selenium Rust script.
What about CAPTCHAs and JS challenges that can still block your Rust Selenium script? The great news is that ZenRows extends Selenium and can replace it completely while giving you anti-bot superpowers.
As a cloud solution, ZenRows also leads to significant savings considering the average cost of Selenium.
Rust Selenium Alternative
Selenium for Rust is a great tool, but there are some alternatives you may want to explore. The best Rust Selenium alternative libraries are:
- ZenRows : A cloud-based data extraction API that enables efficient and effective web scraping on any site on the web.
-
rust-headless-chrome: A rust library to control the Chrome browser in a headless environment, without a graphical user interface. -
chromiumoxide: A Rust package for interacting with the Chrome browser using the DevTools protocol. It provides a high-level API for browser automation and web testing.
Conclusion
You learned the fundamentals of controlling headless Chrome in this Rust Selenium tutorial. You started from the basics and then dug into more advanced techniques. You've become a Rust browser automation master.
Now you know:
- How to set up a Rust Selenium WebDriver project.
- How to use
thirtyfourto extract data from a dynamic content page. - What user interactions you can simulate with it.
- The challenges of scraping online data and how to address them.
No matter how good your browser automation script is, anti-bot measures will still be able to block it. Forget about them with ZenRows, a web scraping API with browser automation capabilities, IP rotation, and the most powerful anti-scraping toolkit available. Scraping dynamic content sites has never been easier. Try ZenRows for free!
Frequent Questions
What Is Rust Selenium Used for?
Rust Selenium is used for browser automation and testing web applications. It enables you to interact with pages in a web browser programmatically as a human user. This library is useful for ensuring the reliability of web apps and perform web scraping.
Can We Use Selenium in Rust?
Yes, we can use Selenium in Rust! Although no official library exists, the community has created a reliable port. The name of this library is “thirtyfour," and it receives weekly updates from the community.
Does Selenium Support Rust?
Yes, Selenium supports Rust. You can use it thanks to the thirtyfour library to perform Selenium-based browser automation in Rust. That's a community-driven package, so the project currently doesn't officially support Rust.
Did you find the content helpful? Spread the word and share it on Twitter, or LinkedIn.