Python offers powerful libraries such as BeautifulSoup for parsing and Requests for scraping, but you're likely to get blocked because of restrictions such as IP banning and rate limiting. So in this tutorial, you'll learn to implement a BeautifulSoup proxy to avoid getting blocked.
Ready? Let's dive in!
First Steps with BeautifulSoup and Python Requests
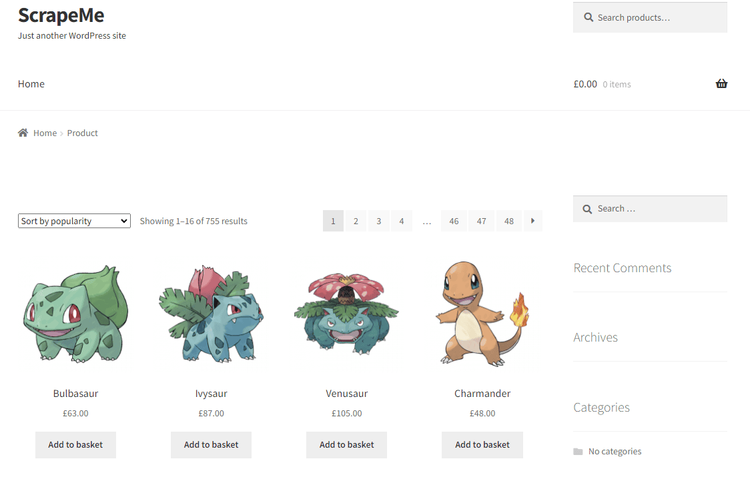
For this example scraping with BeautifulSouip and Python Requests, we'll scrape the Pokémon list of ScrapeMe's front page.

As a prerequisite, install BeautifulSoup and Requests using the following command:
pip install beautifulsoup4 requests
Then, import the required modules.
import requests
from bs4 import BeautifulSoup
Now, send a GET request to the target URL, retrieve the web server's response, and save it in a variable.
url = "https://scrapeme.live/shop/"
response = requests.get(url)
content = response.content
Let's print the response so we can see the full HTML we'll extract data from. Here's the complete code:
import requests
from bs4 import BeautifulSoup

url = "https://scrapeme.live/shop/"
response = requests.get(url)
content = response.content

print(content)
And this is the output:
<!doctype html>\n<html lang="en-GB">\n<head>\n<meta charset="UTF-8">\n<meta name="viewport" content="width=device-width, initial-scale=1, maximum-scale=2.0">\n<link rel="profile" href="http://gmpg.org/xfn/11">\n<link rel="pingback" href="https://scrapeme.live/xmlrpc.php">\n\n<title>Products – ScrapeMe</title>\n<link rel=\'dns-prefetch\' href=\'//fonts.googleapis.com\' />\n<link rel=\'dns-prefetch\' href=\'//s.w.org\' />\n<link rel="alternate" type="application/rss+xml" title="ScrapeMe » Feed" href="https://scrapeme.live/feed/" />\n<link rel="alternate" type="application/rss+xml" title="ScrapeMe » Comments Feed" href="https://scrapeme.live/comments/feed/" />\n<link rel="alternate" type="application/rss+xml" title="ScrapeMe » Products Feed" href="https://scrapeme.live/shop/feed/" />\n\t\t<script type="text/javascript">\n\t\t\twindow._wpemojiSettings = {"baseUrl":"https:\\/\\/s.w.org\\/images\\/core\\/emoji\\/11\\/72x72\\/","ext":".png","svgUrl":"https:\\/\\/s.w.org\\/images\\/core\\/emoji\\/11\\/svg\\/","svgExt":".svg","source":{"concatemoji":"https:\\/\\/scrapeme.live\\/wp-includes\\/js\\/wp-emoji-release.min.js?ver=4.9.23"}};\n\t\t\t!function(e,a,t){var n,r,o,i=a.createElement("canvas"),p=i.getContext&&i.getContext("2d");function s(e,t){var a=String.fromCharCode;p.clearRect(0,0,i.width,i.height),p.fillText(a.apply(this,e),0,0);e=i.toDataURL();return p.clearRect(0,0,i.width,i.height),p.fillText(a.apply(this,t),0,0),e===i.toDataURL()}function c(e){var t=a.createElement("script");t.src=e,t.defer=t.type="text/javascript",a.getElementsByTagName("head")[0].appendChild(t)}for(o=Array("flag","emoji"),t.supports={everything:!0,everythingExceptFlag:!0},r=0;r<o.length;r++)t.supports[o[r]]=function(e)
//..
From the result above, we can observe a seemingly complex HTML that may not be useful as is. Therefore, to extract the Pokémon's name list, we'll parse the HTML stored in the content variable using BeautifulSoup. This allows us to navigate through the HTML structure and retrieve the Pokemon names.
To continue and extract only the creature names, create a BeautifulSoup object to parse the content variable.
soup = BeautifulSoup(content, "html.parser")
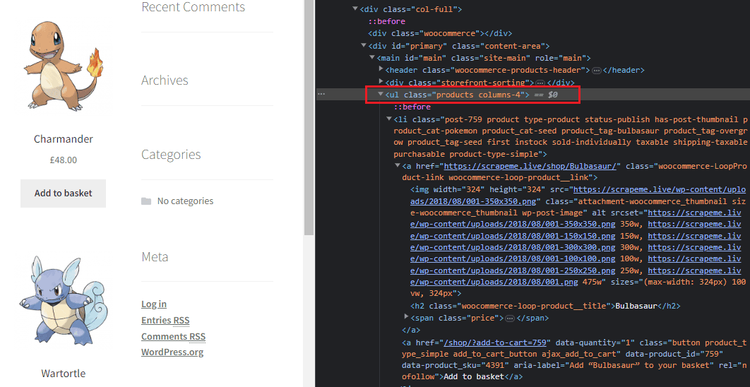
Next, inspect the target URL on a browser using the DevTools to locate the HTML element that contains the Pokémon list. You should see it:

From the image above, the Pokémon list appears to be an unordered list element <ul> inside a <main> tag. Right-click the <ul> element and copy by selector: (#main > ul).
After that, add BeautifulSoup's .select() method, which allows us to identify elements by CSS selectors to locate the specific
- element that represents the Pokémon list within the parsed content. That involves entering your CSS selector as an argument in the
select() method.
pokemon_list_ul = soup.select("#main > ul")
To finish, iterate over each <ul> in the pokemon_list_ul variable and extract the content of each <h2> using a list comprehension. This will retrieve the individual Pokémon names listed within the <li> items of the list.
pokemon_names = []

# Iterate over each <ul> element in the pokemon_list_ul list
for ul in pokemon_list_ul:
    # Use a list comprehension to extract the text content of each <h2> element
    pokemon_names.extend([h2.text for h2 in ul.select("li > a > h2")])
for name in pokemon_names:
    print(name)
Putting everything together, here's the complete code.
import requests
from bs4 import BeautifulSoup

# Define the URL of the website we want to scrape
url = "https://scrapeme.live/shop/"

# Send a GET request to the URL and retrieve the response
response = requests.get(url)

# Extract the content of the response
content = response.content

# Create a BeautifulSoup object to parse the HTML content
soup = BeautifulSoup(content, "html.parser")

# Select the <ul> element within the element with ID "main" using CSS selector
pokemon_list_ul = soup.select("#main > ul")

pokemon_names = []

# Iterate over each <ul> element in the pokemon_list_ul list
for ul in pokemon_list_ul:
    # Use a list comprehension to extract the text content of each <h2> element
    pokemon_names.extend([h2.text for h2 in ul.select("li > a > h2")])


for name in pokemon_names:
    print(name)
Yielding the following result:
Bulbasaur
Ivysaur
Venusaur
Charmander
Charmeleon
Charizard
Squirtle
Wartortle

//..
Congrats, you now know how to scrape using BeautifulSoup and Python Requests.
However, our target was a test website that allows scraping. Our script will get blocked in practical cases involving modern websites with restrictions, so let's move to use proxies with BeautifulSoup.
How to Use a Proxy with BeautifulSoup and Python Requests
Proxies allow you to make requests from different IP addresses. As an example, send a request to ident.me using the following code.
import requests

url = "http://ident.me/"

response = requests.get(url)
ip_address = response.text

print("Your IP address is:", ip_address)
Your result should be your IP address.
Your IP address is: 190.158.1.38
Now, let's make the same request using a proxy. For this example, we'll take any IP from FreeProxyList. And to implement it, we'll specify the proxy details in the script. That way, you'll be making your request through the specified proxy server.
Import Requests and set your proxy.
import requests

proxy = {
    "https": "https://91.25.93.174:3128"
}
Then, enter the proxy variable as a parameter in the request.get() method and print the response.
url = "http://ident.me/"

response = requests.get(url, proxies=proxy)
ip_address = response.text

print("Your new IP address is:", ip_address)
Putting it all together, you'll have the following complete code.
import requests

proxy = {
    "https": "https://91.25.93.174:3128"
}

url = "http://ident.me/"

response = requests.get(url, proxies=proxy)
ip_address = response.text

print("Your new IP address is:", ip_address)
Here's our result:
Your IP address is: 91.25.93.170
Congrats, you've configured your first proxy with BeautifulSoup and Python Requests. The result above is the proxy server's IP address, meaning that the request was successfully routed through the specified proxy.
Not all proxies support HTTP and HTTPS protocols. If you use an HTTPS one, it'll also support HTTP.
However, websites often implement measures like rate limiting and IP banning. Therefore, you must rotate proxies to avoid getting flagged.
To rotate proxies with BeautifulSoup and Python Requests, start by defining a proxy list. Once more, we've obtained a list from FreeProxyList for this example.
import requests

# List of proxies
proxies = [
    "http://46.16.201.51:3129",
    "http://207.2.120.19:80",
    "http://50.227.121.35:80",
    # Add more proxies as needed
]
After that, iterate over each proxy in the proxies list, make a GET request using the current proxy, and print the response.
for proxy in proxies:
    try:
        # Make a GET request to the specified URL using the current proxy
        response = requests.get(url, proxies={"http": proxy, "https": proxy})

        # Extract the IP address from the response content
        ip_address = response.text

        # Print the obtained IP address
        print("Your IP address is:", ip_address)

	except requests.exceptions.RequestException as e:
        print(f"Request failed with proxy {proxy}: {str(e)}")
        continue  # Move to the next proxy if the request fails
The except block is only used to catch errors, and your request would work without it. But since we're using free proxies that often throw errors, it's recommended to catch them.
Putting everything together, here's the complete code.
import requests

# List of proxies
proxies = [
    "http://46.16.201.51:3129",
    "http://207.2.120.19:80",
    "http://50.227.121.35:80",
    # Add more proxies as needed
]

url = "http://ident.me/"

for proxy in proxies:
    try:
        # Make a GET request to the specified URL using the current proxy
        response = requests.get(url, proxies={"http": proxy, "https": proxy})

        # Extract the IP address from the response content
        ip_address = response.text

        # Print the obtained IP address
        print("Your IP address is:", ip_address)

	except requests.exceptions.RequestException as e:
        print(f"Request failed with proxy {proxy}: {str(e)}")
        continue  # Move to the next proxy if the request fails
Here's our result:
Your IP address is: 46.16.201.51
Your IP address is: 207.2.120.19
Your IP address is: 50.227.121.35
Awesome, right? Now you know how to configure a BeautifulSoup proxy and also how to rotate proxies to avoid getting blocked.
That said, there's a lot more on this topic than that. Check out our guide on how to use a proxy with Python Requests to learn more.
Also, bear in mind free proxies are unreliable and often fail in practical use cases. We only used them in this example to show you the basics. For example, if you replace ident.me with OpenSea, you'll get error messages, as seen below.
Request failed with proxy http://46.16.201.51:3129: HTTPSConnectionPool(host='opensea.io', port=443): Max retries exceeded with url: / (Caused by ConnectTimeoutError(<urllib3.connection.VerifiedHTTPSConnection object at 0x0000027FCC4BA710>, 'Connection to 46.16.201.51 timed out. (connect timeout=None)'))

Request failed with proxy http://207.2.120.19:80: HTTPSConnectionPool(host='opensea.io', port=443): Max retries exceeded with url: / (Caused by ProxyError('Cannot connect to proxy.', OSError('Tunnel connection failed: 503 Service Temporarily Unavailable')))

Request failed with proxy http://50.227.121.35:80: HTTPSConnectionPool(host='opensea.io', port=443): Max retries exceeded with url: / (Caused by ConnectTimeoutError(<urllib3.connection.VerifiedHTTPSConnection object at 0x0000027FCC4C0850>, 'Connection to 50.227.121.35 timed out. (connect timeout=None)'))
Fortunately, premium proxies yield better results. Let's use them next.
Premium Proxy to Avoid Getting Blocked with BeautifulSoup
Premium proxies for scraping used to be expensive, particularly for large-scale use cases. However, the introduction of solutions like ZenRows has made them more accessible. And besides that, it comes with many features to avoid being blocked, like JavaScript rendering, header rotation and advanced anti-bot bypass measures.
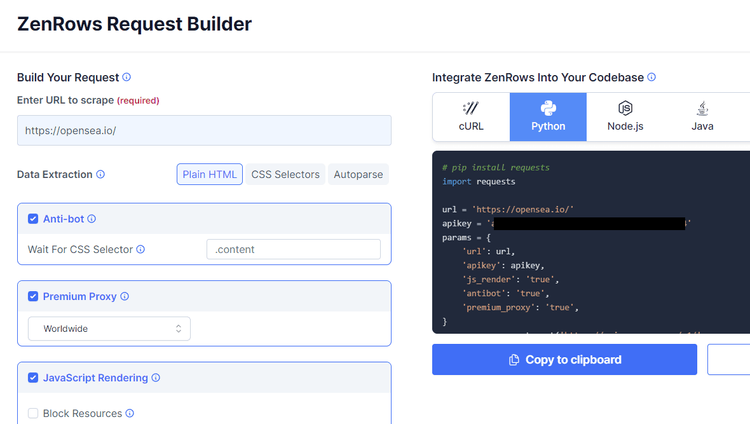
To try ZenRows, sign up to get your free API key. You'll get to the Request Builder, where you have to input your target URL (https://www.opensea.io/), check the boxes for premium proxies, anti-bot, and JavaScript rendering, and select Python.

That will generate the code on the right. Copy it to your IDE to send your request using Python Requests.
Your new script should look like this.
import requests

url = "https://opensea.io/"
apikey = "Your API Key"
params = {
"url": url,
"apikey": apikey,
"js_render": "true",
"antibot": "true",
"premium_proxy": "true",
}
response = requests.get("https://api.zenrows.com/v1/", params=params)
print(response.text)
Here's the result:
<!DOCTYPE html>
//..
<title>OpenSea, the largest NFT marketplace</title>
Bingo! You're all set. ZenRows makes web scraping super easy.
Conclusion
Proxies act as intermediaries between your web scraper and the target web server. You can access websites from different IP addresses and bypass restrictions by routing your requests through proxies. However, free proxies do not work for real-world cases.
A great option is using a Python Requests and BeautifulSoup proxy with ZenRows for effective and scalable web scraping. Sign up now and enjoy 1,000 free API credits.
Did you find the content helpful? Spread the word and share it on Twitter, or LinkedIn.