Selenium is the favorite browser automation tool for web scraping and testing. While Selenium for PHP isn't officially supported, the community created the php-webdriver port.
In this guide, you'll learn the basics and then explore more complex interactions.
- How to use PHP Selenium.
- Interact with web pages in a browser.
- Avoid getting blocked.
Let's dive in!
Why You Should Use Selenium in PHP
Selenium is one of the most popular headless browser libraries due to its consistent API, which opens the doors to multi-platform and multi-language browser automation. That makes it an ideal tool for testing and web scraping tasks.
The tool is so popular that Facebook started a PHP port called php-webdriver. This project is now carried out by the open-source community, which works hard to keep it up-to-date.
How to Use Selenium in PHP
Move your first steps with Selenium in PHP and learn how to scrape this infinite scrolling demo page:
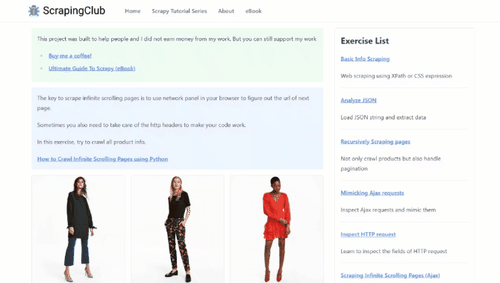
This page uses JavaScript to dynamically load new products as the user scrolls down. That’s a great example of a dynamic page that needs browser automation for scraping, because you couldn't interact with it without a tool like the Selenium PHP library.
Time to retrieve some data from it!
Step 1: Install Selenium in PHP
Before getting started, you need PHP and Composer installed on your computer. Follow the two links to get instructions on how to set up the requirements.
You’re ready to initialize a PHP Composer project. Create a php-selenium-project folder and enter it in the terminal:
mkdir php-selenium-project
cd php-selenium-project
Next, execute the init command to create a new Composer project inside it. Follow the wizard and answer the questions as required:
composer init
Add php-webdriver to the project's dependencies:
composer require php-webdriver/webdriver
This will take a while, so be patient.
To work, the package requires the Selenium standalone server running in the background. Make sure you have Java 8+ installed on your PC, download Selenium Grid executable, and launch it:
java -jar selenium-server-<version>.jar standalone --selenium-manager true
Replace <version> with the version of the Selenium Grid .jar file you just downloaded.
--selenium-manager true is required to set up the browser drivers automatically. That way, you don’t have to download and configure them manually.
The above command should produce something similar to the output below. The last message informs you that the Selenium server is running locally on port 4444:
INFO [LoggingOptions.configureLogEncoding] - Using the system default encoding
INFO [OpenTelemetryTracer.createTracer] - Using OpenTelemetry for tracing
INFO [NodeOptions.getSessionFactories] - Detected 8 available processors
INFO [NodeOptions.report] - Adding Firefox for {"browserName": "firefox","platformName": "Windows 11"} 8 times
INFO [NodeOptions.report] - Adding Chrome for {"browserName": "chrome","platformName": "Windows 11"} 8 times
INFO [NodeOptions.report] - Adding Edge for {"browserName": "MicrosoftEdge","platformName": "Windows 11"} 8 times
INFO [NodeOptions.report] - Adding Internet Explorer for {"browserName": "internet explorer","platformName": "Windows 11"} 1 times
INFO [Node.<init>] - Binding additional locator mechanisms: relative
INFO [GridModel.setAvailability] - Switching Node 8562f610-78a1-49b3-946c-688f53b66fe9 (uri: http://192.168.1.30:4444) from DOWN to UP
INFO [LocalDistributor.add] - Added node 8562f610-78a1-49b3-946c-688f53b66fe9 at http://192.168.1.30:4444. Health check every 120s
INFO [Standalone.execute] - Started Selenium Standalone 4.16.1 (revision 9b4c83354e): http://192.168.1.30:4444
Perfect! You now have all in place to build a Selenium script in PHP.
Create a scraper.php file in the /src folder of the Compose project folder and initialize it with the code below. The first lines contain imports for using Selenium with PHP. Then, there’s the line to require php-webdriver via Composer:
namespace Facebook\WebDriver;

use Facebook\WebDriver\Remote\DesiredCapabilities;
use Facebook\WebDriver\Remote\RemoteWebDriver;
use Facebook\WebDriver\Chrome\ChromeOptions;

require_once('vendor/autoload.php');

// scraping logic
You can run the PHP Selenium script with this command:
php src/scraper.php
Awesome, your Selenium PHP setup is ready!
Step 2: Scrape with Selenium in PHP
Use the lines below to initialize a Chrome driver to control a local instance of Chrome:
// the URL to the local Selenium Server
$host = 'http://localhost:4444/';

// to control a Chrome instance
$capabilities = DesiredCapabilities::chrome();

// define the browser options
$chromeOptions = new ChromeOptions();
// to run Chrome in headless mode
$chromeOptions->addArguments(['--headless']); // <- comment out for testing

// register the Chrome options
$capabilities->setCapability(ChromeOptions::CAPABILITY_W3C, $chromeOptions);

// initialize a driver to control a Chrome instance
$driver = RemoteWebDriver::create($host, $capabilities);

// maximize the window to avoid responsive rendering
$driver->manage()->window()->maximize();
--headless ensures that the Selenium PHP package will launch Chrome in headless mode. Comment that line out if you want to see the actions made by your scraping script in real-time.
Don't forget to release the web driver resources by adding this line to the end of the script:
$driver->close();
Next, use the get() method from $driver to connect to the target page:
$driver->get('https://scrapingclub.com/exercise/list_infinite_scroll/');
Then, retrieve the raw HTML from the page and print it. Use the getPageSource() method of the PHP WebDriver object to get the current page's source. Log it in the terminal with echo:
$html = $driver->getPageSource();
echo $html;
Here’s what scraper.php contains so far:
namespace Facebook\WebDriver;

use Facebook\WebDriver\Remote\DesiredCapabilities;
use Facebook\WebDriver\Remote\RemoteWebDriver;
use Facebook\WebDriver\Chrome\ChromeOptions;

require_once('vendor/autoload.php');

// the URL to the local Selenium Server
$host = 'http://localhost:4444/';

// to control a Chrome instance
$capabilities = DesiredCapabilities::chrome();

// define the browser options
$chromeOptions = new ChromeOptions();
// to run Chrome in headless mode
$chromeOptions->addArguments(['--headless']); // <- comment out for testing

// register the Chrome options
$capabilities->setCapability(ChromeOptions::CAPABILITY_W3C, $chromeOptions);

// initialize a driver to control a Chrome instance
$driver = RemoteWebDriver::create($host, $capabilities);

// maximize the window to avoid responsive rendering
$driver->manage()->window()->maximize();

// open the target page in a new tab
$driver->get('https://scrapingclub.com/exercise/list_infinite_scroll/');

// extract the HTML page source and print it
$html = $driver->getPageSource();
echo $html;

// close the driver and release its resources
$driver->close();
Execute the PHP script in headed mode. The PHP Selenium package will open Chrome and visit the Infinite Scrolling demo page:
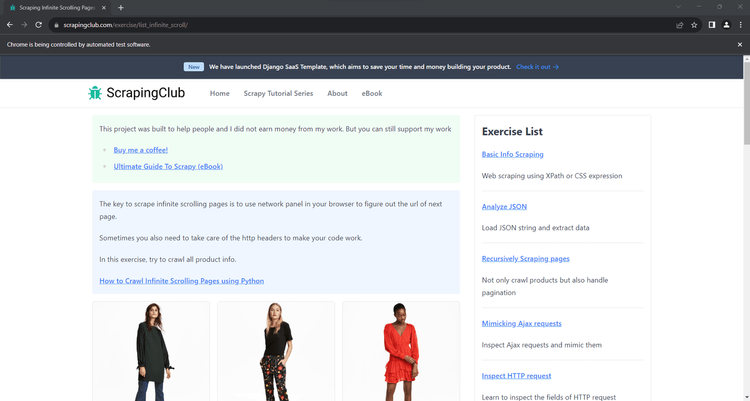
The message "Chrome is being controlled by automated test software" means Selenium is working as expected.
The script will also print the HTML below in the terminal:
<html class="h-full"><head>
  <meta charset="utf-8">
  <meta name="viewport" content="width=device-width, initial-scale=1">
  <meta name="description" content="Learn to scrape infinite scrolling pages"><title>Scraping Infinite Scrolling Pages (Ajax) | ScrapingClub</title>
  <link rel="icon" href="/static/img/icon.611132651e39.png" type="image/png">
  <!-- Omitted for brevity... -->
Great! That's exactly the HTML code of the target page!
Step 3: Parse the Data You Want
Selenium enables you to parse the HTML content of the page to extract specific data from it. Now, suppose the goal of your PHP scraper is to get the name and price of each product on the page. To achieve that, you have to:
- Select the products on the page by applying an effective node selection strategy.
- Collect the desired data from each of them.
- Store the scraped data in a PHP array.
A node selection strategy usually relies on XPath expressions or CSS Selectors. php-webdriver supports both, giving you more options to find elements in the DOM. However, CSS selectors are intuitive, while XPath expressions may appear a bit more complex. Find out more in our guide on CSS Selector vs XPath.
Let's keep things simple and opt for CSS selectors. To figure out how to define the right ones for your goal, you need to analyze a product HTML node. Open the target site in your browser, right-click on a product element, and inspect it with the DevTools:
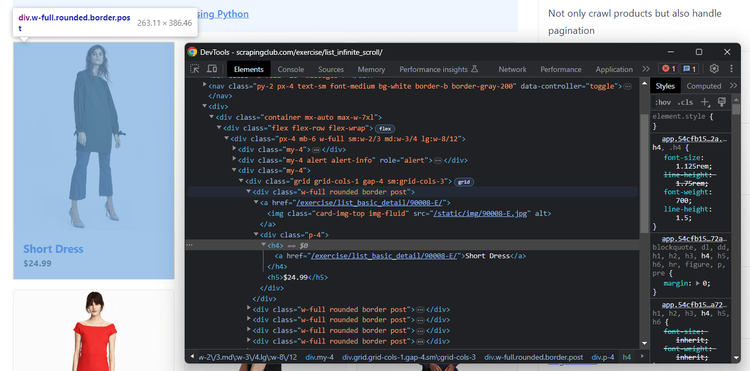
Each product has a post class and contains the name in an <h4> and the price in an <h5>.
Follow the instructions below and see how to extract the name and price from the products on the page.
Initialize a $products array to keep track of the scraped data:
$products = [];
Use the findElements() method to select the HTML product nodes. WebDriverBy::cssSelector() defines a CSS selector strategy for PHP Selenium:
$product_elements = $driver->findElement(WebDriverBy::cssSelector('post'));
After selecting the product nodes, iterate over them and apply the data extraction logic:
foreach ($product_elements as $product_element) {
  // select the name and price elements
  $name_element = $product_element->findElement(WebDriverBy::cssSelector('h4'));
  $price_element = $product_element->findElement(WebDriverBy::cssSelector('h5'));

  // retrieve the data of interest
  $name = $name_element->getText();
  $price = $price_element->getText();

  // create a new product array and add it to the list
  $product = ['name' => $name, 'price' => $price];
  $products[] = $product;
}
To extract the price and name from each product, use the getText() method. That’ll return the inner text of the selected element.
This is what your scraper.php file should now contain:
    namespace Facebook\WebDriver;

    use Facebook\WebDriver\Remote\DesiredCapabilities;
    use Facebook\WebDriver\Remote\RemoteWebDriver;
    use Facebook\WebDriver\Chrome\ChromeOptions;
    use Facebook\WebDriver\WebDriverBy;

    require_once('vendor/autoload.php');

    // the URL to the local Selenium Server
    $host = 'http://localhost:4444/';

    // to control a Chrome instance
    $capabilities = DesiredCapabilities::chrome();

    // define the browser options
    $chromeOptions = new ChromeOptions();
    // to run Chrome in headless mode
    $chromeOptions->addArguments(['--headless']); // <- comment out for testing

    // register the Chrome options
    $capabilities->setCapability(ChromeOptions::CAPABILITY_W3C, $chromeOptions);

    // initialize a driver to control a Chrome instance
    $driver = RemoteWebDriver::create($host, $capabilities);

    // maximize the window to avoid responsive rendering
    $driver->manage()->window()->maximize();

    // open the target page in a new tab
    $driver->get('https://scrapingclub.com/exercise/list_infinite_scroll/');

    // to keep track of the scraped products
    $products = [];

    // select the product elements
    $product_elements = $driver->findElements(WebDriverBy::cssSelector('.post'));

    // iterate over the product nodes
    // and extract data from them
    foreach ($product_elements as $product_element) {
      // select the name and price elements
      $name_element = $product_element->findElement(WebDriverBy::cssSelector('h4'));
      $price_element = $product_element->findElement(WebDriverBy::cssSelector('h5'));

      // retrieve the data of interest
      $name = $name_element->getText();
      $price = $price_element->getText();

      // create a new product array and add it to the list
      $product = ['name' => $name, 'price' => $price];
      $products[] = $product;
    }

    // print all products
    print_r($products);

    // close the driver and release its resources
    $driver->close();

    ?>

Launch the above Selenium PHP script, and it'll print the output below in the terminal:

    Array
    (
        [0] => Array
            (
                [name] => Short Dress
                [price] => $24.99
            )

        // omitted for brevity...

        [9] => Array
            (
                [name] => Fitted Dress
                [price] => $34.99
            )

    )
Launch the above Selenium PHP script, and it'll print the output below in the terminal:
Array
(
    [0] => Array
        (
            [name] => Short Dress
            [price] => $24.99
        )

    // omitted for brevity...

    [9] => Array
        (
            [name] => Fitted Dress
            [price] => $34.99
        )

)
Great! The PHP parsing logic works like a charm.
Step 4: Export Data as CSV
Use the logic below to export the scraped data to an output CSV file. Use fopen() from the PHP standard library to create a products.csv file and populate it with it fputcsv(). That will convert each product array to a CSV record and append it to the CSV file.
// create the output CSV file
$csvFilePath = 'products.csv';
$csvFile = fopen($csvFilePath, 'w');

// write the header row
$header = ['name', 'price'];
fputcsv($csvFile, $header);

// add each product to the CSV file
foreach ($products as $product) {
    fputcsv($csvFile, $product);
}

// close the CSV file
fclose($csvFile);
See your final Selenium PHP scraping script:
namespace Facebook\WebDriver;

use Facebook\WebDriver\Remote\DesiredCapabilities;
use Facebook\WebDriver\Remote\RemoteWebDriver;
use Facebook\WebDriver\Chrome\ChromeOptions;
use Facebook\WebDriver\WebDriverBy;

require_once('vendor/autoload.php');

// the URL to the local Selenium Server
$host = 'http://localhost:4444/';

// to control a Chrome instance
$capabilities = DesiredCapabilities::chrome();

// define the browser options
$chromeOptions = new ChromeOptions();
// to run Chrome in headless mode
$chromeOptions->addArguments(['--headless']); // <- comment out for testing

// register the Chrome options
$capabilities->setCapability(ChromeOptions::CAPABILITY_W3C, $chromeOptions);

// initialize a driver to control a Chrome instance
$driver = RemoteWebDriver::create($host, $capabilities);

// maximize the window to avoid responsive rendering
$driver->manage()->window()->maximize();

// open the target page in a new tab
$driver->get('https://scrapingclub.com/exercise/list_infinite_scroll/');

// to keep track of the scraped products
$products = [];

// select the product elements
$product_elements = $driver->findElements(WebDriverBy::cssSelector('.post'));

// iterate over the product nodes
// and extract data from them
foreach ($product_elements as $product_element) {
  // select the name and price elements
  $name_element = $product_element->findElement(WebDriverBy::cssSelector('h4'));
  $price_element = $product_element->findElement(WebDriverBy::cssSelector('h5'));

  // retrieve the data of interest
  $name = $name_element->getText();
  $price = $price_element->getText();

  // create a new product array and add it to the list
  $product = ['name' => $name, 'price' => $price];
  $products[] = $product;
}

// create the output CSV file
$csvFilePath = 'products.csv';
$csvFile = fopen($csvFilePath, 'w');

// write the header row
$header = ['name', 'price'];
fputcsv($csvFile, $header);

// add each product to the CSV file
foreach ($products as $product) {
    fputcsv($csvFile, $product);
}

// close the CSV file
fclose($csvFile);

// close the driver and release its resources
$driver->close();
And launch it:
php src/scraper.php
After execution is complete, a products.csv file will appear in the root folder of your project. Open it, and you'll see that it contains the following data:
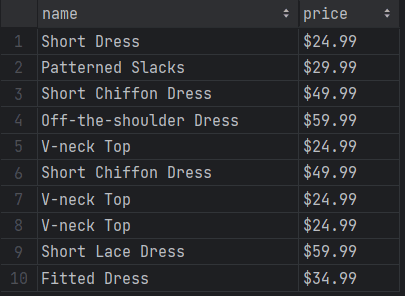
Wonderful! You now know the basics of Selenium with PHP!
However, it's essential to acknowledge that the current output involves only ten items. Why? Because the page initially has only those products. To fetch more, it relies on infinite scrolling. Read the next section to acquire the skills for extracting data from all products on the site with Selenium in PHP.
Interacting with Web Pages in a Browser with PHP WebDriver
The php-webdriver library can simulate several web interactions, including scrolls, waits, mouse movements, and more. That’s key to interacting with dynamic content pages like a human user would. Browser automation also helps your script avoid triggering anti-bot measures.
The interactions supported by the Selenium PHP WebDriver library include:
- Click elements and move the mouse.
- Wait for elements on the page to be present, visible, clickable, etc.
- Fill out and empty input fields.
- Scroll up and down the page.
- Submit forms.
- Take screenshots.
- Drag and drop elements.
You can perform most of those operations with the methods offered by the library. Otherwise, use the executeScript() method to run a JavaScript script directly on the page. With either tool, any user interaction in the browser becomes possible.
Let's learn how to scrape all product data from the infinite scroll demo page and then see other popular PHP Selenium interactions!
Scrolling
Initially, the target page has only ten products and uses infinite scrolling to load new ones. Bear in mind that Selenium doesn't come with a built-in method for scrolling. Thus, you need custom JavaScript logic to simulate the scrolling interaction.
This JavaScript snippet tells the browser to scroll down the page 10 times at an interval of 0.5 seconds each:
// scroll down the page 10 times
const scrolls = 10
let scrollCount = 0

// scroll down and then wait for 0.5s
const scrollInterval = setInterval(() => {
  window.scrollTo(0, document.body.scrollHeight)
  scrollCount++

  if (scrollCount === numScrolls) {
    clearInterval(scrollInterval)
  }
}, 500)
Store the above script in a variable and feed it to the executeScript() method as below:
$scrolling_script = <<<EOD
// scroll down the page 10 times
const scrolls = 10
let scrollCount = 0

// scroll down and then wait for 0.5s
const scrollInterval = setInterval(() => {
  window.scrollTo(0, document.body.scrollHeight)
  scrollCount++

  if (scrollCount === numScrolls) {
    clearInterval(scrollInterval)
  }
}, 500)
EOD;

$driver->executeScript($scrolling_script);
You must place the executeScript() instruction before the HTML node selection logic.
Selenium will now scroll down the page, but that’s not enough. You also need to wait for the scrolling and data loading operation to end. To do so, use sleep() to stop the script execution for 10 seconds:
sleep(10);
Here's your new complete code:
namespace Facebook\WebDriver;

use Facebook\WebDriver\Remote\DesiredCapabilities;
use Facebook\WebDriver\Remote\RemoteWebDriver;
use Facebook\WebDriver\Chrome\ChromeOptions;
use Facebook\WebDriver\WebDriverBy;

require_once('vendor/autoload.php');

// the URL to the local Selenium Server
$host = 'http://localhost:4444/';

// to control a Chrome instance
$capabilities = DesiredCapabilities::chrome();

// define the browser options
$chromeOptions = new ChromeOptions();
// to run Chrome in headless mode
$chromeOptions->addArguments(['--headless']); // <- comment out for testing

// register the Chrome options
$capabilities->setCapability(ChromeOptions::CAPABILITY_W3C, $chromeOptions);

// initialize a driver to control a Chrome instance
$driver = RemoteWebDriver::create($host, $capabilities);

// maximize the window to avoid responsive rendering
$driver->manage()->window()->maximize();

// open the target page in a new tab
$driver->get('https://scrapingclub.com/exercise/list_infinite_scroll/');

 // simulate the infinite scrolling interaction
$scrolling_script = <<<EOD
// scroll down the page 10 times
const scrolls = 10
let scrollCount = 0

// scroll down and then wait for 0.5s
const scrollInterval = setInterval(() => {
  window.scrollTo(0, document.body.scrollHeight)
  scrollCount++

  if (scrollCount === numScrolls) {
    clearInterval(scrollInterval)
  }
}, 500)
EOD;

$driver->executeScript($scrolling_script);

// wait 10 seconds for the new products to load
sleep(10);

// to keep track of the scraped products
$products = [];

// select the product elements
$product_elements = $driver->findElements(WebDriverBy::cssSelector('.post'));

// iterate over the product nodes
// and extract data from them
foreach ($product_elements as $product_element) {
  // select the name and price elements
  $name_element = $product_element->findElement(WebDriverBy::cssSelector('h4'));
  $price_element = $product_element->findElement(WebDriverBy::cssSelector('h5'));

  // retrieve the data of interest
  $name = $name_element->getText();
  $price = $price_element->getText();

  // create a new product array and add it to the list
  $product = ['name' => $name, 'price' => $price];
  $products[] = $product;
}

// create the output CSV file
$csvFilePath = 'products.csv';
$csvFile = fopen($csvFilePath, 'w');

// write the header row
$header = ['name', 'price'];
fputcsv($csvFile, $header);

// add each product to the CSV file
foreach ($products as $product) {
    fputcsv($csvFile, $product);
}

// close the CSV file
fclose($csvFile);

// close the driver and release its resources
$driver->close();
Launch the script to verify that the script stores all 60 products now:
php src/scraper.php
The products.csv file will now contain more than the first ten items:
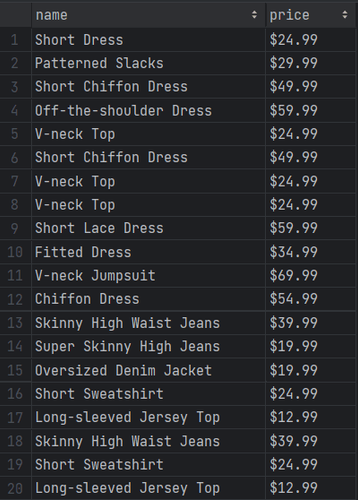
Mission complete! You just scraped all products from the page. 🎉
Wait for Element
The current Selenium PHP script depends on a hard wait. That's a discouraged practice since it introduces unreliability into the scraping logic, making the scraper vulnerable to failures in case of network or browser slowdowns.
Employing a generic time-based wait isn't a trustworthy approach, so you should instead opt for smart waits, like waiting for a specific node to be present on the page. This best practice is crucial for building robust, consistent, reliable scrapers.
php-webdriver provides the presenceOfElementLocated() method to verify if a node is on the page. Use it in the wait() logic to wait up to ten seconds for the 60th product to appear:
$driver->wait(10)->until(
  WebDriverExpectedCondition::visibilityOfElementLocated(WebDriverBy::cssSelector('.post:nth-child(60)'))
);
Replace the sleep() instruction with that logic, and the PHP script will now wait for the products to be rendered after the AJAX calls triggered by the scrolls.
The definitive scraper is:
namespace Facebook\WebDriver;

use Facebook\WebDriver\Remote\DesiredCapabilities;
use Facebook\WebDriver\Remote\RemoteWebDriver;
use Facebook\WebDriver\Chrome\ChromeOptions;

require_once('vendor/autoload.php');

// the URL to the local Selenium Server
$host = 'http://localhost:4444/';

// to control a Chrome instance
$capabilities = DesiredCapabilities::chrome();

// define the browser options
$chromeOptions = new ChromeOptions();
// to run Chrome in headless mode
$chromeOptions->addArguments(['--headless']); // <- comment out for testing

// register the Chrome options
$capabilities->setCapability(ChromeOptions::CAPABILITY_W3C, $chromeOptions);

// initialize a driver to control a Chrome instance
$driver = RemoteWebDriver::create($host, $capabilities);

// maximize the window to avoid responsive rendering
$driver->manage()->window()->maximize();

// open the target page in a new tab
$driver->get('https://scrapingclub.com/exercise/list_infinite_scroll/');

 // simulate the infinite scrolling interaction
$scrolling_script = <<<EOD
// scroll down the page 10 times
const scrolls = 10
let scrollCount = 0

// scroll down and then wait for 0.5s
const scrollInterval = setInterval(() => {
  window.scrollTo(0, document.body.scrollHeight)
  scrollCount++

  if (scrollCount === numScrolls) {
    clearInterval(scrollInterval)
  }
}, 500)
EOD;

$driver->executeScript($scrolling_script);

// wait up to 10 seconds for the 60th product to be
// on the page
$driver->wait(10)->until(
  WebDriverExpectedCondition::visibilityOfElementLocated(WebDriverBy::cssSelector('.post:nth-child(60)'))
);

// to keep track of the scraped products
$products = [];

// select the product elements
$product_elements = $driver->findElements(WebDriverBy::cssSelector('.post'));

// iterate over the product nodes
// and extract data from them
foreach ($product_elements as $product_element) {
  // select the name and price elements
  $name_element = $product_element->findElement(WebDriverBy::cssSelector('h4'));
  $price_element = $product_element->findElement(WebDriverBy::cssSelector('h5'));

  // retrieve the data of interest
  $name = $name_element->getText();
  $price = $price_element->getText();

  // create a new product array and add it to the list
  $product = ['name' => $name, 'price' => $price];
  $products[] = $product;
}

// create the output CSV file
$csvFilePath = 'products.csv';
$csvFile = fopen($csvFilePath, 'w');

// write the header row
$header = ['name', 'price'];
fputcsv($csvFile, $header);

// add each product to the CSV file
foreach ($products as $product) {
    fputcsv($csvFile, $product);
}

// close the CSV file
fclose($csvFile);

// close the driver and release its resources
$driver->close();
If you execute it, you'll get the same results as before. The main difference is that you’ll get better performance as it's now idle for the right amount of time only.
Wait for the Page to Load
The function $driver->get() automatically waits for the browser to fire the load event on the page. In other words, the PHP Selenium library already waits for pages to load for you.
The problem is that most web pages are now extremely dynamic, which may not be enough as it had to tell when a page has truly fully loaded. To deal with more complex scenarios, use the webdriver expected conditions below:
-
titleIs(). -
titleContains(). -
urlIs(). -
urlContains(). -
presenceOfElementLocated(). -
presenceOfAllElementsLocatedBy(). -
elementTextIs(). -
elementTextContains(). -
textToBePresentInElementValue(). -
elementToBeClickable().
For more information on how to wait in Selenium PHP, check out the documentation.
Click Elements
The WebDriverElement objects from php-webdriver expose the click() method to simulate click interactions:
$element->click()
This function signals Selenium to click on the specified node. The browser will send a mouse click event and call the HTML onclick() callback as a result.
If the click() call triggers a page change (as in the example below), you'll have to adjust the parsing logic to the new DOM structure:
$product_element = $driver->findElement(WebDriverBy::cssSelector('.post'));
$product_element->click();
// you are now on the detail product page...

// new scraping logic...

// $driver->findElement(...)
Take a Screenshot
Scraping data from a web page isn't the only way to get useful information from a site. Images of target pages or specific elements are useful too, e.g. to get visual feedback on what competitors are doing.
PHP Selenium offers the takeScreenshot() method to take a screenshot of the current viewport:
// take a screenshot of the current viewport
$driver->takeScreenshot('screenshot.png');
That’ll produce a screenshot.png file in your project's root folder.
Amazing! You're now a master of Selenium PHP WebDriver interactions!
Avoid Getting Blocked When Scraping with Selenium in PHP
The biggest challenge to web scraping is getting blocked by anti-bot solutions, and you’ll need to make your requests seem more natural, which involves techniques such as setting real-world User-Agent header and using proxies to change the exit IP.
To set a custom User Agent in Selenium with PHP, pass it to Chrome's --user-agent flag option:
$custom_user_agent = 'Mozilla/5.0 (Windows NT 10.0; Win64; x64) AppleWebKit/537.36 (KHTML, like Gecko) Chrome/120.0.0.0 Safari/537.36';
$chromeOptions->addArguments([
  "--user-agent=$custom_user_agent"
  // other options...
]);
Learn more in our guide on User Agents for web scraping.
Setting up a PHP proxy requires the --proxy-server flag. Get the URL of a free proxy from a site like Free Proxy List and then add it in Chrome as follows:
$proxy_url = '231.32.1.14:6573';
$chromeOptions->addArguments([
  "--proxy-server=$proxy_url"
  // other options...
]);
Free proxies are information greedy, short-lived, and unreliable. By the time you read this tutorial, the chosen proxy server will no longer work. Use them only for learning purposes!
Don’t forget that these approaches are just baby steps to bypass anti-bot systems. Advanced solutions like Cloudflare will still be able to detect your Selenium PHP script as a bot.
So, what's the best move? ZenRows! As a scraping API, it seamlessly integrates with Selenium to rotate your User Agent, add IP rotation capabilities, and more.
You could also replace the full functionality of Selenium with just ZenRows to get its advanced mind-blowing AI-based anti-bot bypass toolkit so that you never get blocked again.
Try the power of ZenRows with Selenium and redeem your first 1,000 credits by sign up for freeing. You'll get to the Request Builder page below:
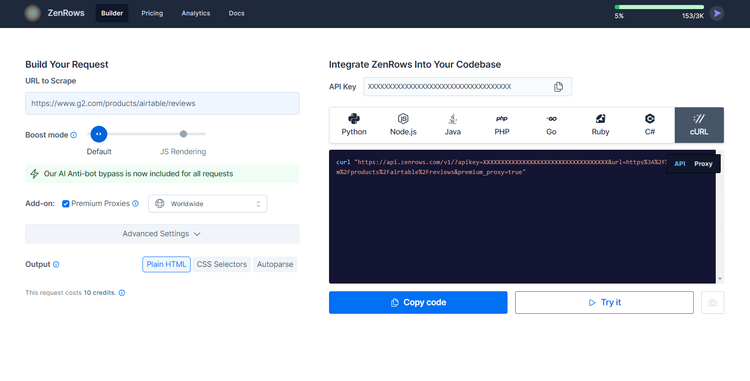
Suppose you want to extract data from the protected G2.com page seen earlier.
Paste your target URL (https://www.g2.com/products/airtable/reviews) into the "URL to Scrape" input. Check "Premium Proxy" to get rotating IPs and make sure the "JS Rendering" feature isn’t enable to avoid double rendering.
The advanced anti-bot bypass tools are included by default.
On the right, choose cURL to get the scraping API URL, copy the generated URL and pass it to the Selenum's get() method:
namespace Facebook\WebDriver;

use Facebook\WebDriver\Remote\DesiredCapabilities;
use Facebook\WebDriver\Remote\RemoteWebDriver;
use Facebook\WebDriver\Chrome\ChromeOptions;

require_once('vendor/autoload.php');

// the URL to the local Selenium Server
$host = 'http://localhost:4444/';

// to control a Chrome instance
$capabilities = DesiredCapabilities::chrome();

// define the browser options
$chromeOptions = new ChromeOptions();
// to run Chrome in headless mode
$chromeOptions->addArguments(['--headless']); // <- comment out for testing

// register the Chrome options
$capabilities->setCapability(ChromeOptions::CAPABILITY_W3C, $chromeOptions);

// initialize a driver to control a Chrome instance
$driver = RemoteWebDriver::create($host, $capabilities);

// maximize the window to avoid responsive rendering
$driver->manage()->window()->maximize();

// open the target page in a new tab
$driver->get('https://api.zenrows.com/v1/?apikey=<YOUR_ZENROWS_API_KEY>&url=https%3A%2F%2Fwww.g2.com%2Fproducts%2Fairtable%2Freviews&premium_proxy=true');

// extract the HTML page source and print it
$html = $driver->getPageSource();
echo $html;

// close the driver and release its resources
$driver->close();
Launch it, and it'll print the source HTML of the G2.com page:
<!DOCTYPE html>
<head>
<meta charset="utf-8" />
<link href="https://www.g2.com/assets/favicon-fdacc4208a68e8ae57a80bf869d155829f2400fa7dd128b9c9e60f07795c4915.ico" rel="shortcut icon" type="image/x-icon" />
<title>Airtable Reviews 2024: Details, Pricing, & Features | G2</title>
<!-- omitted for brevity ... -->
Wow! You just integrated ZenRows into the Selenium PHP library.
Now, what about anti-bot measures like CAPTCHAs that can stop your Selenium PHP script? The great news is that ZenRows not only extends Selenium but can replace it completely while equipping with with even better anti-bot bypass superpowers.
As a cloud solution, ZenRows also introduces significant savings compared to the cost of Selenium.
Conclusion
In this guide for using Selenium with PHP for web scraping, you explored the fundamentals of controlling headless Chrome. You learned the basics and then dug into more advanced techniques. You've become a PHP browser automation expert!
Now you know:
- How to set up a PHP Selenium WebDriver project.
- How to use it to extract data from a dynamic content page.
- What user interactions you can simulate in Selenium.
- The challenges of scraping online data and how to face them.
No matter how complex your browser automation is, anti-bot measures can still block it. Elude them all with ZenRows, a web scraping API with browser automation functionality, IP rotation, and the most powerful anti-scraping bypass available. Scraping dynamic content sites has never been easier. Try ZenRows for free!
Frequent Questions
Does PHP Support Selenium?
Yes, PHP supports Selenium via php-webdriver, the PHP bindings originally developed by Facebook. The library is now maintained by the community, which allows Selenium to work with PHP.
What is the Difference between PHPUnit and Selenium?
PHPUnit is a testing framework for unit testing in PHP. Instead, Selenium is a web testing framework for automating browser interactions. While PHPUnit is for testing individual units of code, Selenium is for end-to-end testing of web applications. Plus, PHP Selenium is a great tool to perform web scraping via browser automation.
Which PHP Language Version Is Supported by Selenium?
php-webdriver, the PHP port of Selenium, requires a version of PHP greater than or equal to 7.3 or greater than or equal to 8.0. In Composer notation, the requirement is php: ^7.3 || ^8.0. At the same time, Selenium itself is not dependent on a specific PHP language version, and the compatibility on Selenium with PHP depends of the binding library chosen.
Did you find the content helpful? Spread the word and share it on Twitter, or LinkedIn.