If your Node.js Selenium web scraper gets blocked by an anti-bot, the Undetected ChromeDriver can help you bypass it. The driver is a Selenium patch in Python that can also work with Node.js.
In this article, you’ll learn how to use the Undetected ChromeDriver to bypass anti-bots like Cloudflare in Node.js.
Why Use Undetected ChromeDriver in NodeJS?
The Undetected ChromeDriver is a modified version of the standard Selenium ChromeDriver that reduces the likelihood of anti-bot detection during web scraping.
Undetected ChromeDriver is a Python library designed for Selenium, but you can adapt it for Node.js with some steps.
The standard Selenium ChromeDriver and Undetected ChromeDriver perform similar automation tasks. The only difference is that the Undetected ChromeDriver has a patch for bypassing anti-bot detection.
How to use ChromeDriver in JavaScript
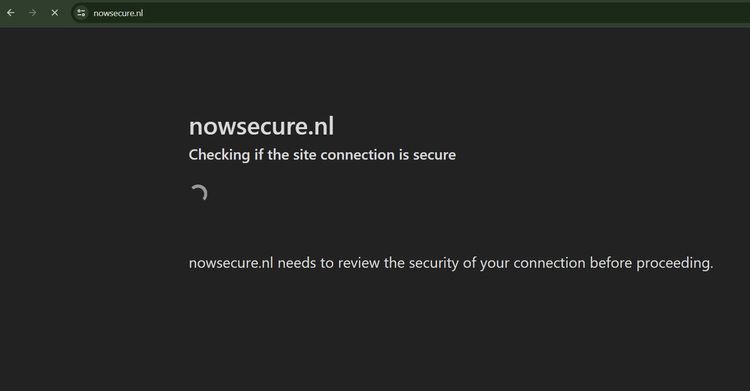
Using the Undetected ChromeDriver in JavaScript requires some setups. Let's go through them with an example that scrapes nowSecure, a demo website protected by Cloudflare.
The blocked page looks like this:

You'll bypass that with the Undetected ChromeDiver.
Prerequisites
This tutorial uses Node.js on a Windows operating system. You'll also use Python to create an executable file for Undetected ChromeDriver. So, Install the latest Node.js and Python versions if you've not done so already.
Step 1: Create an Undetected ChromeDriver Executable File With Python
To use the Undetected ChromeDriver with Node.js, you'll point Node.js to its executable file path.
The Undetected ChromeDriver executable file isn't available for download online. An easy way to create it is to run an instance of the driver with Python.
To begin, install the Undetected ChromeDriver using pip:
pip install undetected-chromedriver
Once installed, create an instance of the driver using the following Python code. The freeze_support method ensures that the Undetected ChromeDriver instance writes an executable file in a default path on your computer (more on this later).
# import the required modules
import undetected_chromedriver as uc
from multiprocessing import freeze_support

if __name__ == '__main__':

    # call freeze support to ensure the creation of an executable
    freeze_support()

    # create a ChromeDriver instance
    driver = uc.Chrome(headless=False, use_subprocess=False)

    # quit the driver
    driver.quit()
Now, run the Python file with the following command:
python scraper.py
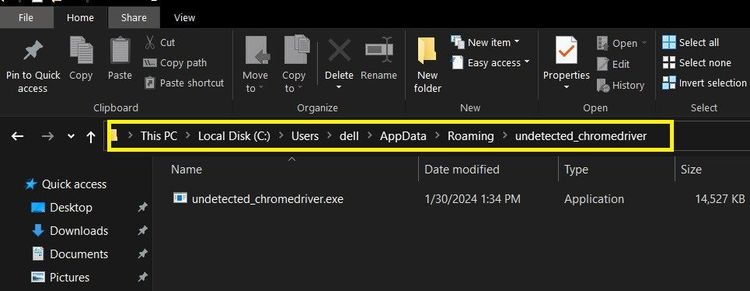
This creates an executable file for the Undetected ChromeDriver inside the following default path (for Windows). It might be slightly different on your computer, but the destination (...AppData/Roaming/) should be the same for Windows operating systems.
C:/Users/dell/AppData/Roaming/undetected_chromedriver/undetected_chromedriver.exe
You should see the executable file in the target folder like so:

On Linux, this path should be equivalent to the following:
~/.config/undetected_chromedriver/undetected_chromedriver
You'll learn how to use this in the next sections.
Step 2: Install Selenium in NodeJS
You'll use the standard Selenium ChromeDriver to build the Undetected ChromeDriver patch in Node.js. Open your command line to your project folder and install Selenium in Node.js using npm:
npm i selenium-webdriver
Now that you've installed Selenium, the next step is to build the Undetected ChromeDriver patch and write your scraping script.
Step 3: Write the Scraping Script in NodeJS
To use the Undetected ChromeDriver in your scraper, start your scraping script by setting the path to the driver and your actual Chrome browser executable files.
// import the required libraries
const { Builder } = require('selenium-webdriver');
const chrome = require('selenium-webdriver/chrome');

// set the path to udetected_chromedriver executable file
const chromeDriverPath = 'C:/Users/dell/AppData/Roaming/undetected_chromedriver/undetected_chromedriver.exe';

// set the path to your actual Chrome browser executable file
const chromeExePath = 'C:/Program Files/Google/Chrome/Application/chrome.exe';
Like the Undetected ChromeDriver, the chrome.exe path varies, based on the operating system.
Next, set the driver options and point Node.js to your Chrome browser executable file path:
// ...

// set Chrome options
const chromeOptions = new chrome.Options();
chromeOptions.setChromeBinaryPath(chromeExePath);

// run Chrome in headless mode
chromeOptions.addArguments('--headless');
Start a ChromeDriver instance and point Node.js to the Undetected ChromeDriver executable path using the service builder, as shown:
// ...

// create a new WebDriver instance
const driver = new Builder()
    .forBrowser('chrome')
    .setChromeOptions(chromeOptions)
    .setChromeService(new chrome.ServiceBuilder(chromeDriverPath))
    .build();
Now, write your scraper function. This function visits the target URL, extracts the page's HTML, and quits the browser:
// ...

// navigate to a website
async function scraper() {
    try {
        await driver.get('https://nowsecure.nl');

        // extract the page HTML
        const pageSource = await driver.getPageSource();
        console.log('Page HTML:', pageSource);

        // close the driver instance
        await driver.quit();

    } catch (error) {
        console.error('An error occurred:', error);
    }
}

// call the main function
scraper();
Put the chunks together, and your final code should look like this:
// import the required libraries
const { Builder } = require('selenium-webdriver');
const chrome = require('selenium-webdriver/chrome');

// set the path to udetected_chromedriver executable file
const chromeDriverPath = 'C:/Users/dell/AppData/Roaming/undetected_chromedriver/undetected_chromedriver.exe';

// set the path to your actual Chrome browser executable file
const chromeExePath = 'C:/Program Files/Google/Chrome/Application/chrome.exe';

// set Chrome options
const chromeOptions = new chrome.Options();
chromeOptions.setChromeBinaryPath(chromeExePath);

// run Chrome in headless mode
chromeOptions.addArguments('--headless');

// create a new WebDriver instance
const driver = new Builder()
    .forBrowser('chrome')
    .setChromeOptions(chromeOptions)
    .setChromeService(new chrome.ServiceBuilder(chromeDriverPath))
    .build();

// navigate to a website
async function scraper() {
    try {
        await driver.get('https://nowsecure.nl');

        // extract the page HTML
        const pageSource = await driver.getPageSource();
        console.log('Page HTML:', pageSource);

        // close the driver instance
        await driver.quit();
    } catch (error) {
        console.error('An error occurred:', error);
    }
}

// call the main function
scraper();
The code bypasses Cloudflare and outputs the page's HTML, as shown:
<!DOCTYPE html>
<html lang="en">
<head>
    <title>nowSecure</title>
</head>
<body>

    <!-- ... -->

    <h1>OH YEAH, you passed!</h1>

    <!-- ... -->

</body>
</html>
You passed! You've just accessed and scraped a protected website with the Undetected ChromeDriver in Node.js.
However, you might need to support the Undetected ChromeDriver with more solutions for stronger anti-bot protection.
When Undetected ChromeDriver Isn't Enough
Enhancing the Undetected ChromeDriver with proxies and custom user agents can further boost your chances of bypassing detection. However, this may still not be enough against advanced anti-bot systems.
For instance, try to access a heavily protected website like G2 using the Undetected ChromeDriver.
To do that, replace the target website in the previous code with https://www.g2.com/products/asana/reviews.
Start by pointing Node.js to your Chrome browser and the Undetected ChromeDriver. Then, add a user agent to the Chrome options.
// import the required libraries
const { Builder } = require('selenium-webdriver');
const chrome = require('selenium-webdriver/chrome');

// set the path to udetected_chromedriver executable file
const chromeDriverPath = 'C:/Users/dell/AppData/Roaming/undetected_chromedriver/undetected_chromedriver.exe';

// set the path to your actual Chrome browser executable file
const chromeExePath = 'C:/Program Files/Google/Chrome/Application/chrome.exe';

// specify custom user agent
const customUserAgent = 'Mozilla/5.0 (Windows NT 10.0; Win64; x64) AppleWebKit/537.36 (KHTML, like Gecko) Chrome/121.0.0.0 Safari/537.36';

// set Chrome options
const chromeOptions = new chrome.Options();
chromeOptions.setChromeBinaryPath(chromeExePath);

// add the custom user agent
chromeOptions.addArguments(`user-agent=${customUserAgent}`);

// run Chrome in headless mode
chromeOptions.addArguments('--headless');
Next, create a driver instance and build the Undetected ChromeDriver patch.
// ...

// create a new WebDriver instance
const driver = new Builder()
    .forBrowser('chrome')
    .setChromeOptions(chromeOptions)
    .setChromeService(new chrome.ServiceBuilder(chromeDriverPath))
    .build();
Write the scraper function to scrape the heavily protected website:
// ...

// navigate to a website
async function scraper() {
    try {
        await driver.get('https://www.g2.com/products/asana/reviews');

        // extract the page HTML
        const pageSource = await driver.getPageSource();
        console.log('Page HTML:', pageSource);

        // close the driver instance
        await driver.quit();
    } catch (error) {
        console.error('An error occurred:', error);
    }
}

// call the main function
scraper();
Let's combine the code:
// import the required libraries
const { Builder } = require('selenium-webdriver');
const chrome = require('selenium-webdriver/chrome');

// set the path to udetected_chromedriver executable file
const chromeDriverPath = 'C:/Users/dell/AppData/Roaming/undetected_chromedriver/undetected_chromedriver.exe';

// set the path to your actual Chrome browser executable file
const chromeExePath = 'C:/Program Files/Google/Chrome/Application/chrome.exe';

// specify custom user agent
const customUserAgent = 'Mozilla/5.0 (Windows NT 10.0; Win64; x64) AppleWebKit/537.36 (KHTML, like Gecko) Chrome/121.0.0.0 Safari/537.36';

// set Chrome options
const chromeOptions = new chrome.Options();
chromeOptions.setChromeBinaryPath(chromeExePath);

// add the custome user agent
chromeOptions.addArguments(`user-agent=${customUserAgent}`);

// run Chrome in headless mode
chromeOptions.addArguments('--headless');

// create a new WebDriver instance
const driver = new Builder()
    .forBrowser('chrome')
    .setChromeOptions(chromeOptions)
    .setChromeService(new chrome.ServiceBuilder(chromeDriverPath))
    .build();

// navigate to a website
async function scraper() {
    try {
        await driver.get('https://www.g2.com/products/asana/reviews');

        // extract the page HTML
        const pageSource = await driver.getPageSource();
        console.log('Page HTML:', pageSource);

        // close the driver instance
        await driver.quit();
    } catch (error) {
        console.error('An error occurred:', error);
    }
}

// call the main function
scraper();
The Undetected ChromeDriver gets blocked by Cloudflare, even with a user agent:
<!DOCTYPE html>
<html class="no-js" lang="en-US">
<head>
    <title>Attention Required! | Cloudflare</title>
</head>
<body>
    <!-- ... other page content ignored for brevity -->

</body>
</html>
The most effective way to avoid getting blocked is to use a web API like ZenRows. It handles premium proxies, user agent rotation, CAPTCHA, and any other anti-bot system, so you can scrape without getting blocked.
ZenRows even offers JavaScript instructions for dynamic scraping in Axios. Let's access the G2 product page with Axios and ZenRows.
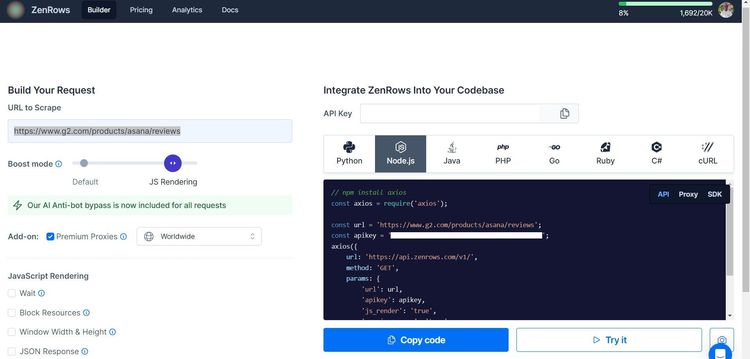
To start, sign up on ZenRows, and you'll get to the Request Builder.
Once in the Request Builder, paste the target URL in the link box, set the Boost mode to JS Rendering, click Premium Proxies, and set your language option as Node.js.

Copy and paste the generated code into your scraper file. It should look like this in your scraper file:
// import axios
const axios = require('axios');

const url = 'https://www.g2.com/products/asana/reviews';

axios({
	url: 'https://api.zenrows.com/v1/',
	method: 'GET',
	params: {
		'url': url,
		'apikey': 'YOUR_ZENROWS_API_KEY',
		'js_render': 'true',
		'premium_proxy': 'true',
	},
})
    .then(response => console.log(response.data))
    .catch(error => console.log(error));
The code accesses and scrapes the protected website. See the brief output below showing the page title:
<!DOCTYPE html>

<!-- ... -->

<head>
    <title>Asana Reviews 2024</title>
</head>
<body>

    <!-- ... other page content ignored for brevity -->

</body>
Congratulations! You just scraped a heavily protected website with Axios using ZenRows.
Conclusion
In this article, you’ve learned how to use the Undetected ChromeDriver in Node.js. You now know:
- How to create an Undetected ChromeDriver executable file with Python.
- Where to find the Undetected ChromeDriver executable file path and point Node.js to it.
- How to access and scrape a protected website with the Undetected ChromeDriver in Node.js.
Feel free to practice what you’ve learned! However, know that many websites will still block your scraper even with the Undetected ChromeDriver. An excellent way to bypass any anti-bot and scrape without limit is to integrate ZenRows. Try ZenRows for free!
Did you find the content helpful? Spread the word and share it on Twitter, or LinkedIn.