What Is a BeautifulSoup 403 Forbidden Error
A 403 forbidden error in BeautifulSoup means the server has blocked your attempt to access and scrape a website. This error is standard when accessing a website with an HTTP client during web scraping.
The error might look like this in your terminal:
HTTPError: 403 Client Error: Forbidden for url: https://www.g2.com/products/asana/reviews
Before solving the problem, let's identify the possible cause.
Identify the Real Cause of 403 Error With BeautifulSoup
BeautifulSoup isn't the direct cause of the 403 forbidden error since it's only a parser library. The error is due to a suspicious request from an HTTP client like the Python Request library.
This can be because there are too many requests from the same IP or some other reasons. Let's see six quick solutions that will solve our problem.
- Implement Proxy in Requests.
- Customize the User Agent String.
- Enhance Request Headers for Better Acceptance.
- Moderate the Frequency of Requests.
- Integrate Headless Browsers.
- Use of CAPTCHA Solving Services.
How to Overcome 403 Forbidden Error With BeautifulSoup
We've now established that the error 403 comes from the HTTP client. Let's apply the highlighted solutions step-by-step.
1. Implement Proxy in Requests
An IP ban is one of the most common causes of the 403 forbidden error in web scraping. Routing your Python requests through a proxy lets you tweak your IP address so the server thinks the request is from different users.
Using Python's requests library, let's see how to implement a single free proxy. Keep in mind that free proxies are prone to failure. You can select a new one from the Free Proxy List.
In the below code, specifying http and https in the proxy_addresses dictionary deploys the proxies for secure and unsecured connections.
from bs4 import BeautifulSoup
import requests

target_website = 'https://httpbin.io/ip'

proxy_addresses = {
    'http': 'http://72.206.181.123:4145',
    'https': 'http://191.96.100.33:3128'
}

response = requests.get(target_website, proxies=proxy_addresses)

if response.status_code == 200:
    print(response.json())
else:
    print(response)
This routes your request through the specified IP.
{'origin': '191.96.100.33:39414'}
However, you need more than one proxy in real-life scraping, as frequent requests from a single proxy can result in an IP ban. Consider rotating your proxy address from a pool instead. Regardless, rotating free proxies is generally unreliable since websites often easily detect and block them.
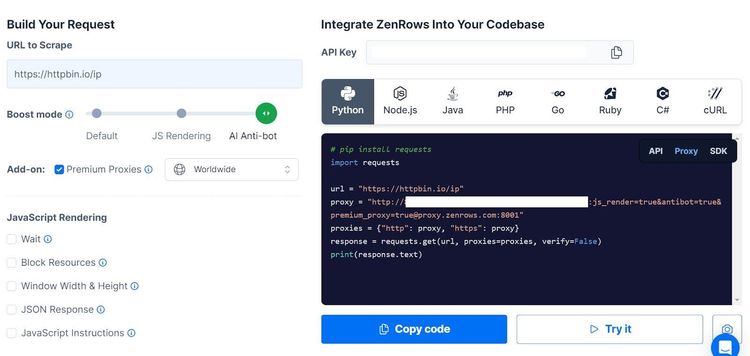
Premium rotating residential proxies are the most reliable and efficient options. And that's where tools like ZenRows come in handy. To integrate ZenRows with your BeautifulSoup web scraper, sign up and log in to the ZenRows Request Builder.

Check the "Premium Proxy" box to enable premium rotating proxies and add "AI Anti-bot" boost mode. Select "Python" at the top of the code box. Copy and paste the generated code into your scraper file.
We're using a testing URL that returns the proxy IP used.
Here's the generated code:
import requests

url = 'https://httpbin.io/ip'
proxy = (
    'http://<YOUR_ZENROWS_API_KEY>:'
    'js_render=true&antibot=true&[email protected]:8001'
    )
proxies = {"http": proxy, "https": proxy}
response = requests.get(url, proxies=proxies, verify=False)
print(response.text)
Running the code consecutive times generates different IP addresses, as shown.
"origin": "154.13.105.244:37989"
"origin": "38.152.7.208:22975"
"origin": "38.152.7.208:22975"
"origin": "154.13.105.244:37989"
"origin": "154.13.105.244:37989"
"origin": "38.152.7.208:22975"
"origin": "154.13.105.244:37989"
"origin": "154.13.105.244:37989"
"origin": "38.152.7.208:22975"
"origin": "154.13.105.244:37989"
You've successfully integrated rotating proxies into your Python requests. But there are still more challenges you need to solve.
2. Customize the User Agent String
Customizing the user agent makes your scraper appear as a real browser and avoid getting detected as a bot. The user agent is a string that specifies the browser engine, type, version, and OS information in your request headers.
A typical user agent might look like this: Mozilla/5.0 (Windows NT 10.0; Win64; x64) AppleWebKit/537.36 (KHTML, like Gecko) Chrome/91.0.4472.124 Safari/537.36.
This tells the server that a request is from a 64-bit Windows 10 OS with Chrome version 91.0.4472.124 that supports the Gecko driver and is compatible with Mozilla.
This user agent is less likely to result in a BeautifulSoup 403 error, unlike an HTTP client like the requests library, which uses python-requests/2.31.0 by default.
Thankfully, you can replace the default user agent with a custom one. It involves passing the user agent string as done with request_headers in this code:
from bs4 import BeautifulSoup
import requests

target_website = 'https://httpbin.io/'

request_headers = {
    'user-agent': 'Mozilla/5.0 (Windows NT 10.0; Win64; x64) AppleWebKit/537.36 (KHTML, like Gecko) Chrome/91.0.4472.124 Safari/537.36'
}

# Initiate HTTP request
response = requests.get(target_website, headers=request_headers)

# Resolve HTTP response
if response.status_code == 200:
    # View request user agent
    print(response.request.headers['user-agent'])
else:
    print(response)
response.request.headers['user-agent'] outputs the request user agent, as shown.
Mozilla/5.0 (Windows NT 10.0; Win64; x64) AppleWebKit/537.36 (KHTML, like Gecko) Chrome/91.0.4472.124 Safari/537.36
However, re-using the same user agent over and over again can get you blocked. This usually happens due to rate limiting or when a server receives unusual traffic from the same client.
You want to rotate your user agent to prevent this. Grab a few user agents from the list of top user agents for web scraping and modify your code, as shown below.
The code below adds each user agent to the header at random using the random.choice() method:
from bs4 import BeautifulSoup
import requests
import random

# Create a list of user agents
user_agents =[
    'Mozilla/5.0 (Windows NT 10.0; Win64; x64) AppleWebKit/537.36 (KHTML, like Gecko) Chrome/109.0.0.0 Safari/537.36',
    'Mozilla/5.0 (Macintosh; Intel Mac OS X 10_15_7) AppleWebKit/537.36 (KHTML, like Gecko) Chrome/109.0.0.0 Safari/537.36',
    'Mozilla/5.0 (Macintosh; Intel Mac OS X 10_15_7) AppleWebKit/537.36 (KHTML, like Gecko) Chrome/108.0.0.0 Safari/537.36',
    'Mozilla/5.0 (X11; Linux x86_64) AppleWebKit/537.36 (KHTML, like Gecko) Chrome/108.0.0.0 Safari/537.36'
    ]

target_website = 'https://httpbin.io/'

# Add user agents at random
request_headers = {
    'user-agent': random.choice(user_agents)
}

# Initiate HTTP request
response = requests.get(target_website, headers=request_headers)

# Resolve HTTP response
if response.status_code == 200:
    # View request user agent
    print(f'User agent used: {response.request.headers["user-agent"]}')
else:
    print(response)
The requests library will now rotate your request before passing it to BeautifulSoup. Does it feel like an achievement?
In a broader scope, you can modify the complete headers, too.
3. Enhance Request Headers for Better Acceptance
The request headers provide information about your scraper's capabilities, and they determine how a website processes your request. Any slight mismatch of header values can result in the 403 forbidden error.
You can enhance the request headers by modifying them with the most common headers for scraping.
For instance, the referrer header specifies the URL that brought you to a page, while the accept-language header tells the server your language. Optimizing the default HTTP client headers with these details can give your scraper a human touch.
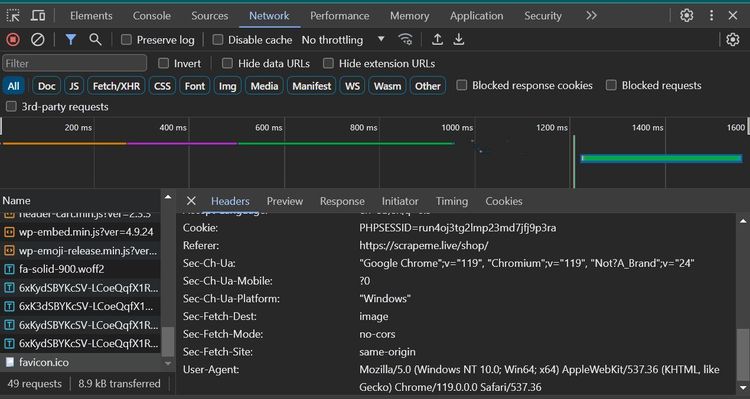
Don't bother generating request headers yourself. You can grab some from Chrome's Network tab by visiting a website like ScrapeMe and opening the developer console (right-click and select "Inspect").
Go to the "Network" tab and reload the page. Select a request like favicon.io from the traffic table. Then scroll down to the "Request Headers" section.

Next, copy and paste the request headers into your code in a key/value pair format, as shown below. We've reformatted this to only include relevant headers:
# Import the required libraries
from bs4 import BeautifulSoup
import requests

# Specify the request headers
request_headers = {
    'referer': 'https://scrapeme.live/shop/',
    'accept-language': 'en-US,en;q=0.9',
    'content-type': 'application/json',
    'accept-encoding': 'gzip, deflate, br',
    'sec-ch-device-memory': '8',
    'sec-ch-ua': '"Google Chrome";v="119", "Chromium";v="119", "Not?A_Brand";v="24"',
    'sec-ch-ua-platform': "Windows",
    'sec-ch-ua-platform-version': '"10.0.0"',
    'sec-ch-viewport-width': '792',
    'user-agent': 'Mozilla/5.0 (Windows NT 10.0; Win64; x64) AppleWebKit/537.36 (KHTML, like Gecko) Chrome/119.0.0.0 Safari/537.36',
  }
#...
Using Python's requests library as the HTTP client, the complete code below modifies the request headers with the ones copied from Chrome.
# Import the required libraries
from bs4 import BeautifulSoup
import requests

# Specify the request headers
request_headers = {
    'referer': 'https://scrapeme.live/shop/',
    'accept-language': 'en-US,en;q=0.9',
    'content-type': 'application/json',
    'accept-encoding': 'gzip, deflate, br',
    'sec-ch-device-memory': '8',
    'sec-ch-ua': '"Google Chrome";v="119", "Chromium";v="119", "Not?A_Brand";v="24"',
    'sec-ch-ua-platform': "Windows",
    'sec-ch-ua-platform-version': '"10.0.0"',
    'sec-ch-viewport-width': '792',
    'user-agent': 'Mozilla/5.0 (Windows NT 10.0; Win64; x64) AppleWebKit/537.36 (KHTML, like Gecko) Chrome/119.0.0.0 Safari/537.36',
  }

target_website = 'https://httpbin.io/'

# Initiate HTTP request
response = requests.get(target_website, headers=request_headers)

# Resolve HTTP response
if response.status_code == 200:
    # View request user agent
    print(f'Request headers: {response.request.headers}')
else:
    print(response)
Although modifying the request headers can be a lifesaver, your scraper may still get stalled due to rate limitations. Next, let's see how to tackle rate limiting in Python's request library.
4. Moderate the Frequency of Requests
Servers often use rate limiting to control the request traffic from an IP in a time cycle. Sending more requests than expected can get you blocked. Fortunately, that's already addressed if you use ZenRows.
Rate frequency moderation is handy when you only get the BeautifulSoup 403 error after a particular number of requests. It involves pausing the request flow at intervals.
Let's see a custom way to achieve this with the requests library in Python:
Say you intend to make ten consecutive requests to update your data flow, for instance. You can implement a time.sleep() for a second or three between requests.
The code below combines the random.choice() and time.sleep() methods to implement a random pause between each request. Putting the pauses in a list (sleep_time_list) ensures that your request has a minimum and maximum pause limit:
from bs4 import BeautifulSoup
import requests
import time
import random

# Create a sleep time list
sleep_time_list = [1, 2, 3, 4, 5]

target_website = 'https://httpbin.io/'

for req in range(10):
    # Initiate HTTP request
    response = requests.get(target_website)

    # Choose a random pause time from the list
    random_sleep_time = random.choice(sleep_time_list)

    # View time paused
    print(f'Resting for {random_sleep_time} seconds')

    # Pause the request for the chosen time
    time.sleep(random_sleep_time)

    # Resolve HTTP response
    if response.status_code == 200:
        # Parse the HTML with BeautifulSoup
        soup = BeautifulSoup(response.text, 'html.parser')
    else:
        print(response)
    # Print page title using BeautifulSoup
    print(f'Page title: {soup.title.get_text()}')
As expected, the code randomly pauses the request at intervals:
resting for 3 seconds
Page title: httpbin.io | HTTP Client Testing Service
Resting for 4 seconds
Page title: httpbin.io | HTTP Client Testing Service
Resting for 1 seconds
Page title: httpbin.io | HTTP Client Testing Service
Resting for 5 seconds
Page title: httpbin.io | HTTP Client Testing Service
Resting for 2 seconds
Page title: httpbin.io | HTTP Client Testing Service
Resting for 5 seconds
Page title: httpbin.io | HTTP Client Testing Service
Resting for 5 seconds
Page title: httpbin.io | HTTP Client Testing Service
Resting for 2 seconds
Page title: httpbin.io | HTTP Client Testing Service
Resting for 5 seconds
Page title: httpbin.io | HTTP Client Testing Service
Resting for 1 seconds
Page title: httpbin.io | HTTP Client Testing Service
While these are all excellent ways to solve the BeautifulSoup 403 error, they won't make a difference if you're dealing with websites that fetch content with JavaScript. Such websites don't load content immediately. How can you deal with this? Read up in the following section.
5. Integrate Headless Browsers
BeautifulSoup can't access JavaScript-generated content. An effective solution is to add JavaScript support with headless browsers like Selenium.
Headless browsers like Selenium allow you to extract information from JavaScript-rendered websites and can be handy for solving JavaScript challenges like Cloudflare 403. For example, Selenium allows you to wait for dynamically loaded content before extracting it.
Let's see how to integrate Selenium with BeautifulSoup. Using Selenium's headless mode, the code below visits ScrapingClub, a website that implements infinite scroll with JavaScript's AJAX. Then, it parses the HTML source through BeautifulSoup.
from bs4 import BeautifulSoup
from selenium import webdriver

target_website = 'https://scrapingclub.com/exercise/list_infinite_scroll/'

# Instantiate ChromeOptions
chrome_options = webdriver.ChromeOptions()

# Activate headless mode
chrome_options.add_argument('--headless=new')

# Instantiate a webdriver instance
driver = webdriver.Chrome(options=chrome_options)

# Visit the target website with Chrome web driver
driver.get(target_website)

# Wait for elements to load
driver.implicitly_wait(10)

# Parse page source to BeautifulSoup for Javascript support
soup = BeautifulSoup(driver.page_source, 'html.parser')

# Get page title with BeautifulSoup
print(soup.title.get_text())
The code prints the page title, indicating that it works.
Scraping Infinite Scrolling Pages (Ajax) | ScrapingClub
You just integrated Selenium with BeautifulSoup. That's great! However, it isn't still foolproof against CAPTCHAs. To deal with this error 403 as a final blow, let's see how to scale your BeautifulSoup web scraper with CAPTCHA-solving functionality.
6. Use of CAPTCHA Solving Services
CAPTCHAs are the number one enemies of web scraping, and bypassing them can be exceptionally challenging. Thankfully, anti-bot and CAPTCHA-bypassing services like ZenRows exist to solve this problem. All you need with ZenRows is an API call, and you're ready to scrape unblocked.
To see how it works, we'll access the HTML content on https://www.g2.com/products/asana/reviews, a Cloudflare-protected website, using Python's requests client with BeautifulSoup.
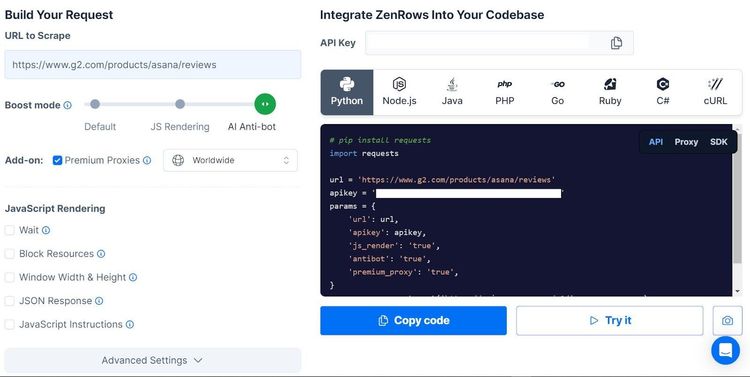
First, log into the ZenRows Request Builder.

Paste the target URL in the URL box at the top. Click "AI Anti-bot" and click the "Premium Proxies" box. Click "Python" and select the "API" option. Copy and paste the generated code into your Python file, as shown:
# Import the required libraries
import requests
from bs4 import BeautifulSoup

# Specify the website URL
url = 'https://www.g2.com/products/asana/reviews'
params = {
    'url': url,
    'apikey': 'YOUR_ZENROWS_API_KEY',
    'js_render': 'true',
    'antibot': 'true',
    'premium_proxy': 'true',
}

# Get HTTP response through requests
response = requests.get('https://api.zenrows.com/v1/', params=params)

#...
Next, extend the code to parse the website's HTML using BeautifulSoup and print the page title.
# Import the required libraries
import requests
from bs4 import BeautifulSoup

# Specify the website URL
url = 'https://www.g2.com/products/asana/reviews'
params = {
    'url': url,
    'apikey': '<YOUR_ZENROWS_API_KEY>',
    'js_render': 'true',
    'antibot': 'true',
    'premium_proxy': 'true',
}

# Get HTTP response through requests
response = requests.get('https://api.zenrows.com/v1/', params=params)

# Parse the HTML with BeautifulSOup
soup = BeautifulSoup(response.text, 'html.parser')

## Get page title with BeautifulSoup
print(soup.title.get_text())
Running this code outputs the page title, as shown:
Asana Reviews 2023 & Product Details
This confirms that your BeautifulSoup scraper has successfully bypassed Cloudflare. Congratulations! You're now ready to scrape the web unblocked with BeautifulSoup.
Conclusion
Solutions, including proxy deployment, user agent customization, request control, headless browsers, and CAPTCHA-solving, come in handy for tackling the BeautifulSoup 403 forbidden error.
While some solutions might work for subtle causes, only anti-bot solvers and premium proxy rotation can resolve more challenging anti-bot and CAPTCHA problems. And there comes ZenRows, a complete solution for collecting data from any website. Try ZenRows and experience a more convenient way to scrape without blockage.
Did you find the content helpful? Spread the word and share it on Twitter, or LinkedIn.