Puppeteer is one of the top browser automation tools for web scraping and testing. It's a JavaScript library, but its popularity has opened the door to many ports in different languages. PuppeteerSharp is the .NET port for an API providing the same functionality!
In this tutorial, you'll learn the Puppeteer C# basics and then dig into more advanced interactions. You'll see:
Let's dive in!
Why You Should Use PuppeteerSharp (Puppeteer in C#)
Puppeteer is one of the most used headless browser libraries. It has millions of weekly downloads thanks to its high-level and easy API to control Chrome and is great for simulating any user interactions. Some applications? Testing and web scraping!
Puppeteer Sharp is a .NET port of the Node.js Puppeteer library. It implements the same API but in C#. The main difference is that it uses Google Chrome v115 instead of the latest version of Chromium.
Before diving into this PuppeteerSharp tutorial, you might be interested in taking a look at our articles on headless browser scraping and web scraping in C#.
How to Use PuppeteerSharp
To move the first steps with Puppeteer in C#, we'll scrape the infinite scrolling demo page below:
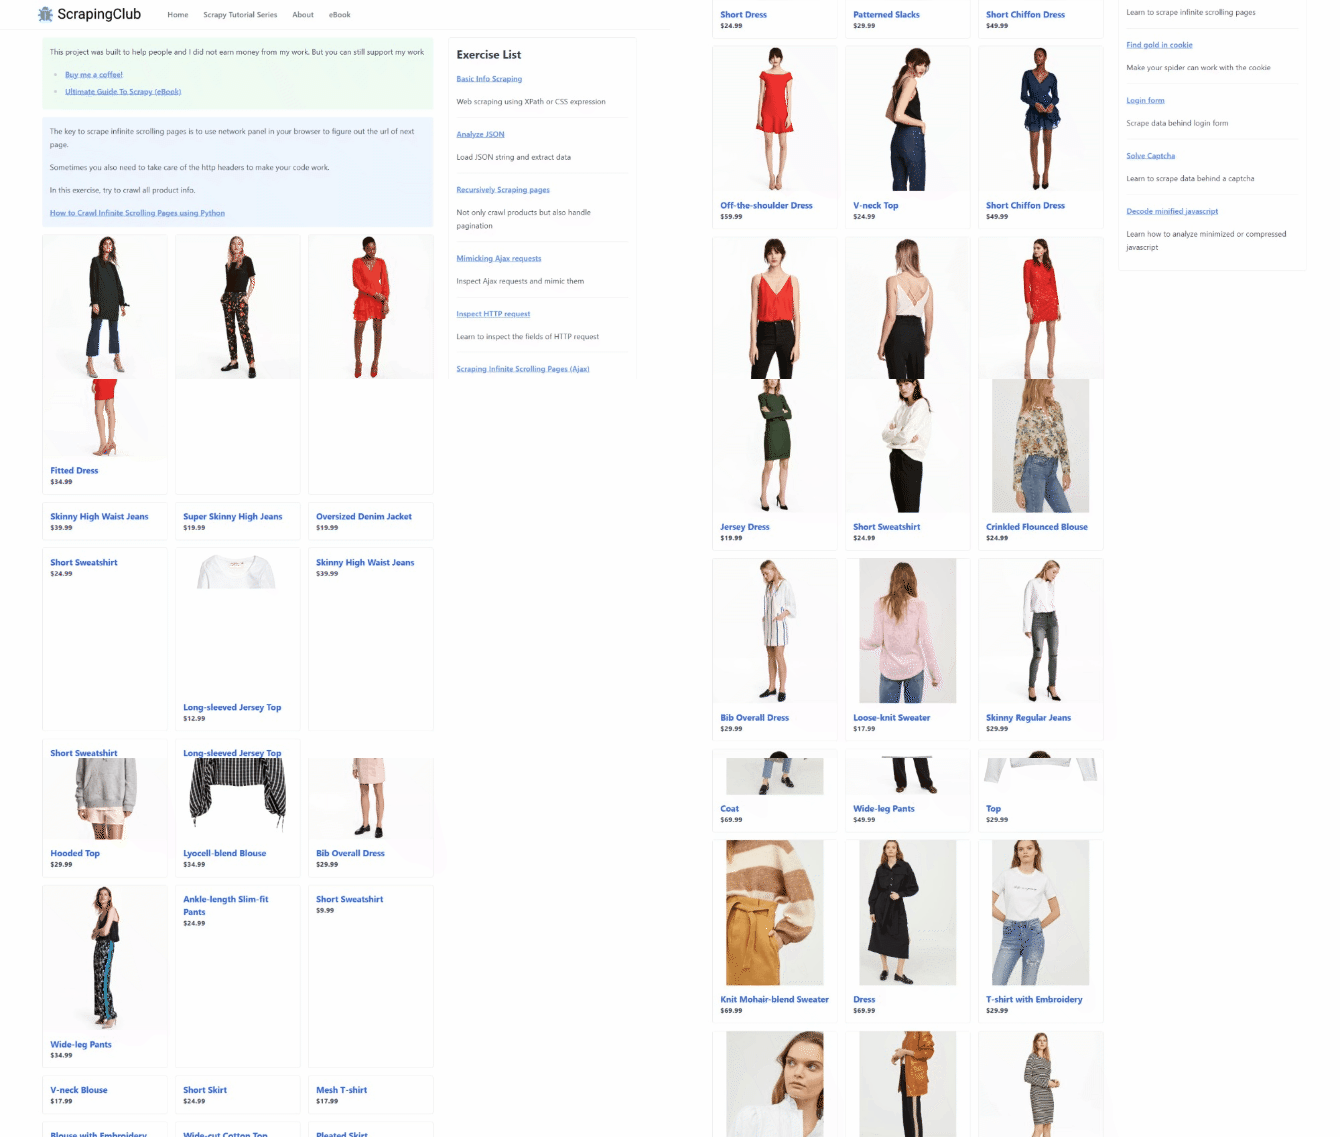
It loads new products as the user scrolls down via JavaScript. The only way to deal with the target site is through a technology that can run JS, such as Puppeteer. That makes it a prime example of a dynamic content page that needs a headless browser for data retrieval.
Time to perform browser automation to extract some data from it!
Step 1: Install PuppeteerSharp
You need the .NET SDK installed on your computer to follow this tutorial. Get the .NET 7+ installer, execute it, and follow the wizard. You'll also need Chrome installed on your computer.
You're ready to initialize a Puppeteer C# project. Create a PuppeteerSharpProject folder and enter it in a PowerShell session:
mkdir PuppeteerSharpProject
cd PuppeteerSharpProject
Run the new console command to initialize a C# application. The project directory will contain the Program.cs and puppeteersharp-demo.csproj files.
dotnet new console --framework net7.0
Next, add Puppeteer Sharp to your project's dependencies:
dotnet add package PuppeteerSharp
Awesome! You have everything you need to set up a PuppeteerSharp script.
Open the project in Visual Studio (or your favorite IDE) and initialize Program.cs with the code below. The first line contains the import for PuppeteerSharp. Main() is the entry function of the C# program and will contain the scraping logic.
using PuppeteerSharp;

namespace PuppeteerSharpProject
{
    class Program
    {
        static async Task Main(string[] args)
        {
            // scraping logic...
        }
    }
}
You can execute the C# script with the following command:
dotnet run
Perfect! Your C# PuppeteerSharp project is ready!
Step 2: Access a Web Page with Puppeteer Sharp
Add the lines below to the Main() function to
- Download Chrome locally,
- Instantiate a Puppeteer object to control a Chrome instance
- Open a new page in the controlled browser with
NewPageAsync().
// download the browser executable
await new BrowserFetcher().DownloadAsync();

// browser execution configs
var launchOptions = new LaunchOptions
{
    Headless = true, // = false for testing
};

// open a new page in the controlled browser
using (var browser = await Puppeteer.LaunchAsync(launchOptions))
using (var page = await browser.NewPageAsync())
{
    // scraping logic...
}
The Headless = true option ensures that Chrome will start in headless mode. Set it to false if you want to view the actions performed by your script on the page in real-time.
Use page to open the target page in the browser instance:
await page.GoToAsync("https://scrapingclub.com/exercise/list_infinite_scroll/");
Next, retrieve the raw HTML content from the page and print it with Console.WriteLine(). The GetContentAsync() method returns the current page's source.
var html = await page.GetContentAsync();
Console.WriteLine(html);
This is what your current Program.cs file should contain now:
using PuppeteerSharp;

namespace PuppeteerSharpProject
{
    class Program
    {
        static async Task Main(string[] args)
        {
            // download the browser executable
            await new BrowserFetcher().DownloadAsync();

            // browser execution configs
            var launchOptions = new LaunchOptions
            {
                Headless = true, // = false for testing
            };

            // open a new page in the controlled browser
            using (var browser = await Puppeteer.LaunchAsync(launchOptions))
            using (var page = await browser.NewPageAsync())
            {
                // visit the target page
                await page.GoToAsync("https://scrapingclub.com/exercise/list_infinite_scroll/");
                // retrieve the HTML source code and log it
                var html = await page.GetContentAsync();
                Console.WriteLine(html);
            }
        }
    }
}
Run your script in headless mode (setting Headless = false) with the command dotnet run. A Chrome window will open, and it'll visit the Infinite Scrolling demo page:
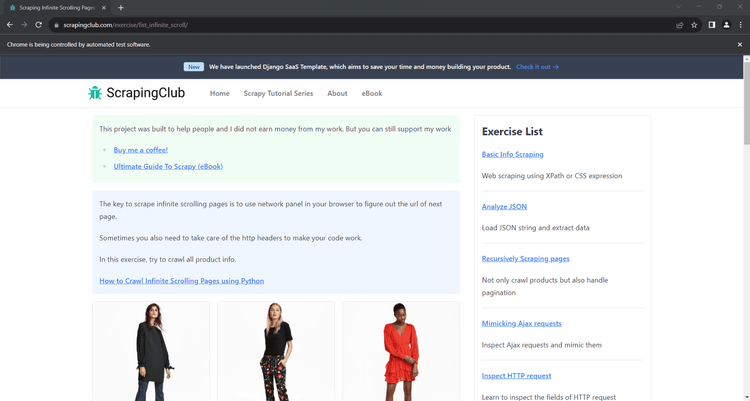
The "Chrome is being controlled by automated test software" means Puppeteer Sharp is working on Chrome as expected.
Your C# scraper will produce the output below in PowerShell:
    <html class="h-full"><head>
      <meta charset="utf-8">
      <meta name="viewport" content="width=device-width, initial-scale=1">
      <meta name="description" content="Learn to scrape infinite scrolling pages"><title>Scraping Infinite Scrolling Pages (Ajax) | ScrapingClub</title>
      <link rel="icon" href="/static/img/icon.611132651e39.png" type="image/png">
      <!-- Omitted for brevity... -->
Fantastic! That's exactly the HTML source code of your target page!
Now that you have access to the HTML code, it's time to see how to extract specific data from it.
Step 3: Extract Specific Data by Parsing
Let's suppose your scraping goal is to retrieve the name and price of each product on the page. Puppeteer enables you to select HTML elements and extract data from them. Achieving that involves these steps:
First, select the DOM elements associated with the product by applying a selector strategy. Then, collect the desired information from each of them. Lastly, store the scraped data in C# objects.
A selector strategy usually relies on a CSS Selector or XPath expression. Both of those methods are useful for finding elements in the DOM. CSS selectors are intuitive, while XPath expressions are generally more complex. Find out more in our article on CSS Selector vs XPath.
Keep it simple and opt for CSS selectors. How to define them? Open your target page in the browser and inspect a product HTML element with the DevTools to discover it:
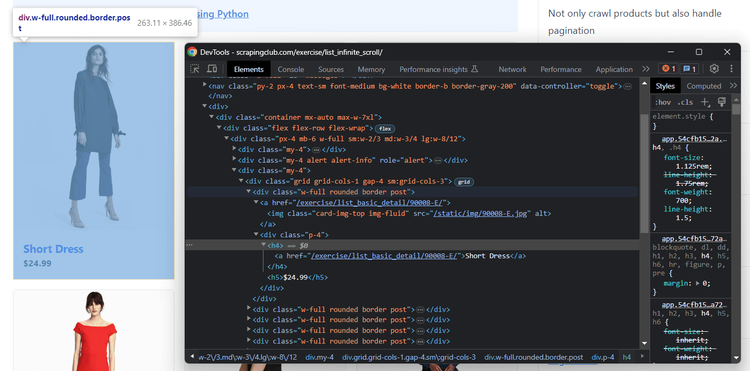
There, you can see that a product is a .post DOM element containing:
- The name in an
<h4>node. - The price in an
<h5>node.
Follow the instructions below to look at how to get the name and price of the products on the target page:
First, create a Product class with the attribute to store the desired data:
public class Product
{
    public string? Name { get; set; }
    public string? Price { get; set; }
}
In Main(), initialize a list of Products. Its goal is to contain all the scraped data retrieved from the page.
var products = new List<Product>();
Use the QuerySelectorAllAsync() method to find the product HTML elements via a CSS selector.
var productElements = await page.QuerySelectorAllAsync(".post");
After selecting the product nodes, iterate over them and apply the data parsing logic. And, thanks to the innerText HTML property, you can get the rendered text of a node.
foreach (var productElement in productElements)
{
    // select the name and price elements
    var nameElement = await productElement.QuerySelectorAsync("h4");
    var priceElement = await productElement.QuerySelectorAsync("h5");
    // extract their text
    var name = (await nameElement.GetPropertyAsync("innerText")).RemoteObject.Value.ToString();
    var price = (await priceElement.GetPropertyAsync("innerText")).RemoteObject.Value.ToString();
    // instantiate a new product and add it to the list
    var product = new Product { Name = name, Price = price };
    products.Add(product);
}
using PuppeteerSharp;

namespace PuppeteerSharpProject
{
    public class Product
    {
        public string? Name { get; set; }
        public string? Price { get; set; }
    }

    class Program
    {
        static async Task Main(string[] args)
        {
            // to store the scraped data
            var products = new List<Product>();

            // download the browser executable
            await new BrowserFetcher().DownloadAsync();

            // browser execution configs
            var launchOptions = new LaunchOptions
            {
                Headless = true, // = false for testing
            };

            // open a new page in the controlled browser
            using (var browser = await Puppeteer.LaunchAsync(launchOptions))
            using (var page = await browser.NewPageAsync())
            {
                // visit the target page
                await page.GoToAsync("https://scrapingclub.com/exercise/list_infinite_scroll/");
                // select all product HTML elements
                var productElements = await page.QuerySelectorAllAsync(".post");

                // iterate over them and extract the desired data
                foreach (var productElement in productElements)
                {
                    // select the name and price elements
                    var nameElement = await productElement.QuerySelectorAsync("h4");
                    var priceElement = await productElement.QuerySelectorAsync("h5");

                    // extract their text
                    var name = (await nameElement.GetPropertyAsync("innerText")).RemoteObject.Value.ToString();
                    var price = (await priceElement.GetPropertyAsync("innerText")).RemoteObject.Value.ToString();

                    // instantiate a new product and add it to the list
                    var product = new Product { Name = name, Price = price };
                    products.Add(product);
                }
            }

            // log the scraped products
            foreach (var product in products)
            {
                Console.WriteLine($"Name: {product.Name}, Price: {product.Price}");
            };
        }
    }
}
Launch the script, and it'll print the following lines:
Name: Short Dress, Price: $24.99
Name: Patterned Slacks, Price: $29.99
// omitted for brevity...
Name: Short Lace Dress, Price: $59.99
Name: Fitted Dress, Price: $34.99
Way to go! The data extraction logic produces the expected output!
Step 4: Export the Data to CSV
The easiest way to convert the scraped data to CSV is to use CsvHelper, a .NET library for dealing with CSV files. Add it to your project's dependencies like this:
dotnet add package CsvHelper
Import it into your application by adding this line to the top of your Program.cs file:
using CsvHelper;
Create a products.csv file and use CsvHelper to populate it with the CSV-representation of the products objects.
// initialize the CSV output file
using (var writer = new StreamWriter("products.csv"))
// create the CSV writer
using (var csv = new CsvWriter(writer, CultureInfo.InvariantCulture))
{
    // populate the CSV file
    csv.WriteRecords(products);
}
The CultureInfo.nvariantCulture option ensures that any software can parse the produced CSV, regardless of the user's local settings.
Add the import below to make CultureInfo work:
using System.Globalization;
This is the entire code of your scraping script:
using PuppeteerSharp;
using CsvHelper;
using System.Globalization;

namespace PuppeteerSharpProject
{
    public class Product
    {
        public string? Name { get; set; }
        public string? Price { get; set; }
    }

    class Program
    {
        static async Task Main(string[] args)
        {
            // to store the scraped data
            var products = new List<Product>();

            // download the browser executable
            await new BrowserFetcher().DownloadAsync();

            // browser execution configs
            var launchOptions = new LaunchOptions
            {
                Headless = true, // = false for testing
            };

            // open a new page in the controlled browser
            using (var browser = await Puppeteer.LaunchAsync(launchOptions))
            using (var page = await browser.NewPageAsync())
            {
                // visit the target page
                await page.GoToAsync("https://scrapingclub.com/exercise/list_infinite_scroll/");
                // select all product HTML elements
                var productElements = await page.QuerySelectorAllAsync(".post");

                // iterate over them and extract the desired data
                foreach (var productElement in productElements)
                {
                    // select the name and price elements
                    var nameElement = await productElement.QuerySelectorAsync("h4");
                    var priceElement = await productElement.QuerySelectorAsync("h5");

                    // extract their text
                    var name = (await nameElement.GetPropertyAsync("innerText")).RemoteObject.Value.ToString();
                    var price = (await priceElement.GetPropertyAsync("innerText")).RemoteObject.Value.ToString();

                    // instantiate a new product and add it to the list
                    var product = new Product { Name = name, Price = price };
                    products.Add(product);
                }
            }

            // initialize the CSV output file and create the CSV writer
            using (var writer = new StreamWriter("products.csv"))
            using (var csv = new CsvWriter(writer, CultureInfo.InvariantCulture))
            {
                // populate the CSV file
                csv.WriteRecords(products);
            }
        }
    }
}
Run the Puppeteer C# scraper:
dotnet run
Wait for the script to complete. A products.csv file with the following data will appear in the root folder of your project:
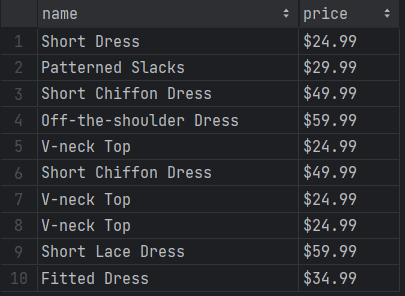
Amazing! The basics of Puppeteer Sharp are no longer a secret for you!
At the same time, pay attention to the current output, and you'll realize it only involves ten elements. That's because the target page initially contains only a few products, relying on infinite scrolling to load more. Don't worry, you'll see how to extract all product data in the next section!
Interacting with Web Pages in a Browser: Scroll, Screenshot, Etc.
PuppeteerSharp can simulate several automated user interactions. These include mouse movements, waits, and more. Your script can use them to behave like a human, gaining access to dynamic content and eluding anti-bot measures.
The most important interactions supported by C# Puppeteer are:
- Click page elements.
- Mouse movements and actions.
- Wait for DOM nodes on the page to be present, visible, or hidden.
- Fill out input fields.
- Submit forms.
- Take screenshots.
The operations are all available through native methods. For the remaining interactions, such as scrolling and dragging, you can use EvaluateExpressionAsync(). This function executes a JavaScript script directly on the page to support any other browser interaction.
It's time to see how to scrape all products from the infinite scroll demo page. Then, we'll explore other popular interactions in different PuppeteerSharp examples!
Scrolling
Your target page contains only ten products at the beginning, and it loads new data as the user scrolls down. Note that PuppeteerSharp doesn't provide a method to scroll down. Thus, you need custom JavaScript logic to deal with infinite scrolling.
The following JS script instructs the browser to scroll down the page ten times at an interval of 0.5 seconds each:
// scroll down the page 10 times
const scrolls = 10
let scrollCount = 0

// scroll down and then wait for 0.5s
const scrollInterval = setInterval(() => {
  window.scrollTo(0, document.body.scrollHeight)
  scrollCount++

  if (scrollCount === numScrolls) {
    clearInterval(scrollInterval)
  }
}, 500)
Store the above script in a variable and execute it through the EvaluateExpressionAsync() method:
// deal with infinite scrolling
var jsScrollScript = @"
    const scrolls = 10
    let scrollCount = 0

    // scroll down and then wait for 0.5s
    const scrollInterval = setInterval(() => {
    window.scrollTo(0, document.body.scrollHeight)
    scrollCount++

    if (scrollCount === numScrolls) {
        clearInterval(scrollInterval)
    }
    }, 500)
";
await page.EvaluateExpressionAsync(jsScrollScript);
The operation must be run before getting the HTML products to ensure the DOM has been updated as desired.
The scrolling interaction takes time, so you have to instruct Puppeteer Sharp to wait for the operation to end. Use WaitForTimeoutAsync() to wait 10 seconds for new products to load:
await page.WaitForTimeoutAsync(10000);
This should be your new complete script:
using PuppeteerSharp;
using CsvHelper;
using System.Globalization;

namespace PuppeteerSharpProject
{
    public class Product
    {
        public string? Name { get; set; }
        public string? Price { get; set; }
    }

    class Program
    {
        static async Task Main(string[] args)
        {
            // to store the scraped data
            var products = new List<Product>();

            // download the browser executable
            await new BrowserFetcher().DownloadAsync();

            // browser execution configs
            var launchOptions = new LaunchOptions
            {
                Headless = true, // = false for testing
            };

            // open a new page in the controlled browser
            using (var browser = await Puppeteer.LaunchAsync(launchOptions))
            using (var page = await browser.NewPageAsync())
            {
                // visit the target page
                await page.GoToAsync("https://scrapingclub.com/exercise/list_infinite_scroll/");

                // deal with infinite scrolling
                var jsScrollScript = @"
                    const scrolls = 10
                    let scrollCount = 0

                    // scroll down and then wait for 0.5s
                    const scrollInterval = setInterval(() => {
                      window.scrollTo(0, document.body.scrollHeight)
                      scrollCount++
                      if (scrollCount === numScrolls) {
                          clearInterval(scrollInterval)
                      }
                    }, 500)
                ";
                await page.EvaluateExpressionAsync(jsScrollScript);

                // wait for 10 seconds for the products to load
                await page.WaitForTimeoutAsync(10000);

                // select all product HTML elements
                var productElements = await page.QuerySelectorAllAsync(".post");

                // iterate over them and extract the desired data
                foreach (var productElement in productElements)
                {
                    // select the name and price elements
                    var nameElement = await productElement.QuerySelectorAsync("h4");
                    var priceElement = await productElement.QuerySelectorAsync("h5");

                    // extract their text
                    var name = (await nameElement.GetPropertyAsync("innerText")).RemoteObject.Value.ToString();
                    var price = (await priceElement.GetPropertyAsync("innerText")).RemoteObject.Value.ToString();

                    // instantiate a new product and add it to the list
                    var product = new Product { Name = name, Price = price };
                    products.Add(product);
                }
            }

            // initialize the CSV output file and create the CSV writer
            using (var writer = new StreamWriter("products.csv"))
            using (var csv = new CsvWriter(writer, CultureInfo.InvariantCulture))
            {
                // populate the CSV file
                csv.WriteRecords(products);
            }
        }
    }
}
The products list will now contain all 60 products. Execute the script to verify that:
dotnet run
Be patient as the execution will take more than 10 seconds.
The products.csv file generated by the script now stores more than just the first ten elements:
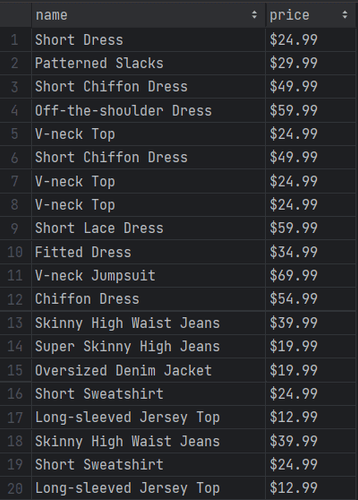
Mission completed! You just scraped all product data from the page.
Wait for Element
The current PuppeteerSharp example script uses a hard wait. That's globally discouraged as it makes the automation logic flaky. You don't want your scraper to fail because of a browser or network slowdown!
You shouldn't wait for a fixed amount of seconds every time the page loads dynamic data. That's unreliable and slows down your script. Instead, you need to wait for DOM elements to be on the page before interacting with them. That way, your scraper will produce consistent results all the time.
The Puppeteer API offers the WaitForSelector() method to check if a DOM node is present on the page. Use it to wait up to ten seconds for the 60th .post element to appear:
await page.WaitForSelectorAsync(".post:nth-child(60)", new WaitForSelectorOptions { Timeout = 10000 });
Replacing the WaitForTimeoutAsync() instruction with the above line. The scraper will now wait for the page to render the products retrieved by the AJAX calls triggered by the scrolls.
Your definitive Puppeteer C# script code is here:
using PuppeteerSharp;
using CsvHelper;
using System.Globalization;

namespace PuppeteerSharpProject
{
    public class Product
    {
        public string? Name { get; set; }
        public string? Price { get; set; }
    }

    class Program
    {
        static async Task Main(string[] args)
        {
            // to store the scraped data
            var products = new List<Product>();

            // download the browser executable
            await new BrowserFetcher().DownloadAsync();

            // browser execution configs
            var launchOptions = new LaunchOptions
            {
                Headless = true, // = false for testing
            };

            // open a new page in the controlled browser
            using (var browser = await Puppeteer.LaunchAsync(launchOptions))
            using (var page = await browser.NewPageAsync())
            {
                // visit the target page
                await page.GoToAsync("https://scrapingclub.com/exercise/list_infinite_scroll/");

                // deal with infinite scrolling
                var jsScrollScript = @"
                    const scrolls = 10
                    let scrollCount = 0

                    // scroll down and then wait for 0.5s
                    const scrollInterval = setInterval(() => {
                      window.scrollTo(0, document.body.scrollHeight)
                      scrollCount++
                      if (scrollCount === numScrolls) {
                          clearInterval(scrollInterval)
                      }
                    }, 500)
                ";
                await page.EvaluateExpressionAsync(jsScrollScript);

                // wait up to  10 seconds for the 60th products to be on the page
                await page.WaitForSelectorAsync(".post:nth-child(60)", new WaitForSelectorOptions { Timeout = 10000 });

                // select all product HTML elements
                var productElements = await page.QuerySelectorAllAsync(".post");

                // iterate over them and extract the desired data
                foreach (var productElement in productElements)
                {
                    // select the name and price elements
                    var nameElement = await productElement.QuerySelectorAsync("h4");
                    var priceElement = await productElement.QuerySelectorAsync("h5");

                    // extract their text
                    var name = (await nameElement.GetPropertyAsync("innerText")).RemoteObject.Value.ToString();
                    var price = (await priceElement.GetPropertyAsync("innerText")).RemoteObject.Value.ToString();

                    // instantiate a new product and add it to the list
                    var product = new Product { Name = name, Price = price };
                    products.Add(product);
                }
            }

            // initialize the CSV output file and create the CSV writer
            using (var writer = new StreamWriter("products.csv"))
            using (var csv = new CsvWriter(writer, CultureInfo.InvariantCulture))
            {
                // populate the CSV file
                csv.WriteRecords(products);
            }
        }
    }
}
Run it, and you'll get the same results as before but faster as it no longer wastes time on a fixed wait.
Wait for the Page to Load or Other Events
browser.GoToAsync() automatically waits for the page to fire the load event. This occurs when the whole page has loaded, including all dependent resources such as images and JS scripts. So, the Puppeteer Sharp library already waits for pages to load.
If you want to change the type of event to wait for or the timeout, you can pass some arguments to GoToAsync() as follows:
await page.GoToAsync(
    "https://scrapingclub.com/exercise/list_infinite_scroll/",
    10000, // wait up to 10 seconds
    new WaitUntilNavigation[] {WaitUntilNavigation.DOMContentLoaded} // wait for the DOMContentLoaded event to be fired
);
If this wasn't enough, page provides several other wait methods for more control:
-
WaitForNavigationAsync(): Wait for a specific event when navigating to a new URL or reloading the page. -
WaitForFunctionAsync(): Wait for a function to be evaluated to a truthy value. -
WaitForRequestAsync(): Wait for an AJAX request to be performed. -
WaitForResponseAsync(): Wait for the response of an AJAX request to be received. -
WaitForSelectorAsync(): Wait for an element identified by a selector to be added to the DOM.
Click Elements
Puppeteer C# elements expose the ClickAsync() method to simulate click interactions. This function instructs the browser to click on the selected node as a human user would.
element.ClickAsync();
If ClickAsync() triggers a page change (as in the example below), you'll have to adapt the data parsing logic to the new page structure:
var product = await page.QuerySelectorAsync(".post");
await product.ClickAsync();
// wait for the new page to load
await page.WaitForNavigationAsync();

// you are now on the detail product page...

// new scraping logic...
File Download
Create a download directory in your project and configure it as the browser's default download folder, as follows:
// current project directory + "/download"
var downloadDirectory = Path.Combine(Directory.GetCurrentDirectory(), "download");
// set the default download folder of the browser
await page.Target.CreateCDPSessionAsync().Result.SendAsync("Page.setDownloadBehavior", new
{
    behavior = "allow",
    downloadPath = downloadDirectory
}, false);
Perform a user interaction that triggers a file download. Chrome will now store the downloaded files in the local download folder.
var downloadButton = await browser.QuerySelectorAsync(".download");
await downloadButton.ClickAsync();
Submit Form
You can submit a form in Puppeteer Sharp with this approach:
- Select the input elements in the form.
- Use the
TypeAsync()method to fill them out. - Submit the form by calling
ClickAsync()on the submit button.
See an example below:
// retrieve the input elements
var emailElement = await productElement.QuerySelectorAsync("name=email");
var passwordElement = await productElement.QuerySelectorAsync("name=password");

// fill in the form
await emailElement.TypeAsync("[email protected]");
await passwordElement.TypeAsync("46hdb18sna9");

// submit the form
var submitElement = await page.QuerySelectorAsync("[type=submit]");
await submitElement.ClickAsync();
Take a Screenshot
Online data retrieval involves not only textual information but also images. Taking screenshots of specific elements or the entire page is useful too! For example, you could use it to study what competitors are doing for the user experience of their site.
PuppeteerSharp comes with built-in screenshot capabilities thanks to the ScreenshotAsync() method:
// take a screenshot of the current viewport
await page.ScreenshotAsync(".\\screenshot.jpg");
Launch the script, and a screenshot.jpg file will appear in the root folder of your project.
Keep in mind that you can call ScreenshotAsync() also on a single element, and the screenshot will include only the selected element.
// take a screenshot of the current element
await element.ScreenshotAsync(".\\element.jpg");
Avoid Getting Blocked when Web Scraping with PuppeteerSharp
The biggest challenge when scraping data from a page is getting blocked. An effective way to minimize that issue involves using proxies to make your requests come from different IPs and locations, and use a real User-Agent in the HTTP request header.
Set a custom User Agent in PuppeteerSharp with the SetUserAgentAsync() method:
await page.SetUserAgentAsync("Mozilla/5.0 (Windows NT 10.0; Win64; x64) AppleWebKit/537.36 (KHTML, like Gecko) Chrome/117.0.0.0 Safari/537.36");
We recommend checking out our guide on User Agents for web scraping to learn more.
Configuring a proxy in the Puppeteer C# library is a bit trickier as it involves an advanced Chrome flag. First, get a free proxy from sites like Free Proxy List. Then, specify it in the --proxy-server argument:
var proxyServerURL = "50.170.90.25";
var launchOptions = new LaunchOptions
{
    // other configs...
    Args = new string[] {
        "--proxy-server=" + proxyServerURL
    }
};
using (var browser = await Puppeteer.LaunchAsync(launchOptions))
// ...
Free proxies are short-lived and unreliable. By the time you read this article, it is unlikely that the proxy we chose would work.
Keep in mind that these are just baby steps to avoid anit-bots. Advanced solutions like Cloudflare will still be able to detect and block you:
On top of that, there are two huge issues with --proxy-server. First, it works at the browser level, which means you can't set different proxies for different requests. The exit server's IP is likely to get blocked at some point. Second, the flag doesn't support proxies with a username and password. Thus, forget about using premium proxies that require authentication.
The solution to bypass anti-bots like Cloudflare in Puppeteer is to use ZenRows. As a technology that perfectly integrates with PuppeteerSharp, it provides you with User-Agent rotation and rotating residential proxies to avoid getting blocked.
To get started with ZenRows, sign up for free and you'll get to the Request Builder page.
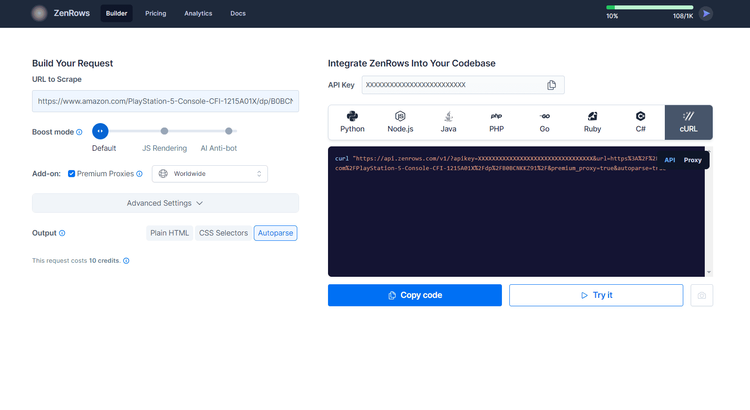
Suppose you want to scrape data from Amazon. Paste your target URL (https://www.amazon.com/PlayStation-5-Console-CFI-1215A01X/dp/B0BCNKKZ91/), and check the "Premium Proxy" option to get rotating IPs. User Agent rotation is included by default.
Then, on the right side of the screen, select "cURL". Copy the generated link and paste it into your code as a target URL inside C# Puppeteer's GoToAsync() method.
using PuppeteerSharp;

namespace PuppeteerSharpProject
{

    class Program
    {
        static async Task Main(string[] args)
        {
            // download the browser executable
            await new BrowserFetcher().DownloadAsync();

            // browser execution configs
            var launchOptions = new LaunchOptions
            {
                Headless = true, // = false for testing
            };

            // open a new page in the controlled browser
            using (var browser = await Puppeteer.LaunchAsync(launchOptions))
            using (var page = await browser.NewPageAsync())
            {
                // visit the target page
                await page.GoToAsync("https://api.zenrows.com/v1/?apikey=<YOUR_ZENROWS_API_KEY>&url=https%3A%2F%2Fwww.amazon.com%2FPlayStation-5-Console-CFI-1215A01X%2Fdp%2FB0BCNKKZ91%2F&premium_proxy=true&autoparse=true");
                // retrieve the HTML source code and log it
                var html = await page.GetContentAsync();
                Console.WriteLine(html);
            }
        }
    }
}
Execute it, and it'll log the the HTML of the page:
<!DOCTYPE html>
<head>
  <meta charset="utf-8" /><!doctype html><html lang="en-us" class="a-no-js" data-19ax5a9jf="dingo"><!-- sp:feature:head-start -->
<head><script>var aPageStart = (new Date()).getTime();</script><meta charset="utf-8"/>
<!-- sp:end-feature:head-start -->
<!-- sp:feature:csm:head-open-part1 -->

<script type='text/javascript'>var ue_t0=ue_t0||+new Date();</script>
  <!-- omitted for brevity ... -->
Wow! You just integrated ZenRows with Puppeteer Sharp.
Now, what about the anti-bot solutions that can stop PuppeteerSharp, like CAPTCHAS? Note that ZenRows doesn't only extend PuppeterSharp, but can replace it entirely! That's because it offers the same JavaScript rendering functionality.
The advantage of adopting ZenRows is the additional possibility of getting its advanced anti-bot bypass feature, which can get you access to any website. For that, enable the "AI Anti-bot" option in the Request Builder and call the target URL from any HTTP client of your choice, like RestSharp. For example, a C# client like HttClient supports proxy configuration and works perfectly with ZenRows.
Moreover, as a SaaS solution, ZenRows also introduces significant machine cost savings!
Conclusion
In this PuppeteerSharp tutorial, you saw the fundamentals of Chrome automation in C#. You started from the basics and explored more complex techniques to become an expert.
Now you know:
- How to set up a Puppeteer Sharp project.
- How to use it to scrape data from a dynamic content page.
- What user interactions you can simulate through some PuppeteerSharp examples.
- The challenges of web scraping and how to go over them.
However, no matter how sophisticated your browser automation is, anti-bot measures can still block you. Luckily, you can bypass them all with ZenRows, a web scraping API with headless browser capabilities, IP rotation, and an advanced AI-based anti-scraping bypass toolkit. Nothing will stop your automated scripts. Try ZenRows for free!
Did you find the content helpful? Spread the word and share it on Twitter, or LinkedIn.