The most popular library for browser automation is Selenium, both for web scraping and testing. And while Selenium doesn't support Go, its community has created an unofficial Selenium Golang port.
In this tutorial, you'll dig into the basics of Selenium with Golang and then explore more advanced interactions. You'll learn:
- Why use Selenium in Go.
- How to use Selenium in Golang.
- Interact with web pages in a browser.
- Avoid getting blocked.
- Alternatives to Golang Selenium.
Let's dive in!
Why Use Selenium in Go
Selenium is the most popular headless browser library. Its wide API makes it ideal for simulating any user interactions and performing testing and web scraping tasks.
The unofficial tebeka/selenium package provides the ability to use Selenium WebDriver with Go. It hasn't been actively maintained since 2021, but it's still a useful resource for web automation.
Before diving into this tutorial, you might be interested in checking out our guides on headless browser scraping and web scraping with Go.
How to Use Selenium in Golang
In your first steps with Selenium in Go, you'll scrape this infinite scrolling demo page:
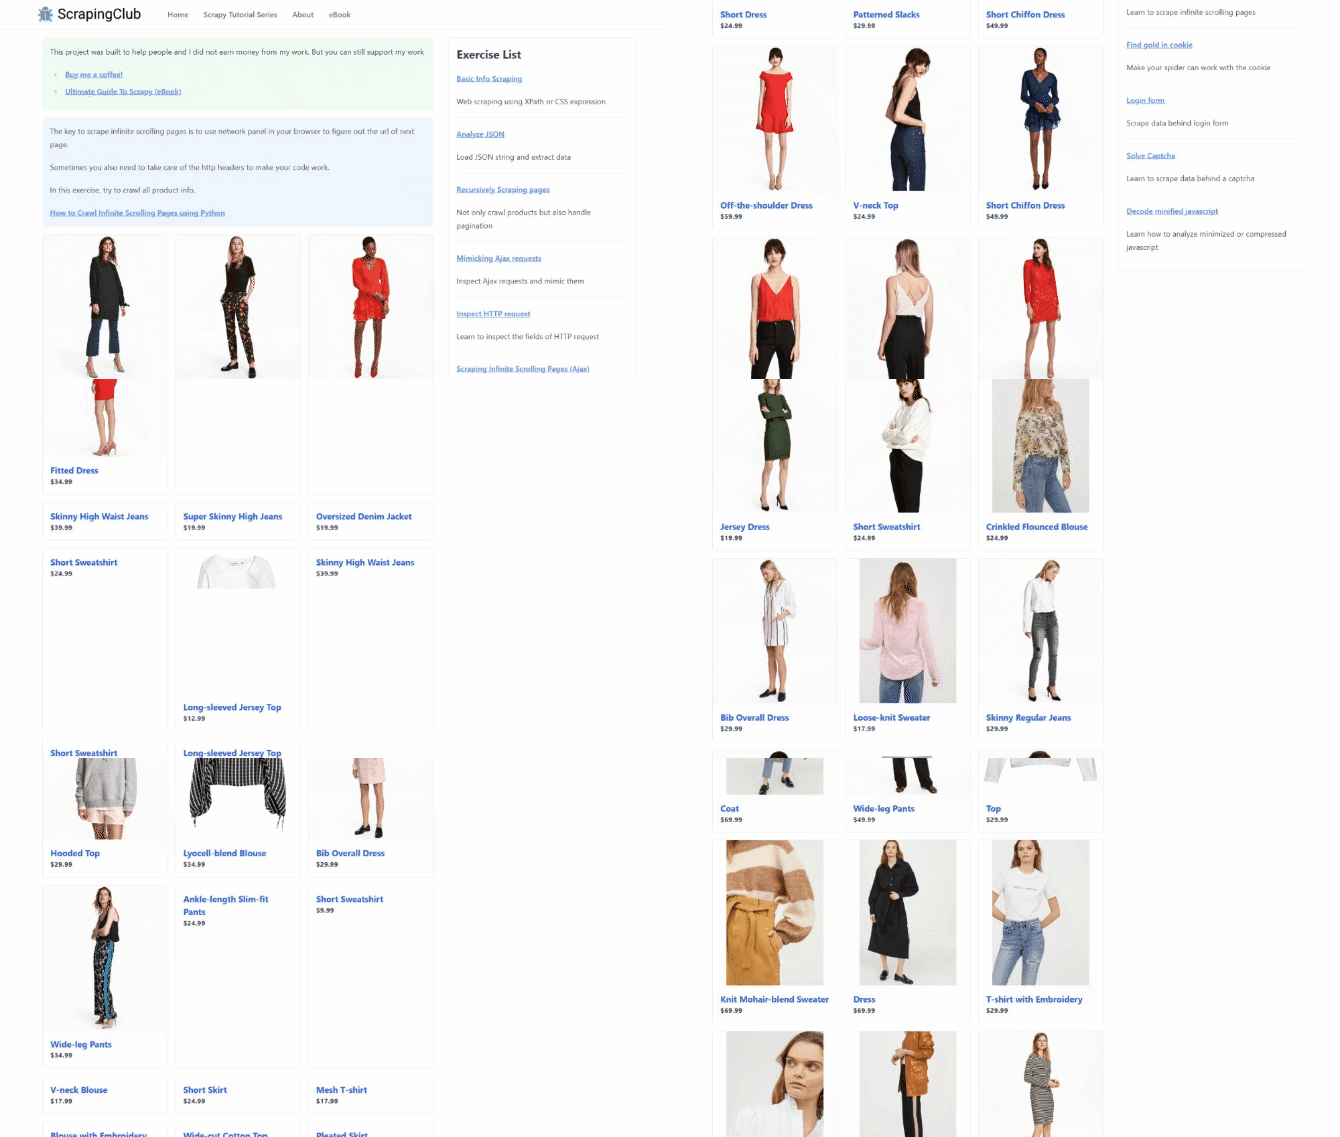
That page loads new products as you scroll down. Without a tool that can run JavaScript, like Selenium, you couldn't interact with it. So, it's a perfect example of a dynamic content page that requires a headless browser for data retrieval.
Time to extract some data from it!
Step 1: Install Selenium in Go
Before getting started, you need Go installed on your computer. Download the Golang installer, run it, and follow the wizard.
After setting it up, initialize a Golang Selenium project. Create a selenium-project folder and enter it in the terminal:
 mkdir selenium-project
 cd selenium-project
Next, launch the init command to set up a Go module:
go mod init selenium-scraper
Add Go port of Selenium to the project's dependencies:
go get -t -d github.com/tebeka/selenium
The package requires the executable of the driver of the browser you want to control to be able to work. Download the right chromedriver according to your Chrome version and OS. Unzip the archive, and copy the chromedriver file to the root folder of your project.
Perfect! You now have everything you need to set up a Selenium script in Go.
Create a file named scraper.go into the project folder and initialize it with the code below. The first line contains the name of the project package, and then there are the imports for Selenium. main() represents the entry function of any Go program and will contain the scraping logic.
 package main
 import (
  "github.com/tebeka/selenium"
  "github.com/tebeka/selenium/chrome"
  "log"
 )
 func main() {
  // scraping logic...
 }
You can run the Selenium Go script with this command:
go run scraper.go
Great! Your Golang Selenium project is ready!
Step 2: Scrape with Selenium in Golang
Add the lines below to the main() function to create a controllable Chrome instance. This snippet instantiates a Selenium Service and uses it to initialize a Chrome driver.
 // initialize a Chrome browser instance on port 4444
 service, err := selenium.NewChromeDriverService("./chromedriver", 4444)
 if err != nil {
  log.Fatal("Error:", err)
 }
 defer service.Stop()

 // configure the browser options
 caps := selenium.Capabilities{}
 caps.AddChrome(chrome.Capabilities{Args: []string{
  "--headless-new", // comment out this line for testing
 }})

// create a new remote client with the specified options
 driver, err := selenium.NewRemote(caps, "")

 if err != nil {
  log.Fatal("Error:", err)
 }

 // maximize the current window to avoid responsive rendering
 err = driver.MaximizeWindow("")
 if err != nil {
  log.Fatal("Error:", err)
 }
--headless=new ensures that Selenium will launch Chrome in headless mode. Comment that out if you instead want to follow the actions performed by your scraping script in the browser.
Then, use driver to connect to the target page:
 err = driver.Get("https://scrapingclub.com/exercise/list_infinite_scroll/")
 if err != nil {
  log.Fatal("Error:", err)
 }
Next, extract the raw HTML from the page and print it. The PageSource() function returns the current page's source. Import fmt and use it to log the raw HTML in the terminal.
 html, err := driver.PageSource()
 if err != nil {
  log.Fatal("Error:", err)
 }
 fmt.Println(html)
This is what your complete scraper.go file should look like now:
 package main
 import (
  "fmt"
  "github.com/tebeka/selenium"
  "github.com/tebeka/selenium/chrome"
  "log"
 )

 func main() {
  // initialize a Chrome browser instance on port 4444
  service, err := selenium.NewChromeDriverService("./chromedriver", 4444)

  if err != nil {
   log.Fatal("Error:", err)
  }

  defer service.Stop()

  // configure the browser options

  caps := selenium.Capabilities{}
  caps.AddChrome(chrome.Capabilities{Args: []string{
   "--headless", // comment out this line for testing
  }})

  // create a new remote client with the specified options
  driver, err := selenium.NewRemote(caps, "")
  if err != nil {
   log.Fatal("Error:", err)
  }

  // visit the target page
  err = driver.Get("https://scrapingclub.com/exercise/list_infinite_scroll/")
  if err != nil {
   log.Fatal("Error:", err)
  }

  // retrieve the page raw HTML as a string
  // and logging it

  html, err := driver.PageSource()
  if err != nil {
   log.Fatal("Error:", err)
  }
  fmt.Println(html)
 }
Run the script, and you will see that Selenium launches a Chrome window. Then, it visits the Infinite Scrolling demo page:
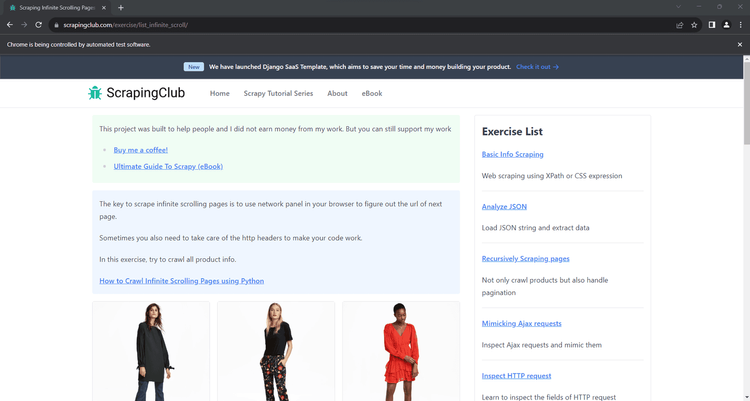
The "Chrome is being controlled by automated test software" means Selenium is working on Chrome as expected.
Then, it prints the content below in the terminal:
 <html class="h-full"><head>
<meta charset="utf-8">
<meta name="viewport" content="width=device-width, initial-scale=1">
<meta name="description" content="Learn to scrape infinite scrolling pages"> <title>Scraping Infinite Scrolling Pages (Ajax) | ScrapingClub</title>
<link rel="icon" href="/static/img/icon.611132651e39.png" type="image/png">
<!-- Omitted for brevity... -->
Awesome! That's exactly the HTML code of your target page!
Step 3: Parse the Data You Want
Selenium allows you to parse the HTML content of the page to extract specific data from it. Let's assume your scraping goal is to get the name and price of each product on the page. To do so, you have to:
- Select the product HTML elements by applying a DOM selector strategy.
- Extract the desired data from each of them.
- Store the extracted data in a Go data structure.
A DOM selector strategy typically involves an XPath expression or a CSS Selector. Both are two effective tools for finding elements in the DOM. CSS selectors are straightforward, while XPath expressions are a bit more complex. Learn more in our guide on CSS Selector vs XPath.
Let's keep it simple and go for CSS selectors. To understand how to define them, open the target site in the browser and inspect a product HTML node with the DevTools:
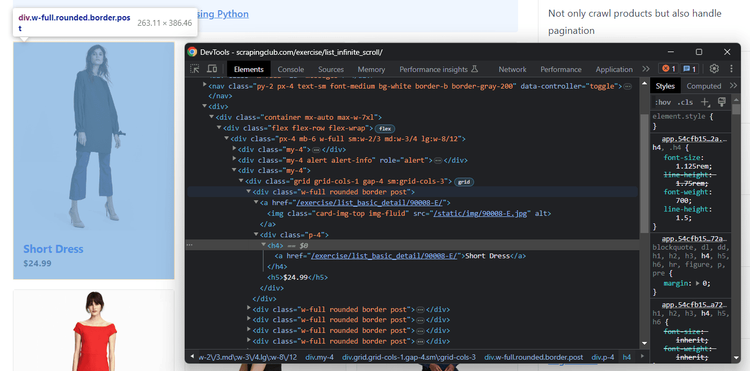
Note that each product is a .post element that contains the name in an <h4>and the price in an <h5> node.
Now, follow the instructions below to see how to extract the name and price from the products on your target page.
Create a global type to store the scraped data:
 type Product struct {
 name, price string
 }
In main(), initialize an array of type Product. At the end of the script execution, this array will contain the scraped data.
var products []Product
Use the FindElements() method to select the product HTML elements. selenium.ByCSSSelector instructs Selenium to treat the second argument as a CSS selector.
 productElements, err := driver.FindElements(selenium.ByCSSSelector, ".post")
 if err != nil {
  log.Fatal("Error:", err)
 }
Once you get the product nodes, iterate over them and apply the data extraction logic.
 for _, productElement := range productElements {

  // select the name and price nodes
  nameElement, err := productElement.FindElement(selenium.ByCSSSelector, "h4")
  priceElement, err := productElement.FindElement(selenium.ByCSSSelector, "h5")

  // extract the data of interest
  name, err := nameElement.Text()
  price, err := priceElement.Text()
  if err != nil {
   log.Fatal("Error:", err)
  }

  // add the scraped data to the list
  product := Product{}
  product.name = name
  product.price = price
  products = append(products, product)
 }
Keep in mind that Text() returns the text of the current element, enabling you to achieve your goal.
This is your entire scraper.go so far:
 package main
 import (
  "fmt"
  "github.com/tebeka/selenium"
  "github.com/tebeka/selenium/chrome"
  "log"
 )

// define a custom data type for the scraped data
 type Product struct {
  name, price string
 }

 func main() {

  // where to store the scraped data
  var products []Product

// initialize a Chrome browser instance on port 4444
  service, err := selenium.NewChromeDriverService("./chromedriver", 4444)
  if err != nil {
   log.Fatal("Error:", err)
  }

  defer service.Stop()

// configure the browser options
  caps := selenium.Capabilities{}
  caps.AddChrome(chrome.Capabilities{Args: []string{
  "--headless", // comment out this line for testing
  }})

  // create a new remote client with the specified options
  driver, err := selenium.NewRemote(caps, "")
  if err != nil {
   log.Fatal("Error:", err)
  }

  // maximize the current window to avoid responsive rendering
  err = driver.MaximizeWindow("")
  if err != nil {
   log.Fatal("Error:", err)
  }

  // visit the target page
  err = driver.Get("https://scrapingclub.com/exercise/list_infinite_scroll/")
  if err != nil {
   log.Fatal("Error:", err)
  }

// select the product elements
  productElements, err := driver.FindElements(selenium.ByCSSSelector, ".post")
  if err != nil {
   log.Fatal("Error:", err)
  }

  // iterate over the product elements
  // and extract data from them
  for _, productElement := range productElements {
   // select the name and price nodes
   nameElement, err := productElement.FindElement(selenium.ByCSSSelector, "h4")
   priceElement, err := productElement.FindElement(selenium.ByCSSSelector, "h5")

   // extract the data of interest
   name, err := nameElement.Text()
   price, err := priceElement.Text()
   if err != nil {
    log.Fatal("Error:", err)
   }

   // add the scraped data to the list
   product := Product{}
   product.name = name
   product.price = price
   products = append(products, product)
  }

  fmt.Println(products)
 }
Run it, and it'll print the output below in the terminal:
[{Short Dress $24.99} {Patterned Slacks $29.99} {Short Chiffon Dress $49.99} {Off-the-shoulder Dress $59.99} {V-neck Top $24.99} {Short Chiffon Dress $49.99} {V-neck Top $24.99} {V-neck Top $24.99} {Short Lace Dress $59.99} {Fitted Dress $34.99}]
Well done! The parsing logic works like a charm!
Step 4: Export Data to CSV
Use the following logic to export your scraped data to a CSV file in Golang with Selenium. It creates a products.csv file and initializes it with the header columns. Then, it iterates over products, converts each object to a CSV record, and appends it to the CSV file.
 // open the CSV file
 file, err := os.Create("products.csv")
 if err != nil {
  log.Fatal("Error:", err)
 }

 defer file.Close()

 // initialize a file writer
 writer := csv.NewWriter(file)

 // define the CSV headers
 headers := []string{
  "name",
  "price",
 }

 // write the column headers
 writer.Write(headers)

 // adding each product to the CSV output file
 for _, product := range products {
  // converting a Product to an array of strings
  record := []string{
   product.name,
   product.price,
  }

  // writing a new CSV record
  writer.Write(record)
 }
 defer writer.Flush()
Add the following imports to your script to make scraper.go work:
 import (
  "encoding/csv"
  "log"
  "os"
  // other imports...
 )
This is your final entire scraping script:
 package main
 import (
  "encoding/csv"
  "github.com/tebeka/selenium"
  "github.com/tebeka/selenium/chrome"
  "log"
  "os"
 )

 // define a custom data type for the scraped data
 type Product struct {
  name, price string
 }

 func main() {
  // where to store the scraped data
  var products []Product

// initialize a Chrome browser instance on port 4444
  service, err := selenium.NewChromeDriverService("./chromedriver", 4444)
  if err != nil {
   log.Fatal("Error:", err)
  }

  defer service.Stop()

// configure the browser options
  caps := selenium.Capabilities{}
  caps.AddChrome(chrome.Capabilities{Args: []string{
   "--headless", // comment out this line for testing
  }})

  // create a new remote client with the specified options
  driver, err := selenium.NewRemote(caps, "")
  if err != nil {
   log.Fatal("Error:", err)
  }

// maximize the current window to avoid responsive rendering
  err = driver.MaximizeWindow("")
  if err != nil {
   log.Fatal("Error:", err)
  }

  // visit the target page
  err = driver.Get("https://scrapingclub.com/exercise/list_infinite_scroll/")
  if err != nil {
   log.Fatal("Error:", err)
  }

  // select the product elements
  productElements, err := driver.FindElements(selenium.ByCSSSelector, ".post")
  if err != nil {
   log.Fatal("Error:", err)
  }

  // iterate over the product elements
  // and extract data from them
  for _, productElement := range productElements {
   // select the name and price nodes
   nameElement, err := productElement.FindElement(selenium.ByCSSSelector, "h4")
   priceElement, err := productElement.FindElement(selenium.ByCSSSelector, "h5")
   // extract the data of interest
   name, err := nameElement.Text()
   price, err := priceElement.Text()
   if err != nil {
    log.Fatal("Error:", err)
   }

   // add the scraped data to the list
   product := Product{}
   product.name = name
   product.price = price
   products = append(products, product)
  }

  // export the scraped data to CSV
  file, err := os.Create("products.csv")
  if err != nil {
   log.Fatal("Error:", err)
  }

  defer file.Close()

  // initialize a file writer
  writer := csv.NewWriter(file)

// define the CSV headers
  headers := []string{
   "name",
   "price",
  }

  // write the column headers
  writer.Write(headers)

  // adding each product to the CSV output file
  for _, product := range products {

   // converting a Product to an array of strings
   record := []string{
    product.name,
    product.price,
   }

   // writing a new CSV record
   writer.Write(record)
  }

  defer writer.Flush()
 }
Launch the Golang Selenium scraper:
go run scraper.go
When the execution ends, a products.csv file will appear in the root directory of your project. Open it, and it'll contain the following data:
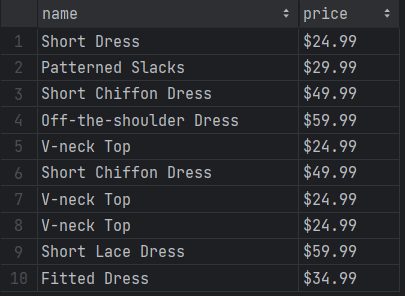
Fantastic! You now know the basics of Selenium with Golang.
However, note that the current output only involves ten items. The reason is that the page initially contains only those products and relies on infinite scrolling to load new ones. But you'll learn how to scrape all products in the next section!
Interacting with Web Pages in a Browser: Scroll, Screenshot, etc.
The Selenium library in Golang supports interactions, including scrolls, mouse movements, waits, and more. These actions make your automated script behave like a human user, helping it bypass anti-bot measures as a result, as well as getting access to dynamic content and pages.
The interactions supported by Selenium include:
- Scroll down or up the page.
- Click page elements and perform other mouse actions.
- Wait for elements on the page to load, be visible, clickable, etc.
- Fill out and empty input fields.
- Submit forms.
- Take screenshots.
- Drag and drop elements.
You can achieve most of those operations through built-in driver methods. Otherwise, you can use the ExecuteScript() function to execute a JavaScript script directly on the page. With both tools, any browser interaction becomes possible.
Let's see how to scrape all product data from the infinite scroll demo page and then explore other popular Selenium interactions!
Scrolling
After the first load, the target page only contains ten products. That's because it uses infinite scrolling to load new data. Since Selenium for Golang doesn't offer a method to scroll down, you need custom JavaScript logic to simulate that popular interaction.
The JS code below instructs the browser to scroll down the page ten times at an interval of 0.5 seconds each:
 // scroll down the page 10 times
 const scrolls = 10
 let scrollCount = 0

 // scroll down and then wait for 0.5s
 const scrollInterval = setInterval(() => {
  window.scrollTo(0, document.body.scrollHeight)
  scrollCount++

  if (scrollCount === numScrolls) {
  clearInterval(scrollInterval)
  }
 }, 500)
Store the above script in a scrollingScript variable and pass it to the ExecuteScript() method as follows:
 scrollingScript := `

  // scroll down the page 10 times
  const scrolls = 10
  let scrollCount = 0

  // scroll down and then wait for 0.5s
  const scrollInterval = setInterval(() => {
   window.scrollTo(0, document.body.scrollHeight)
   scrollCount++

   if (scrollCount === scrolls) {
   clearInterval(scrollInterval)
   }

  }, 500)
  `
 _, err = driver.ExecuteScript(scrollingScript, []interface{}{})
 if err != nil {
  log.Fatal("Error:", err)
 }
The Evaluate() action must be placed before the HTML node selection logic.
Since performing the scrolling interaction takes time, you also need Selenium to wait for the operation to end. Thus, add the following instruction to stop the script execution for 10 seconds, waiting for new products to load.
time.Sleep(10 * time.Second) // wait 10 seconds
And don't forget to import time from the Go standard library:
 import (
  "time"
  // other imports...
 )
Here's your new complete code:
 package main
 import (
  "encoding/csv"
  "github.com/tebeka/selenium"
  "github.com/tebeka/selenium/chrome"
  "log"
  "os"
  "time"
 )

 // define a custom data type for the scraped data
 type Product struct {
  name, price string
 }

 func main() {

  // where to store the scraped data
  var products []Product

// initialize a Chrome browser instance on port 4444
  service, err := selenium.NewChromeDriverService("./chromedriver", 4444)
  if err != nil {
   log.Fatal("Error:", err)
  }

  defer service.Stop()

  // configure the browser options
  caps := selenium.Capabilities{}
  caps.AddChrome(chrome.Capabilities{Args: []string{
   "--headless", // comment out this line for testing
  }})

  // create a new remote client with the specified options
  driver, err := selenium.NewRemote(caps, "")
  if err != nil {
   log.Fatal("Error:", err)
  }

  // maximize the current window to avoid responsive rendering
  err = driver.MaximizeWindow("")
  if err != nil {
   log.Fatal("Error:", err)
  }

  // visit the target page
  err = driver.Get("https://scrapingclub.com/exercise/list_infinite_scroll/")
  if err != nil {
   log.Fatal("Error:", err)
  }

  // perform the scrolling interaction
  scrollingScript := `

  // scroll down the page 10 times
  const scrolls = 10
  let scrollCount = 0

// scroll down and then wait for 0.5s
  const scrollInterval = setInterval(() => {
   window.scrollTo(0, document.body.scrollHeight)
   scrollCount++

   if (scrollCount === scrolls) {
   clearInterval(scrollInterval)
   }
  }, 500)
  `
  _, err = driver.ExecuteScript(scrollingScript, []interface{}{})

  if err != nil {
   log.Fatal("Error:", err)
  }

  // wait 10 seconds for the new products to load
  time.Sleep(10 * time.Second)

  // select the product elements
  productElements, err := driver.FindElements(selenium.ByCSSSelector, ".post")
  if err != nil {
   log.Fatal("Error:", err)
  }

  // iterate over the product elements
  // and extract data from them
  for _, productElement := range productElements {

// select the name and price nodes
   nameElement, err := productElement.FindElement(selenium.ByCSSSelector, "h4")
   priceElement, err := productElement.FindElement(selenium.ByCSSSelector, "h5")

  // extract the data of interest
   name, err := nameElement.Text()
   price, err := priceElement.Text()
   if err != nil {
    log.Fatal("Error:", err)
   }

   // add the scraped data to the list
   product := Product{}
   product.name = name
   product.price = price
   products = append(products, product)
  }

  // export the scraped data to CSV
  file, err := os.Create("products.csv")
  if err != nil {
   log.Fatal("Error:", err)
  }

  defer file.Close()

  // initialize a file writer
  writer := csv.NewWriter(file)

  // define the CSV headers
  headers := []string{
   "name",
   "price",
  }

  // write the column headers
  writer.Write(headers)
  // adding each product to the CSV output file
  for _, product := range products {

   // converting a Product to an array of strings
   record := []string{
    product.name,
    product.price,
   }

   // writing a new CSV record
   writer.Write(record)
  }

  defer writer.Flush()
 }
The products array will now contain all 60 product elements. Launch the script to verify it:
go run scraper.go
The products.csv file will now store more than just the first ten elements:
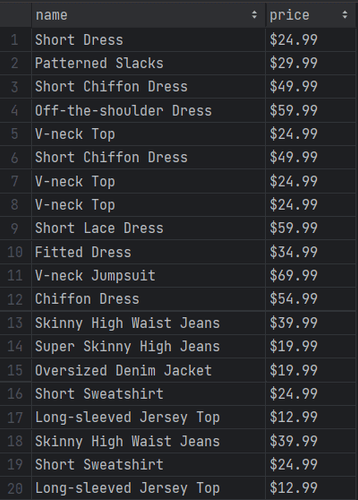
Amazing, mission complete! You just scraped all products from the page.
Wait for Element
Your current Selenium Golang script relies on a hard wait, which is discouraged as it makes the scraping logic flaky. The scraper can fail because of a network or browser slowdown, and you don't want that!
Consider how common it is for pages to retrieve data dynamically. You can't just wait for a specific amount of seconds all the time. Instead, you need to wait for nodes to be on the page before interacting with them. That's how to build effective scrapers that achieve consistent results.
Selenium provides the isDisplayed() method to verify if an element is present on the page. Use it in combination with WaitWithTimeout() to wait up to ten seconds for the 60th .post element to appear:
  err = driver.WaitWithTimeout(func(driver selenium.WebDriver) (bool, error) {
    lastProduct, _ := driver.FindElement(selenium.ByCSSSelector, ".post:nth-child(60)")

    if lastProduct != nil {
      return lastProduct.IsDisplayed()
    }
    return false, nil
  }, 10*time.Second)
  if err != nil {
    log.Fatal("Error:", err)
  }
Place the code above after the scrolling logic, replacing the time.Sleep() instruction. The script will now wait for the products to render after the AJAX calls triggered by the scrolls.
The definitive scraper code is this:
  package main
  import (
    "encoding/csv"
    "github.com/tebeka/selenium"
    "github.com/tebeka/selenium/chrome"
    "log"
    "os"
    "time"
  )

  // define a custom data type for the scraped data
  type Product struct {
    name, price string
  }

  func main() {
    // where to store the scraped data
    var products []Product

    // initialize a Chrome browser instance on port 4444
    service, err := selenium.NewChromeDriverService("./chromedriver", 4444)
    if err != nil {
      log.Fatal("Error:", err)
    }
    defer service.Stop()
    // configure the browser options
    caps := selenium.Capabilities{}
    caps.AddChrome(chrome.Capabilities{Args: []string{
      "--headless", // comment out this line for testing
    }})

    // create a new remote client with the specified options

    driver, err := selenium.NewRemote(caps, "")
    if err != nil {
      log.Fatal("Error:", err)
    }

    // maximize the current window to avoid responsive rendering
    err = driver.MaximizeWindow("")

    if err != nil {
      log.Fatal("Error:", err)
    }

    // visit the target page
    err = driver.Get("https://scrapingclub.com/exercise/list_infinite_scroll/")
    if err != nil {
      log.Fatal("Error:", err)
    }

    // perform the scrolling interaction
    scrollingScript := `
    // scroll down the page 10 times
    const scrolls = 10
    let scrollCount = 0

    // scroll down and then wait for 0.5s
    const scrollInterval = setInterval(() => {
     window.scrollTo(0, document.body.scrollHeight)
     scrollCount++
     if (scrollCount === scrolls) {
      clearInterval(scrollInterval)
     }
    }, 500)
    `
    _, err = driver.ExecuteScript(scrollingScript, []interface{}{})
    if err != nil {
      log.Fatal("Error:", err)
    }

    // wait up to 10 seconds for the 60th product to be on the page
    err = driver.WaitWithTimeout(func(driver selenium.WebDriver) (bool, error) {
      lastProduct, _ := driver.FindElement(selenium.ByCSSSelector, ".post:nth-child(60)")
      if lastProduct != nil {
       return lastProduct.IsDisplayed()
      }
      return false, nil
    }, 10*time.Second)
    if err != nil {
      log.Fatal("Error:", err)
    }

    // select the product elements
    productElements, err := driver.FindElements(selenium.ByCSSSelector, ".post")
    if err != nil {
      log.Fatal("Error:", err)
    }

    // iterate over the product elements
    // and extract data from them
    for _, productElement := range productElements {
      // select the name and price nodes
      nameElement, err := productElement.FindElement(selenium.ByCSSSelector, "h4")
      priceElement, err := productElement.FindElement(selenium.ByCSSSelector, "h5")

      // extract the data of interest
      name, err := nameElement.Text()
      price, err := priceElement.Text()
      if err != nil {
       log.Fatal("Error:", err)
      }
      // add the scraped data to the list
      product := Product{}
      product.name = name
      product.price = price
      products = append(products, product)
    }

       // export the scraped data to CSV
    file, err := os.Create("products.csv")
    if err != nil {
      log.Fatal("Error:", err)
    }

    defer file.Close()

   // initialize a file writer
    writer := csv.NewWriter(file)

    // define the CSV headers
    headers := []string{
      "name",
      "price",
    }

    // write the column headers
    writer.Write(headers)

    // adding each product to the CSV output file

    for _, product := range products {
      // converting a Product to an array of strings
      record := []string{
       product.name,
       product.price,
      }

      // writing a new CSV record
      writer.Write(record)
    }

    defer writer.Flush()
  }
Launch it, and you'll get the same results as before but with better performance since you're now waiting for the right amount of time only.
Wait for Page to Load
driver.Get() automatically waits for document.readyState to be equal to "complete", which occurs when the whole page has loaded. So, the Golang Selenium library already waits for pages to load.
The idle time the driver waits isn't infinite and is controlled by the SetPageLoadTimeout() method:
  // wait up to 120 seconds for the page to load
  driver.SetPageLoadTimeout(120*time.Second)
At the same time, web pages are now extremely dynamic and it's not easy to tell when a page has fully loaded. Use the driver methods functions below for more control:
-
Wait(): Wait for a specific condition to occur within default timeouts. -
WaitWithTimeout(): Wait for a condition to occur in the specified timeout. -
WaitWithTimeoutAndInterval(): Wait for a condition to occur in the specified timeout, checking it regularly at a specified interval.
Click Elements
Selenium elements expose the Click() method to simulate click interactions:
element.Click()
This function instructs Selenium to click on the specified event. The browser will send a mouse click event and call the HTML onclick() callback accordingly.
If the click() triggers a page change (and the example below is such a case), you'll have to adapt the scraping logic to the new DOM structure:
  productElement, err := driver.FindElement(selenium.ByCSSSelector, ".post")
  if err != nil {
    log.Fatal("Error:", err)
  }
  productElement.Click()
  // you are now on the detail product page...
  // scraping logic...
  // driver.findElement(...)
Take a Screenshot
Extracting data from a page isn't the only way to get useful information from it. For example, screenshots of the entire page or specific elements are useful to get visual feedback on what competitors are doing.
Selenium comes with built-in screenshot capabilities exposed by the Screenshot() method:
  // take a screenshot of the current viewport
  screenshotBytes, err := driver.Screenshot()
  if err != nil {
    log.Fatal("Error:", err)
  }
That returns an array of bytes you can export to a PNG file as below:
  img, _, _ := image.Decode(bytes.NewReader(screenshotBytes))
  out, err := os.Create("./screenshot.png")
  if err != nil {
    log.Fatal("Error:", err)
  }

  err = png.Encode(out, img)
  if err != nil {
    log.Fatal("Error:", err)
  }
Execute the script, and a screenshot.png file will appear in your project's root folder.
But don't forget to import the required standard packages first:
   import (
    "bytes"
    "image"
    "image/png"
    // other imports...
  )
Submit a Form
Selenium allows you to submit forms through these methods:
-
SendKeys(): To simulate the activity of typing data into an input element. -
Submit(): To call on the<form>element to submit the form.
See an example below:
  // select the login form
  formElement, err := wd.FindElement(selenium.ByID, "example-form")
  if err != nil {
    log.Fatal("Error:", err)
  }


  // fill in the login form fields
  formElement.FindElement(selenium.ByName, "email").SendKeys("[email protected]")
  formElement.FindElement(selenium.ByName, "password").SendKeys("u1h36sb18sZa")

  // submit the form
  formElement.Submit()
File Download
Customize the download directory of the browser controlled by Selenium:
  // get the current project directory
  curDir, _ := os.Getwd()

  caps := selenium.Capabilities{}
  caps.AddChrome(chrome.Capabilities{Args: []string{
    "--headless",
  }, Prefs: map[string]interface{}{
    "download.default_directory": curDir, // set the download directory to the current one
  }})
When you trigger a download operation, the browser will now save the file in your project's directory:
  downloadButton, err := driver.FindElement(selenium.ByCSSSelector, ".download")
  if err != nil {
   log.Fatal("Error:", err)
  }
  downloadButton.Click()
Avoid Getting Your Requests Blocked
The biggest challenge when doing web scraping is getting blocked by anti-scraping measures, such as IP bans. An effective way to avoid that is to randomize your requests with proxies and custom headers. The idea is to make requests hard to track.
Let's now see how to mitigate the risk of getting blocked in Golang Selenium.
Golang Selenium Proxy: An Essential Tool
Getting your IP banned has a terrible impact on the effectiveness of your scraping process. Avoid seeing all requests made by your script fail with a proxy. It acts as an intermediary between your scraper and target site, hiding your IP.
First, get a free proxy from providers like Free Proxy List. Then, specify it in the --proxy-server Chrome argument:
  proxyServerURL := "213.157.6.50"
  caps := selenium.Capabilities{}
  caps.AddChrome(chrome.Capabilities{Args: []string{
    "--proxy-server=" + proxyServerURL,
    // ...
  }})
Free proxies are short-lived, so the above snippet is unlikely to work by the time you read this guide. Check out our article on the best web scraping proxy providers.
Set a Custom User Agent in Golang
Besides adopting a proxy, changing the User-Agent header is vital as well. Why? Because there's a huge difference between default user agents used by libraries and real-world user agents set by browsers.
For example, this is the User Agent set by the Golang http client:
"Go-http-client/1.1"
While this is a recent Chrome User Agent:
Mozilla/5.0 (Windows NT 10.0; Win64; x64) AppleWebKit/537.36 (KHTML, like Gecko) Chrome/117.0.0.0 Safari/537.36
Quite different, isn't it?
Due to that header, anti-bots don't have a hard time detecting browsers from automated software.
By default, Golang's Selenium uses the User Agent specified by the browser under control. Change the Selenium User Agent to make your script appear as a different browser:
  customUserAgent := "Mozilla/5.0 (Android 13; Mobile; rv:109.0) Gecko/117.0 Firefox/117.0"
  caps := selenium.Capabilities{}
  caps.AddChrome(chrome.Capabilities{Args: []string{
    "--user-agent=" + customUserAgent,
    // ...
  }})
Find out more in our in-depth guide on User Agents for web scraping.
Complete Toolkit to Avoid Getting Blocked while Web Scraping
Using custom user agents and proxies with Selenium and Golang are just baby steps to avoid getting blocked. The main reason is that Selenium for Golang allows you to set them only at the browser level. Thus, you can't set a different proxy or user agent for each request.
Also, --proxy-server doesn't support proxies with a username and a password. Considering that premium proxies always require authentication and free proxies are unreliable, that's another problem.
Anyway, regardless of your Selenium settings, advanced anti-bot technologies can still block you. Consider the script below with a proxy and a custom user agent:
  package main

  import (
    "github.com/tebeka/selenium"
    "github.com/tebeka/selenium/chrome"
    "log"
  )

  func main() {
    // initialize a Chrome browser instance on port 4444
    service, err := selenium.NewChromeDriverService("./chromedriver", 4444)
    if err != nil {
      log.Fatal("Error:", err)
    }
    defer service.Stop()

    proxyServerURL := "213.157.6.50"
    customUserAgent := "Mozilla/5.0 (Android 13; Mobile; rv:109.0) Gecko/117.0 Firefox/117.0"
    caps := selenium.Capabilities{}
    caps.AddChrome(chrome.Capabilities{Args: []string{
      "--user-agent=" + customUserAgent,
      "--proxy-server=" + proxyServerURL,
    }})

    // create a new remote client with the specified options
    driver, err := selenium.NewRemote(caps, "")
    if err != nil {
      log.Fatal("Error:", err)
    }

    // maximize the current window to avoid responsive rendering
    err = driver.MaximizeWindow("")
    if err != nil {
      log.Fatal("Error:", err)
    }


    // visit the target page
    err = driver.Get("https://www.g2.com/products/jira/reviews")
    if err != nil {
      log.Fatal("Error:", err)
    }

    // scraping logic...
  }
Run it, and it'll trigger the following page:
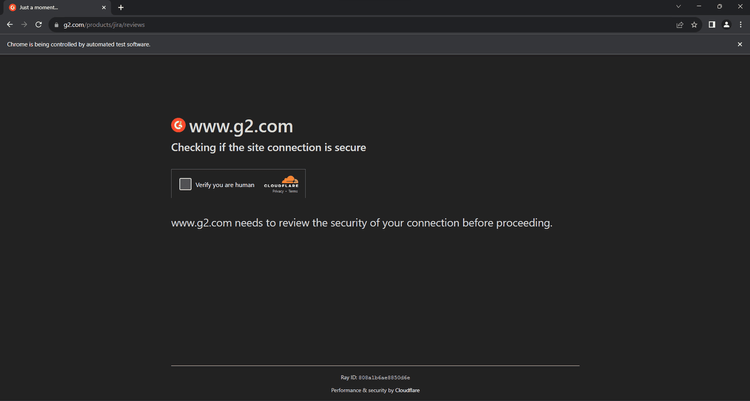
Cloudflare detected your script as a bot!
The solution? ZenRows! As a popular Selenium alternative for Golang, it offers IP rotation through premium residential proxies, User-Agent rotation, and the most advanced anti-bot bypass toolkit that exists.
Follow the steps below to get started with ZenRows:
- Sign up for free to get your free 1,000 credits.
- You'll get to the Request Builder page. Paste your target URL
https://www.g2.com/products/jira/reviewsand select cURL. - Check "Premium Proxy" and enable the "AI anti-bot" feature (it includes advanced anti-bot bypass tools, as well as JS rendering).
- Copy the generated link and paste it into your code as a target URL inside Selenium's
Get()method.
  package main

  import (
    "fmt"
    "github.com/tebeka/selenium"
    "github.com/tebeka/selenium/chrome"
    "log"
  )

  func main() {
    // initialize a Chrome browser instance on port 4444
    service, err := selenium.NewChromeDriverService("./chromedriver", 4444)
    if err != nil {
      log.Fatal("Error:", err)
    }

    defer service.Stop()
    caps := selenium.Capabilities{}
    caps.AddChrome(chrome.Capabilities{Args: []string{}})

    // create a new remote client with the specified options
    driver, err := selenium.NewRemote(caps, "")
    if err != nil {
      log.Fatal("Error:", err)
    }

    // maximize the current window to avoid responsive rendering
    err = driver.MaximizeWindow("")
    if err != nil {
      log.Fatal("Error:", err)
    }

    // visit the target page

    err = driver.Get("https://api.zenrows.com/v1/?apikey=<YOUR_ZENROWS_API_KEY>&url=https%3A%2F%2Fwww.g2.com%2Fproducts%2Fjira%2Freviews&js_render=true&antibot=true&premium_proxy=true")
    if err != nil {
      log.Fatal("Error:", err)
    }

    html, err := driver.PageSource()
    if err != nil {
      log.Fatal("Error:", err)
    }
    fmt.Println(html)
  }
Run it, and it'll produce the following output:
<!DOCTYPE html>
<head>
<meta charset="utf-8" />
<link href="https://www.g2.com/assets/favicon-fdacc4208a68e8ae57a80bf869d155829f2400fa7dd128b9c9e60f07795c4915.ico" rel="shortcut icon" type="image/x-icon" />
<title>Jira Reviews 2023: Details, Pricing, & Features | G2</title>
<!-- omitted for brevity ... -->
Wow! Bye-bye "Access Denied" errors!
Golang Selenium Alternative
The Golang port of Selenium is a great tool but it has a major drawback: its last update was in 2021. During this time, browsers and web technology in general have evolved a lot. The result is that some approaches used by the library may now be obsolete or even deprecated.
Here's a list of alternatives to the Selenium Golang library:
- ZenRows: The next-generation scraping API with JS rendering that can bypass any anti-bot measures.
- Chromedp: A native Go package for browser automation based on the DevTools Protocol.
-
Playwright: A popular headless browser library developed in JavaScript by Microsoft. For Go, there's the
playwright-gocommunity-driven port. - Pupeeteer: A powerful headless browser npm library for automating Chrome in JavaScript. As of this writing, there isn't a popular port for Go.
Conclusion
In this Selenium Golang tutorial, you saw the fundamentals of controlling a headless Chrome instance. You began from the basics and dove into more advanced techniques to become an expert.
Now you know:
- How to set up a Selenium Golang project.
- What methods to use to scrape data with it.
- What user interactions you can simulate with Selenium.
- The challenges of web scraping and how to overcome them.
No matter how sophisticated your browser automation is, anti-scraping systems can still detect you. Avoid them all with ZenRows, a web scraping API with IP rotation, headless browser capabilities, and an advanced built-in bypass for anti-bots. Scraping dynamic-content sites has never been easier. Try ZenRows for free!
Frequent Questions
Can We Use Golang with Selenium?
Yes, you can use Golang with Selenium to automate web browser interactions. In detail, the tebeka/selenium package allows you to use Selenium WebDriver in Go. With it, you can write automated scripts based on the Selenium API in Golang.
Does Selenium Support Golang?
Yes, Selenium supports Golang through the unofficial tebeka/selenium port. The author of the library has done a good job of translating the WebDriver protocol API into Golang. That means you can use Chrome, Firefox, Safari, and other browsers in Go.
Did you find the content helpful? Spread the word and share it on Twitter, or LinkedIn.